[Welcome to “Curly Braces,” Eric Bruno’s new Java Magazine column. Just as braces (used, for example, in if, while, and for statements) are critical elements that surround your code, the focus of this column will be on topics that surround Java development. Some of the topics will be familiar while others will be novel—and the goal will be to help you think more deeply about how to build Java applications. —Ed.]
I recently explored a fairly new concept in code repository organization that some large companies have adopted, called the monorepo. This is a subtle shift in how to manage projects in systems such as Git. But from what I’ve seen, some people have strong feelings about monorepos one way or the other. As a Java developer, I believe there are some tangible benefits to using a monorepo.
First, I assume nearly everyone agrees that IDEs make it easy to build and test a multicomponent application. Whether you’re building a series of microservices, a set of libraries, or an application with distributed components, it’s straightforward to use NetBeans, IntelliJ IDEA, or Eclipse to import them, build dependencies, deploy, and run the result. As for external dependencies, tools such as Maven and Gradle handle them well.
It’s straightforward and common to have a single script to build a project and all its dependent projects, pull down external dependencies, and then deploy and even run the application.
By contrast, managing Git repositories is a tedious process to me. Why can’t I have an experience similar to an IDE across source code repositories? Well, I can and you can, and that’s the reason for the monorepo movement.
What is a monorepo, and why should you care?
Overall, I feel a monorepo helps to overcome some of the nagging polyrepo issues that bother me. The act of cloning multiple repos, configuring permissions, dealing with pushes across separate Git repos and directories, forgetting to push to one repo when I’ve updated code across more than one…phew. That is tedious and exhausting.
With the monorepo, you ideally place all of your code—every application, every microservice, every library, and so on—into a single repository. Only one.
Developers then pull down the entire bundle and operate on that one repo going forward.
Even as developers work on different applications, they’re working from the same Git repository, which means all pull requests, all branches and merges, tags, and so on take place against that one repo.
This has the advantage that you clone one repository for your entire organization’s codebase, and that’s it. That means no more tedium related to multiple repos, as described above. It also has other benefits, such as the following:
◉ Avoiding silos: Because they pull down the source for all internal applications and libraries, all developers have the means to make code changes and, indeed, they should be expected to. This removes silos, where only certain developers are permitted to maintain the code.
◉ Fewer pull requests: If you change a library, its interface, one or more applications that use that library, or the related documentation, you need only one pull request and merge with the monorepo compared to multiple requests if the elements lived in separate repos. This is sometimes referred to as an atomic commit.
◉ Transparency: I once worked for a company whose main application consisted of dozens and dozens of individual Java projects. Depending on what you were trying to do, you needed to choose combinations of these projects. (In a way, these were a simple form of microservices.) Occasionally I needed to discover which additional Git repo I needed to clone to make things work, and that wasn’t always easy. With a monorepo, all of the code is in your local tree.
◉ Code awareness: Due to transparency, there’s reduced risk of code duplication.
◉ Improved structure: I’ve seen different approaches to structuring a monorepo, but a common one is to create subdirectories for the different types of codebases, such as apps, libs, or docs. Each application resides within its own subdirectory under apps, each library resides under libs, and so on. This approach also helps because documentation is kept with the code in the repo.
◉ Continuous integration/continuous delivery (CI/CD): GitHub Actions helps resolve many tooling issues with monorepos. Specifically, GitHub supports code owners with scoped workflows for project management and permissions. Atlassian also provides tips for monorepos and GitLab does as well. Other tools are available to support monorepos. However, you can get by very well with just Maven or Gradle.
Monorepo and Maven for Java projects
A monorepo advantage specific to Java projects is improved dependency management. Since you’re likely to have all your organization’s applications and libraries locally, any changes to a dependency in an application (other than the one you’re focused on) will be built locally and tests will run locally as well. This process will highlight potential conflicts and the need for regression testing earlier during development before binaries are rolled out to production.
Here’s how the monorepo concept affects Maven projects. Of course, Maven isn’t aware of your repo structure, but using a monorepo does affect how you organize your Java projects; therefore, Maven is involved.
For instance, it’s common to structure a monorepo (and the development directory structure) as follows:
<monorepo-name>
|–apps
| |–app1
| |–app2
|–libs
| |–librarybase
| |–library1
| |–library2
|–docs
However, you can structure your monorepo any way you wish, with directories named frontend, backend, mobile, web, microservices, devops, and so on.
To support the monorepo hierarchy, I use Maven modules. For instance, at the root of the project, I define a pom.xml file with modules for apps and libs. Listing 1 is a partial listing that shows root-level modules.
Listing 1.
<?xml version="1.0" encoding="UTF-8"?>
<project xmlns="http://maven.apache.org/POM/4.0.0" xmlns:xsi="http://www.w3.org/2001/XMLSchema-instance"
xsi:schemaLocation="http://maven.apache.org/POM/4.0.0 http://maven.apache.org/xsd/maven-4.0.0.xsd">
<modelVersion>4.0.0</modelVersion>
<groupId>com.ericbruno</groupId>
<artifactId>root</artifactId>
<version>${revision}</version>
<packaging>pom</packaging>
<properties>
<revision>1.0-SNAPSHOT</revision>
<project.build.sourceEncoding>UTF-8</project.build.sourceEncoding>
<maven.compiler.source>15</maven.compiler.source>
<maven.compiler.target>15</maven.compiler.target>
</properties>
<modules>
<module>libs</module>
<module>apps</module>
</modules>
…
Within each of the subdirectories, such as libs and apps, there are pom.xml files that define the set of library and application modules, respectively. As shown in Listing 2, the pom.xml file for the set of library modules is straightforward and goes within the libs subdirectory.
Listing 2.
<?xml version="1.0" encoding="UTF-8"?>
<project xmlns="http://maven.apache.org/POM/4.0.0" xmlns:xsi="http://www.w3.org/2001/XMLSchema-instance"
xsi:schemaLocation="http://maven.apache.org/POM/4.0.0 http://maven.apache.org/xsd/maven-4.0.0.xsd">
<modelVersion>4.0.0</modelVersion>
<parent>
<groupId>com.ericbruno</groupId>
<artifactId>root</artifactId>
<version>${revision}</version>
</parent>
<groupId>com.ericbruno.libs</groupId>
<artifactId>libs</artifactId>
<packaging>pom</packaging>
<modules>
<module>LibraryBase</module>
<module>Library1</module>
<module>Library2</module>
</modules>
</project>
The pom.xml file for applications is more involved. To avoid consuming local disk space, and to avoid long compile times, you might decide to keep only a subset of your organization’s applications locally. This is not recommended, because you lose some of the benefits of a monorepo, but due to resource constraints, you may have no choice. In such cases, you can omit application subdirectories as you see fit. However, to avoid build errors in your Maven scripts, you can use Maven build profiles, which contain <activation> property sections with <file> and <exists> properties, as shown in Listing 3.
Listing 3.
<?xml version="1.0" encoding="UTF-8"?>
<project xmlns="http://maven.apache.org/POM/4.0.0" xmlns:xsi="http://www.w3.org/2001/XMLSchema-instance"
xsi:schemaLocation="http://maven.apache.org/POM/4.0.0 http://maven.apache.org/xsd/maven-4.0.0.xsd">
<modelVersion>4.0.0</modelVersion>
<parent>
<groupId>com.ericbruno</groupId>
<artifactId>root</artifactId>
<version>${revision}</version>
</parent>
<groupId>com.ericbruno.apps</groupId>
<artifactId>apps</artifactId>
<packaging>pom</packaging>
<profiles>
<profile>
<id>App1</id>
<activation>
<file>
<exists>App1/pom.xml</exists>
</file>
</activation>
<modules>
<module>App1</module>
</modules>
</profile>
<profile>
<id>App2</id>
<activation>
<file>
<exists>App2/pom.xml</exists>
</file>
</activation>
<modules>
<module>App2</module>
</modules>
</profile>
</profiles>
</project>
The sample monorepo in Listing 3 contains only two applications: App1 and App2. There are Maven build profiles defined for each, which causes the existence of each application’s separate pom.xml file to be checked before the profile is activated. In summary, only the applications that exist on your local file system will be built, no Maven errors will occur, and you don’t need to change the Maven scripts. This works well with Git’s concept of sparse checkouts, as explained on the GitHub blog.
Note: Alternatively, you can drive Maven profile activation by checking for the lack of a file using the <missing> property, which can be combined with <exists>.
In the sample monorepo, available in my GitHub repository here, I created two libraries, both of which extend a base library using Java interfaces and Maven modules and profiles. For example, whereas LibraryBase is a standalone Maven Java project, Library1 depends on it. As you can see, LibraryBase is denoted as a Maven dependency in the pom.xml for Library1.
...
<dependency>
<groupId>com.ericbruno</groupId>
<artifactId>LibraryBase</artifactId>
<version>1.0-SNAPSHOT</version>
<type>jar</type>
</dependency>
...
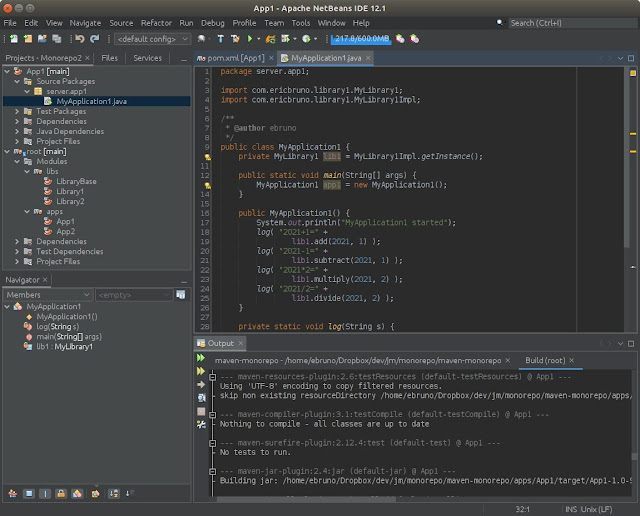
You can open the root monorepo pom.xml file as a Maven Java project within NetBeans, and all the modules will be listed in a hierarchy (see Figure 1). You can build the entire set of libraries and applications from this root project. You can also double-click a module—such as App1 in this example—and that project will load separately so you can edit its code.


0 comments:
Post a Comment