Friday, November 27, 2020

Testing with Hoverfly and Java Part 4: Exact, Glob and Regex Matchers

Previously we used Hoverfly among its state feature.

So far our examples have been close to an absolute request match, thus on this blog we will focus on utilising the matchers.

Having a good range of matchers is very important because most API interactions are dynamic and you can’t always predict the example. Imagine a JWT signature. You can match the body but the signature might change per environment.

Oracle Java Tutorial and Material, Oracle Java Exam Prep, Oracle Java Study Material, Oracle Java Career

There are three type of matchers available.

◉ The exact matcher: The fields headers should be an exact match
◉ The glob matcher: A match that gives the ability to using the `*`
◉ The regex matcher: A matcher that requires you to search again on the internet on how to make a regex
◉ XML matcher: This about matching the xml as XML node by node value by value
◉ Xpath matcher: Match based on a value match through Xpath
◉ JSON matcher: Match the json exactly
◉ JSON partial matcher: Match if the json submitted contains the Json values specified
◉ JSONPath matcher: Just like the xpath match based the on the json path submitted

Let’s start with the exact matcher.

public class ExactMatcherTests {
    private Hoverfly hoverfly;
    @BeforeEach
    void setUp() {
        var simulation = SimulationSource.dsl(service("http://localhost:8085")
                .get("/exact")
                .header("Origin", RequestFieldMatcher.newExactMatcher("internal-server"))
                .willReturn(success("{\"exact\":true}", "application/json")));
        var localConfig = HoverflyConfig.localConfigs().disableTlsVerification().asWebServer().proxyPort(8085);
        hoverfly = new Hoverfly(localConfig, SIMULATE);
        hoverfly.start();
        hoverfly.simulate(simulation);
    }
    @AfterEach
    void tearDown() {
        hoverfly.close();
    }
    @Test
    void testExactMatcherSuccess() {
        var client = HttpClient.newHttpClient();
        var exactRequest = HttpRequest.newBuilder()
                .uri(URI.create("http://localhost:8085/exact"))
                .header("Origin","internal-server")
                .build();
        var exactResponse = client.sendAsync(exactRequest, HttpResponse.BodyHandlers.ofString())
                .thenApply(HttpResponse::body)
                .join();
        Assertions.assertEquals("{\"exact\":true}", exactResponse);
    }
    @Test
    void testExactMatcherFailure() {
        var client = HttpClient.newHttpClient();
        var exactRequest = HttpRequest.newBuilder()
                .uri(URI.create("http://localhost:8085/exact"))
                .build();
        var exactResponse = client.sendAsync(exactRequest, HttpResponse.BodyHandlers.ofString())
                .join();
        Assertions.assertEquals(502, exactResponse.statusCode());
    }
}

The failures or success come based on wether the header was matching exactly or not.

We shall use the glob match for a request parameter.

public class GlobMatcher {
    private Hoverfly hoverfly;
    @BeforeEach
    void setUp() {
        var simulation = SimulationSource.dsl(service("http://localhost:8085")
                .get("/glob")
                .queryParam("userName", RequestFieldMatcher.newGlobMatcher("john*"))
                .willReturn(success("{\"glob\":true}", "application/json")));
        var localConfig = HoverflyConfig.localConfigs().disableTlsVerification().asWebServer().proxyPort(8085);
        hoverfly = new Hoverfly(localConfig, SIMULATE);
        hoverfly.start();
        hoverfly.simulate(simulation);
    }
    @AfterEach
    void tearDown() {
        hoverfly.close();
    }
    @Test
    void testGlobMatcherSuccess() {
        var client = HttpClient.newHttpClient();
        var exactRequest = HttpRequest.newBuilder()
                .uri(URI.create("http://localhost:8085/glob?userName=johnDoe"))
                .build();
        var exactResponse = client.sendAsync(exactRequest, HttpResponse.BodyHandlers.ofString())
                .thenApply(HttpResponse::body)
                .join();
        Assertions.assertEquals("{\"glob\":true}", exactResponse);
    }
    @Test
    void testGlobMatcherFailure() {
        var client = HttpClient.newHttpClient();
        var exactRequest = HttpRequest.newBuilder()
                .uri(URI.create("http://localhost:8085/glob?userName=nojohnDoe"))
                .build();
        var exactResponse = client.sendAsync(exactRequest, HttpResponse.BodyHandlers.ofString())
                .join();
        Assertions.assertEquals(502, exactResponse.statusCode());
    }
}

Oracle Java Tutorial and Material, Oracle Java Exam Prep, Oracle Java Study Material, Oracle Java Career
Last let’s head for the regex matcher. The regex matcher will just check for a capital letter: ([A-Z])\w+

public class RegexMatcherTests {
    private Hoverfly hoverfly;
    @BeforeEach
    void setUp() {
        var simulation = SimulationSource.dsl(service("http://localhost:8085")
                .post("/regex")
                .body(RequestFieldMatcher.newRegexMatcher("([A-Z])\\w+"))
                .willReturn(success("{\"regex\":true}", "application/json")));
        var localConfig = HoverflyConfig.localConfigs().disableTlsVerification().asWebServer().proxyPort(8085);
        hoverfly = new Hoverfly(localConfig, SIMULATE);
        hoverfly.start();
        hoverfly.simulate(simulation);
    }
    @AfterEach
    void tearDown() {
        hoverfly.close();
    }
    @Test
    void testRegexMatcherSuccess() {
        var client = HttpClient.newHttpClient();
        var exactRequest = HttpRequest.newBuilder()
                .uri(URI.create("http://localhost:8085/regex"))
                .POST(HttpRequest.BodyPublishers.ofString("Contains capital letter"))
                .build();
        var exactResponse = client.sendAsync(exactRequest, HttpResponse.BodyHandlers.ofString())
                .thenApply(HttpResponse::body)
                .join();
        Assertions.assertEquals("{\"regex\":true}", exactResponse);
    }
    @Test
    void testRegexMatcherFailure() {
        var client = HttpClient.newHttpClient();
        var exactRequest = HttpRequest.newBuilder()
                .uri(URI.create("http://localhost:8085/regex"))
                .POST(HttpRequest.BodyPublishers.ofString("won't match due to capital letter missing"))
                .build();
        var exactResponse = client.sendAsync(exactRequest, HttpResponse.BodyHandlers.ofString())
                .join();
        Assertions.assertEquals(502, exactResponse.statusCode());
    }
}

Wednesday, November 25, 2020

CompositeName size() method in Java with Examples

Oracle Java Certification, Oracle Java Tutorial and Material, Oracle Java Prep, Oracle Java Career

The size() method of a javax.naming.CompositeName class is used to return the size of the composite name object which is equal to the number of components in this composite name.

Syntax:

public int size()

Parameters: This method accepts nothing.

Return value: This method returns nonnegative number of components in this composite name.

Below programs illustrate the CompositeName.size() method:

Program 1:

// Java program to demonstrate 

// CompositeName.size() 

import java.util.Properties; 

import javax.naming.CompositeName; 

import javax.naming.InvalidNameException; 

public class GFG { 

public static void main(String[] args) 

throws InvalidNameException 

// create composite name object 

CompositeName CompositeName1 

= new CompositeName( 

"1/2/3/4/5/6/7/8/9/0"); 

// apply size() 

int size = CompositeName1.size(); 

// print value 

System.out.println("size: "

+ size); 

Output:

size: 10

Oracle Java Certification, Oracle Java Tutorial and Material, Oracle Java Prep, Oracle Java Career
Program 2:


// Java program to demonstrate 
// CompositeName.size() method 

import java.util.Properties; 
import javax.naming.CompositeName; 
import javax.naming.InvalidNameException; 

public class GFG { 
public static void main(String[] args) 
throws InvalidNameException 
// create composite name object 
CompositeName CompositeName1 
= new CompositeName( 
"c/e/d/v/a/y/x/f"); 

// apply size() 
int size = CompositeName1.size(); 

// print value 
System.out.println("size:" + size); 

Output:

size:8

Monday, November 23, 2020

Java Program to Find Transpose of a Matrix

Oracle Java Tutorial and Material, Oracle Java Certification, Oracle Java Exam Prep

A quick and practical guide to calculate the matrix transpose in java. Transpose of a given matrix is nothing but the changing the values and order.

1. Overview

In this article, you’ll learn how to find the transpose of a given matrix using a simple for loop.

You can go thorough the previous articles on addition and multiplication of two matrices using arrays.

Transpose is nothing but a swapping the rows with columns and also order will be swapped. Finally, it produces the new matrix.

Matrix M : [A11, A12 

          A21, A22

          A31, A32]

Transpose of Matrix M: [ A11, A21, A31

             A12, A22, A32]

Order of Transpose Matrix:

Matrix M order: 3 X 2 

Transpose of Matrix M order: 2 X 3

2. Example Program to Find the Transpose Of Matrix

Need only one matrix to find the transpose. This can be done with only two for loops.

In the below program, added two methods doMatricTranspose() for generating the transpose of a matrix and other doPrintResultMatric() is to print the given matrix.

Moved the values from rows to columns. Input matrix order is 2 X 3 with 2 rows and 3 columns.

After calling the doMatricTranspose() and generated output matrix order is 3 X 2 with 3 rows and 2 columns. And also all the values of input matrix are swapped with its positions such as A12 to A21, A31 to A13 etc.

Core logic :

Oracle Java Tutorial and Material, Oracle Java Certification, Oracle Java Exam Prep
Main logic is added inside a separate function for reuse.

result[j][i] = matrix[i][j];

package com.oraclejavacertified.programs.arrays.matrix;

public class MatrixTranspose {

    public static void main(String[] args) {

        // creating the first matrix using arrays

        int[][] matrix = { { 1, 2, 3 }, { 4, 5, 6 } };

        //Printing the original matrix

        System.out.println("Input Matrix : ");

        doPrintResultMatric(matrix);   

        // Matrix 1 rows and columns length

        int rows = matrix.length;

        int columns = matrix[0].length;

        // Calling a function for matrix transpose core logic

        int[][] result = doMatricTranspose(matrix, rows, columns);

        // printing the result

        System.out.println("Transpose of Matrix : ");

        doPrintResultMatric(result);

    }

    /**

     * Calculates the matrix transpose for given inputs arrays.

     * 

     * @param matrix1

     * @param rows1

     * @param columns1

     * @return

     */

    private static int[][] doMatricTranspose(int[][] matrix, int rows, int columns) {

        // output array for storing the transpose result. order needs to be swapped.

        int[][] result = new int[columns][rows];

        for (int i = 0; i < rows; i++) {

            for (int j = 0; j < columns; j++) {

                result[j][i] = matrix[i][j];

            }

        }

        return result;

    }

    // prints the given matrix

    private static void doPrintResultMatric(int[][] result) {

        for (int i = 0; i < result.length; i++) {

            for (int j = 0; j < result[1].length; j++) {

                System.out.print(result[i][j] + " ");

            }

            System.out.println();

        }

    }

}

Output:

Input Matrix : 

1 2 3

4 5 6

Transpose of Matrix : 

1 4

2 5

3 6

Friday, November 20, 2020

Permutation – Heap’s Algorithm

This is a little bit of experimentation that I did recently to figure out a reasonable code to get all possible permutations of a set of characters. 

So say given a set of characters “ABC”, my objective is to come up code which can spit out “ABC”, “ACB”, “BAC”, “BCA”, “CBA”, “CAB”. 

The approach I took is to go with the definition of permutation itself, so with “ABCD” as the set of characters a 4 slot that needs to be filled.

Oracle Java Tutorial and Material, Oracle Java Exam Prep, Oracle Java Career

The first slot can be filled by any of A, B, C, D, in 4 ways:

Oracle Java Tutorial and Material, Oracle Java Exam Prep, Oracle Java Career

The second slot by any of the remaining 3 characters, so with “A” in the first slot – 

Oracle Java Tutorial and Material, Oracle Java Exam Prep, Oracle Java Career

The third slot by the remaining 2 characters, so with “A”, “B” in the first two slots:

Oracle Java Tutorial and Material, Oracle Java Exam Prep, Oracle Java Career

And finally, the fourth slot by the remaining 1 character, with say “A”, “B”, “C” in the first 3 slots:

Oracle Java Tutorial and Material, Oracle Java Exam Prep, Oracle Java Career

In total, there would be 4 for the first slot * 3 for the 2nd slot * 2 for the 3rd slot * 1 for the 4th slot – 24 permutations altogether. 

I can do this in place, using an algorithm that looks like this:

package org.bk.algo.general;
 
import org.junit.jupiter.api.Test;
 
import java.util.ArrayList;
import java.util.List;
 
import static org.assertj.core.api.Assertions.assertThat;
 
public class Permutations {
 
    public List<string> permutations(String str) {
        char[] chars = str.toCharArray();
        List<string> result = new ArrayList<>();
        permutations(0, chars, result);
        return result;
    }
 
    private void permutations(int idx, char[] arr, List<string> result) {
        if (idx == arr.length - 1) {
            result.add(new String(arr));
        }
 
        for (int i = idx; i <= arr.length - 1; i++) {
            swap(arr, i, idx);
            permutations(idx + 1, arr, result);
            swap(arr, i, idx);
        }
    }
 
 
    private void swap(char[] arr, int p1, int p2) {
        if (p1 == p2) return;
        char temp = arr[p1];
        arr[p1] = arr[p2];
        arr[p2] = temp;
    }
 
    @Test
    void testPerms() {
        List<string> abcdPerms = permutations("ABCD");
        assertThat(abcdPerms).hasSize(24);
        assertThat(abcdPerms)
                .containsExactlyInAnyOrder(
                        "ABCD", "ABDC", "ACBD", "ACDB", "ADCB", "ADBC", "BACD", "BADC", "BCAD", "BCDA", "BDCA", "BDAC",
                        "CBAD", "CBDA", "CABD", "CADB", "CDAB", "CDBA", "DBCA", "DBAC", "DCBA", "DCAB", "DACB", "DABC");
    }
}
</string></string></string></string>

A trace of flow and the swaps is here:

Oracle Java Tutorial and Material, Oracle Java Exam Prep, Oracle Java Career

The only trick here is that the code does all the holding of characters and getting it into the right place in place by swapping the right characters to the right place and restoring it at the end of it. 

This works well for a reasonably sized set of characters – reasonable because for just 10 characters, there would be 3,628,800 permutations. 

An algorithm that works even better, though a complete mystery to me how it actually functions, is the Heap’s Algorithm. Here is a java implementation of it:

package org.bk.algo.general;
 
import org.junit.jupiter.api.Test;
 
import java.util.ArrayList;
import java.util.List;
 
import static org.assertj.core.api.Assertions.assertThat;
 
public class PermutationsHeap {
 
    public List<string> permutations(String str) {
        char[] chars = str.toCharArray();
        List<string> result = new ArrayList<>();
        permutations(chars.length, chars, result);
        return result;
    }
 
    private void permutations(int k, char[] arr, List<string> result) {
        if (k == 1) {
            result.add(new String(arr));
            return;
        }
        permutations(k - 1, arr, result);
        for (int i = 0; i < k - 1; i++) {
            if (k % 2 == 0) {
                swap(arr, i, k - 1);
            } else {
                swap(arr, 0, k - 1);
            }
            permutations(k - 1, arr, result);
        }
    }
    private void swap(char[] arr, int p1, int p2) {
        if (p1 == p2) return;
        char temp = arr[p1];
        arr[p1] = arr[p2];
        arr[p2] = temp;
    }
 
    @Test
    void testPerms() {
        List<string> abcdPerms = permutations("ABCD");
        assertThat(abcdPerms).hasSize(24);
        assertThat(abcdPerms)
                .containsExactlyInAnyOrder(
                        "ABCD", "ABDC", "ACBD", "ACDB", "ADCB", "ADBC", "BACD", "BADC", "BCAD", "BCDA", "BDCA", "BDAC",
                        "CBAD", "CBDA", "CABD", "CADB", "CDAB", "CDBA", "DBCA", "DBAC", "DCBA", "DCAB", "DACB", "DABC");
    }
}
</string></string></string></string>

It very efficiently does one swap per permutation, which is still high but better than the approach that I have described before. 

In a sample perumutation of 8 characters, which generates 40320 permutations, the home cooked version swaps 80638 times, and the Heap’s algorithm swaps 40319 times! thus proving its efficacy.

Wednesday, November 18, 2020

Java Program to Print Multiplication Table For Given Number

Oracle Java Tutorial and Material, Oracle Java Exam Prep, Oracle Java Guides, Oracle Java Career

A quick example program to create multiplication table in java using simple for loop and while loops.

1. Overview

In this article, you’ll learn how to generate and print multiplication table in java for a given number.

This can be done using for loop and while or do while loops.

Knowledge on the below topics is required to understand the examples in this post.

for loops 

while and dowhile loops

2. Generate Multiplication Table Using For Loop

Simple example program to create multiplication of any given number with help of for loop.

package com.oraclejavacertified.programs;

public class MultiplicationTableForLoop {

    public static void main(String[] args) {

        int tableNumber = 10;

        System.out.println("Generating the table 10");

        // generating table 10

        for (int i = 1; i <= 10; i++) {

            System.out.format("%d * %d = %d \n", tableNumber, i, tableNumber * i);

        }

        // generating the 20 table.

        System.out.println("\nGenerating the table 20");

        int anotherTableNumber = 20;

        for (int i = 1; i <= 10; i++) {

            System.out.format("%d * %d = %d \n", anotherTableNumber, i, anotherTableNumber * i);

        }

    }

}

Output:

Generating the table 10

10 * 1 = 10

10 * 2 = 20

10 * 3 = 30

10 * 4 = 40

10 * 5 = 50

10 * 6 = 60

10 * 7 = 70

10 * 8 = 80

10 * 9 = 90

10 * 10 = 100

Generating the table 20

20 * 1 = 20

20 * 2 = 40

20 * 3 = 60

20 * 4 = 80

20 * 5 = 100

20 * 6 = 120

20 * 7 = 140

20 * 8 = 160

20 * 9 = 180

20 * 10 = 200

3. Generate Multiplication Table Using While Loop

Next examples is using while loop running from 1 to 10.

public class MultiplicationTableWhileLoop {

    public static void main(String[] args) {

        int tableNumber = 5;

        System.out.println("Generating the table 9");

        int tableStartIndex = 1;

        int tableEndIndex = 10;

        // generating table 10

        while (tableStartIndex <= tableEndIndex) {

            System.out.format("%d * %d = %d \n", tableNumber, tableStartIndex, tableNumber * tableStartIndex);

            tableStartIndex++;

        }

        // generating the 20 table.

        System.out.println("\nGenerating the table 18");

        // resetting the start and end index

        tableStartIndex = 1;

        tableEndIndex = 10;

        int anotherTableNumber = 18;

        while (tableStartIndex <= tableEndIndex) {

            System.out.format("%d * %d = %d \n", anotherTableNumber, tableStartIndex, tableNumber * tableStartIndex);

            tableStartIndex++;

        }

    }

}

Oracle Java Tutorial and Material, Oracle Java Exam Prep, Oracle Java Guides, Oracle Java Career
Output:

Generating the table 9

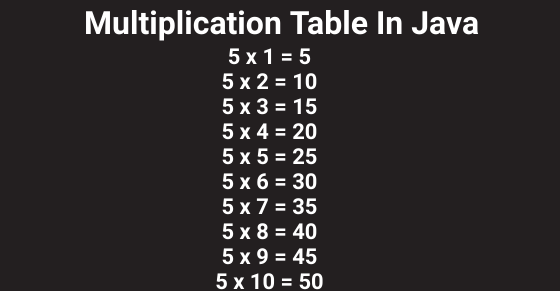
5 * 1 = 5

5 * 2 = 10

5 * 3 = 15

5 * 4 = 20

5 * 5 = 25

5 * 6 = 30

5 * 7 = 35

5 * 8 = 40

5 * 9 = 45

5 * 10 = 50

Generating the table 18

18 * 1 = 5

18 * 2 = 10

18 * 3 = 15

18 * 4 = 20

18 * 5 = 25

18 * 6 = 30

18 * 7 = 35

18 * 8 = 40

18 * 9 = 45

18 * 10 = 50

Wednesday, November 11, 2020

Java Program to Bubble Sort(Sinking Sort)

Oracle Java Tutorial and Material, Oracle Java Certification, Oracle Java Exam Prep, Oracle Java Guides

Bubble Sort in Java | Sinking Sort Technique

Bubble sort, sometimes referred to as sinking sort, is a simple sorting algorithm that repeatedly steps through the list to be sorted, compares each pair of adjacent items and swaps them if they are in the wrong order. The algorithm, which is a comparison sort, is named for the way smaller or larger elements "bubble" to the top of the list. Although the algorithm is simple, it is too slow and impractical for most problems even when compared to insertion sort. It can be practical if the input is usually in sorted order but may occasionally have some out-of-order elements nearly in position.

1) Easy to understand.

2) Easy to implement.

3) In-place, no external memory is needed.

4) Performs greatly when the array is almost sorted (This is part of Optimized Bubble Sort).

5) Widely used by students to clear practical exams or freshers interview process as the end result is the same as that of any sorting technique

Example Simulation:

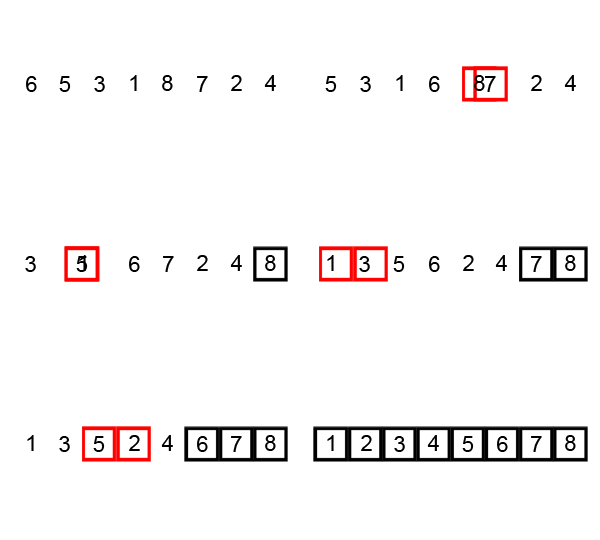
An example of bubble sort. Starting from the beginning of the list, compare every adjacent pair, swap their position if they are not in the right order (the latter one is smaller than the former one). After each iteration, one less element (the last one) is needed to be compared until there are no more elements left to be compared.

Oracle Java Tutorial and Material, Oracle Java Certification, Oracle Java Exam Prep, Oracle Java Guides

Algorithm (Source):


procedure bubbleSort( A : list of sortable items )
    n = length(A)
   Outer: for (int i = 0; i < n; i++) then
 Inner: for (int j = 0; j < n; j++) then
             if (A[i] < A[j]) then
                /* swap them and remember something changed */
                swap( A[i], A[j] )
            end if
        end for inner
    end for outer
end procedure 

Bubble Sort Program in Ascending Order:


package com.adeepdrive.swap.numbers;
public class BubbleSort {
 public static void main(String[] args) {
  int values[] = { 30, 10, 40, 90, 50 };
  int length = values.length;
  System.out.println("Before sorting ");
  for (int value : values) {
   System.out.print(" " + value);
  }
  System.out.println();
  for (int i = 0; i < length; i++) {
   for (int j = 0; j < length; j++) {
    if (values[i] < values[j]) {
     int temp = values[i];
     values[i] = values[j];
     values[j] = temp;
    }
   }
               System.out.print("For outer loop i value : "+i+" : ");
   for (int value : values) {
    System.out.print(" " + value);
   }
   System.out.println();
               }
  System.out.println("After sorting in Ascending Order");
  for (int value : values) {
   System.out.print(" " + value);
  }
 }
}

Output:

Before sorting
 30 10 40 90 50
For outer loop i value : 0 :  90 10 30 40 50
For outer loop i value : 1 :  10 90 30 40 50
For outer loop i value : 2 :  10 30 90 40 50
For outer loop i value : 3 :  10 30 40 90 50
For outer loop i value : 4 :  10 30 40 50 90
After sorting in Ascending Order
 10 30 40 50 90

Bubble Sort Program in Descending Order:


To get sorted in descending order, Just do the below change in the above program.

if (values[i] > values[j]) {

Output:

Before sorting
 30 10 40 90 50
For outer loop i value : 0 :  10 30 40 90 50
For outer loop i value : 1 :  30 10 40 90 50
For outer loop i value : 2 :  40 30 10 90 50
For outer loop i value : 3 :  90 40 30 10 50
For outer loop i value : 4 :  90 50 40 30 10
After sorting in Descending Order
 90 50 40 30 10

Drawbacks of bubble sort


1) we have to traverse the input array until the last element.
2) Very expensive, O(n2) in the worst case and average case.
3) It does more element assignments than its counterpart, insertion sort.

Monday, November 9, 2020

How to create PDF File in Java – iText Example

Oracle Java Tutorial and Material, Oracle Java Certification, Core Java, Oracle Java Exam Prep

Generating PDF files in today’s enterprise applications is quite common. Doing this with Java is not an easy task as Java does not gives default api’s to handle PDF files. No worries, iText jar is for you. If you are not familiar,  iText is a free Java-PDF library that allows you to generate PDF files on the fly (dynamically). iText is an ideal library for developers looking to enhance web- and other applications with dynamic PDF document generation and/or manipulation.

By the way, iText is not an end-user tool. Typically you won’t use it on your Desktop as you would use Acrobat or any other PDF application. Rather, you’ll build iText into your own applications so that you can automate the PDF creation and manipulation process.

Here are a couple of things for which you can use iText (Java-PDF Library):

◉ Serve PDF to a browser

◉Generate dynamic documents from XML files or databases

◉Use PDF’s many interactive features

◉Add bookmarks, page numbers, watermarks, etc.

◉Split, concatenate, and manipulate PDF pages

◉Automate filling out of PDF forms

◉Add digital signatures to a PDF file

◉Technical Requirements to use iText

◉You should have JDK 1.4 or later to integrate iText PDF generation in your application.

Getting iText

You can either download iText jar from its home page http://www.lowagie.com/iText/download.html

iText core: iText-5.5.13.jar

or you can also download from the Maven repository by adding iText dependency on your pom.xml file. 

iText Maven Dependency

<!-- https://mvnrepository.com/artifact/com.itextpdf/itextpdf -->

<dependency>

    <groupId>com.itextpdf</groupId>

    <artifactId>itextpdf</artifactId>

    <version>5.5.13</version>

</dependency>

iText Gradle Dependency

// https://mvnrepository.com/artifact/com.itextpdf/itextpdf

compile group: 'com.itextpdf', name: 'itextpdf', version: '5.5.13'

iText JARS :

C:\m2\repository\com\lowagie\itext\4.2.1\itext-4.2.1.jar

C:\m2\repository\org\bouncycastle\bctsp-jdk14\1.38\bctsp-jdk14-1.38.jar

C:\m2\repository\org\bouncycastle\bcprov-jdk14\1.38\bcprov-jdk14-1.38.jar

C:\m2\repository\org\bouncycastle\bcmail-jdk14\1.38\bcmail-jdk14-1.38.jar

C:\m2\repository\jfree\jfreechart\1.0.12\jfreechart-1.0.12.jar

C:\m2\repository\jfree\jcommon\1.0.15\jcommon-1.0.15.jar

C:\m2\repository\org\swinglabs\pdf-renderer\1.0.5\pdf-renderer-1.0.5.jar

How to create PDF files/documents in Java – iText library Example


Here is a complete code example to generate a PDF file using the iText library in Java.

import java.io.File;
import java.io.FileOutputStream;
import java.io.IOException;
import java.io.OutputStream;
import java.sql.Date;
 
import com.lowagie.text.Document;
import com.lowagie.text.Paragraph;
import com.lowagie.text.pdf.PdfWriter;
 
/**
* Java Program to generate PDF document using iText library.
*
* @author Javin
*/
public class Testing {
 
    public static void main(String args[]) {
 
        OutputStream file = null;
        try {
            file = new FileOutputStream(new File("Contacts.pdf"));
 
            // Create a new Document object
            Document document = new Document();
 
            // You need PdfWriter to generate PDF document
            PdfWriter.getInstance(document, file);
 
            // Opening document for writing PDF
            document.open();
 
            // Writing content
            document.add(new Paragraph("Hello World, Creating PDF document in Java is easy"));
            document.add(new Paragraph("You are customer # 2345433"));
            document.add(new Paragraph(new Date(new java.util.Date().getTime()).toString()));
 
                   // Add meta data information to PDF file
            document.addCreationDate();
            document.addAuthor("oraclejavacertified");
            document.addTitle("How to create PDF document in Java");
            document.addCreator("Thanks to iText, writing into PDF is easy");
 
 
            // close the document
            document.close();
 
            System.out.println("Your PDF File is succesfully created");
 
        } catch (Exception e) {
            e.printStackTrace();
 
        } finally {
 
            // closing FileOutputStream
            try {
                if (file != null) {
                    file.close();
                }
            } catch (IOException io) {/*Failed to close*/
 
            }
 
        }
 
    }
 
}
 
Output:
Your PDF File is successfully created

Adding metadata/Setting attributes of PDF using free Java-PDF library


Oracle Java Tutorial and Material, Oracle Java Certification, Core Java, Oracle Java Exam Prep
While you generate a PDF, you may want to set its different attribute like: author name, title, file description etc. iText jar can help you to set different attributes of a PDF file. Document object provide different methods to add various attributes to a PDF file.

document.addCreationDate();
document.addAuthor("");
document.addTitle("How to create PDF document in Java");
document.addCreator("Thanks to iText, writing into PDF is easy");

That’s all on how to generate PDF files in Java using iText. Lots of open source framework uses iText to provide PDF support in their application. for example display tag, which is a popular JSP tag library to generate dynamic HTML tables, allow you to export table in PDF format. It does this conversion by using iText library, so all you need is to include iText.jar in your classpath and boom, you can export PDF documents from Java application.

Friday, November 6, 2020

Memento Pattern

Without violating encapsulation, capture and externalize an object’s internal state so that the object can be restored to this state later.

Oracle Java Tutorial and Material, Oracle Java Certification, Oracle Java Learning, Oracle Java Exam Prep

Participants

Memento: stores internal state of the Originator object. The memento may store as much or as little of the originator’s internal state as necessary at its originator’s discretion. Protect against access by objects of other than the originator. Mementos have effectively two interfaces. Caretaker sees a narrow interface to the Memento — it can only pass the memento to the other objects. Originator, in contrast, sees a wide interface, one that lets it access all the data necessary to restore itself to its previous state. Ideally, only the originator that produces the memento would be permitted to access the memento’s internal state.

Originator: creates a memento containing a snapshot of its current internal state. Uses the memento to restore its internal state

Caretaker: is responsible for the memento’s safekeeping. Never operates on or examines the contents of a memento.

Code

public class Main {
    public static void main(String[] args) {
        Originator o = new Originator();
        o.setState("On");
        Caretaker c = new Caretaker();
        c.setMemento(o.createMemento());
        o.setState("Off");
        o.setMemento(c.getMemento());
    }
}
public class Originator {
    private String state;
    public String getState() {
        return state;
    }
    public void setState(String state) {
        this.state = state;
        System.out.println("State = " + state);
    }
    public Memento createMemento() {
        return new Memento(state);
    }
    public void setMemento(Memento memento) {
        System.out.println("Restoring state...");
        setState(memento.getState());
    }
}
public class Memento {
    private String state;
    public Memento(String state) {
        this.state = state;
    }
    public String getState() {
        return state;
    }
    public void setState(String state) {
        this.state = state;
    }
}
public class Caretaker {
    private Memento memento;
    public Memento getMemento() {
        return memento;
    }
    public void setMemento(Memento memento) {
        this.memento = memento;
    }
}

Output

State = On
State = Off
Restoring state...
State = On

Wednesday, November 4, 2020

Java Based Akka application Part 2: Adding tests

Oracle Java Exam Prep, Oracle Java Tutorial and Material, Oracle Java Guides

On the previous blog we focused on spinning up our first Akka project.

Now it’s time to add a test for our codebase.

First thing to get started is adding the right dependencies to the existing project.

<dependencies>

        <dependency>

            <groupId>com.typesafe.akka</groupId>

            <artifactId>akka-actor-typed_2.13</artifactId>

            <version>${akka.version}</version>

        </dependency>

        <dependency>

            <groupId>ch.qos.logback</groupId>

            <artifactId>logback-classic</artifactId>

            <version>1.2.3</version>

        </dependency>

        <dependency>

            <groupId>org.projectlombok</groupId>

            <artifactId>lombok</artifactId>

            <version>1.18.16</version>

            <scope>provided</scope>

        </dependency>

        <!-- Test -->

        <dependency>

            <groupId>com.typesafe.akka</groupId>

            <artifactId>akka-actor-testkit-typed_2.13</artifactId>

            <version>${akka.version}</version>

            <scope>test</scope>

        </dependency>

        <dependency>

            <groupId>junit</groupId>

            <artifactId>junit</artifactId>

            <version>4.13.1</version>

            <scope>test</scope>

        </dependency>

    </dependencies>

What you shall notice is the usage of Junit 4, instead of Junit 5. Some of the testing utils like TestKitJunitResource need annotations like @ClassRule and are bound to Junit4. Obviously this is not a blocker on using JUnit 5, with some tweaks it is feasible to use the tools your project needs. However in this example Junit 4 shall be used.

Before we write the test we need to think of our code.

It is obvious that we sent a message to our actor in a fire and forget fashion.

private Behavior<GuardianMessage> receiveMessage(MessageToGuardian messageToGuardian) {

        getContext().getLog().info("Message received: {}",messageToGuardian.getMessage());

        return this;

    }

Oracle Java Exam Prep, Oracle Java Tutorial and Material, Oracle Java Guides
If you don’t have a way to intercept what happens inside the method your options are limited. In those cases you can utilise the log messages and actually expect log events to happen.

Before we add the unit test we need to make some logback adjustments. This will take effect only on our test logback.xml. More specific we need to have an appender on logback that captured the data. This is the CapturingAppender.

<?xml version="1.0" encoding="UTF-8"?>
<configuration>
    <appender name="STDOUT" class="ch.qos.logback.core.ConsoleAppender">
        <filter class="ch.qos.logback.classic.filter.ThresholdFilter">
            <level>INFO</level>
        </filter>
        <encoder>
            <pattern>[%date{ISO8601}] [%level] [%logger] [%marker] [%thread] - %msg MDC: {%mdc}%n</pattern>
        </encoder>
    </appender>
    <!-- Logging from tests are silenced by this appender. When there is a test failure the captured logging events are flushed to the appenders defined for the akka.actor.testkit.typed.internal.CapturingAppenderDelegate logger. -->
    <appender name="CapturingAppender" class="akka.actor.testkit.typed.internal.CapturingAppender" />
    <!-- The appenders defined for this CapturingAppenderDelegate logger are used when there is a test failure and all logging events from the test are flushed to these appenders. -->
    <logger name="akka.actor.testkit.typed.internal.CapturingAppenderDelegate" >
      <appender-ref ref="STDOUT"/>
    </logger>
    <root level="DEBUG">
        <appender-ref ref="CapturingAppender"/>
    </root>
</configuration>

Now it’s time to add the unit test.

package com.gkatzioura;
import akka.actor.testkit.typed.javadsl.LogCapturing;
import akka.actor.testkit.typed.javadsl.LoggingTestKit;
import akka.actor.testkit.typed.javadsl.TestKitJunitResource;
import akka.actor.testkit.typed.javadsl.TestProbe;
import akka.actor.typed.ActorRef;
import org.junit.ClassRule;
import org.junit.Rule;
import org.junit.Test;
public class AppGuardianTests {
    @ClassRule
    public static final TestKitJunitResource testKit = new TestKitJunitResource();
    @Rule
    public final LogCapturing logCapturing = new LogCapturing();
    @Test
    public void testReceiveMessage() {
        ActorRef<AppGuardian.GuardianMessage> underTest = testKit.spawn(AppGuardian.create(), "app-guardian");
        LoggingTestKit.info("Message received: hello")
                .expect(
                        testKit.system(),
                        () -> {
                            underTest.tell(new AppGuardian.MessageToGuardian("hello"));
                            return null;
                        });
    }
}

Once we run the test the expected outcome is to pass. The actor did receive the message, did execute a logging action and this was captured by the CapturingAppender. Then the logging event was validated if it was the expected one. In case of exception probably you need to check if the logback.xml took effect.

Monday, November 2, 2020

Java Based Akka application Part 1: Your base Project

Oracle Java Tutorial and Material, Oracle Java Learning, Oracle Java Exam Prep

Akka is a free, open-source toolkit and runtime for building highly concurrent, distributed, and resilient message-driven applications on the JVM. Along with Akka you have akka-streams  a module that makes the ingestion and processing of streams easy  and Alpakka, a Reactive Enterprise Integration library for Java and Scala, based on Reactive Streams and Akka.

On this blog I shall focus on creating an Akka project using Java as well as packaging it.

You already know that Akka is built on Scala, thus why Java and no Scala? There are various reasons to go for Java.

◉ Akka is a toolkit running on the JVM so you don’t have to be proficient with Scala to use it.

◉ You might have a team already proficient with Java but not in Scala.

◉ It’s much easier to evaluate if you already have a codebase on Java and the various build tools (maven etc)

Will shall go for the simple route and Download the Application from lightbend quickstart. The project received, will be backed with typed actors.

After some adaption the maven file would look like this, take note that we shall use lombok.

<project>

    <modelVersion>4.0.0</modelVersion>

    <groupId>com.gkatzioura</groupId>

    <artifactId>akka-java-app</artifactId>

    <version>1.0</version>

    <properties>

      <akka.version>2.6.10</akka.version>

    </properties>

    <dependencies>

        <dependency>

            <groupId>com.typesafe.akka</groupId>

            <artifactId>akka-actor-typed_2.13</artifactId>

            <version>${akka.version}</version>

        </dependency>

        <dependency>

            <groupId>ch.qos.logback</groupId>

            <artifactId>logback-classic</artifactId>

            <version>1.2.3</version>

        </dependency>

        <dependency>

            <groupId>org.projectlombok</groupId>

            <artifactId>lombok</artifactId>

            <version>1.18.16</version>

            <scope>provided</scope>

        </dependency>

    </dependencies>

    <build>

        <plugins>

            <plugin>

                <groupId>org.apache.maven.plugins</groupId>

                <artifactId>maven-compiler-plugin</artifactId>

                <version>3.8.0</version>

                <configuration>

                    <source>11</source>

                    <target>11</target>

                </configuration>

            </plugin>

            <plugin>

                <groupId>org.codehaus.mojo</groupId>

                <artifactId>exec-maven-plugin</artifactId>

                <version>1.6.0</version>

                <configuration>

                    <executable>java</executable>

                    <arguments>

                        <argument>-classpath</argument>

                        <classpath />

                        <argument>com.gkatzioura.Application</argument>

                    </arguments>

                </configuration>

            </plugin>

        </plugins>

    </build>

</project>

Oracle Java Tutorial and Material, Oracle Java Learning, Oracle Java Exam Prep
Now there is one Actor that is responsible for managing your other actors. This is the top level actor called Guardian Actor. It is created along with the ActorSystem and when it stops the ActorSystem will stop too.

In order to create an actor you define the message the actor will receive and you specify why it will behave to those messages.

package com.gkatzioura;

import akka.actor.typed.Behavior;

import akka.actor.typed.javadsl.AbstractBehavior;

import akka.actor.typed.javadsl.ActorContext;

import akka.actor.typed.javadsl.Behaviors;

import akka.actor.typed.javadsl.Receive;

import lombok.AllArgsConstructor;

import lombok.Getter;

public class AppGuardian extends AbstractBehavior<AppGuardian.GuardianMessage> {

    public interface GuardianMessage {}

    static Behavior<GuardianMessage> create() {

        return Behaviors.setup(AppGuardian::new);

    }

    @Getter

    @AllArgsConstructor

    public static class MessageToGuardian implements GuardianMessage {

        private String message;

    }

    private AppGuardian(ActorContext<GuardianMessage> context) {

        super(context);

    }

    @Override

    public Receive<GuardianMessage> createReceive() {

        return newReceiveBuilder().onMessage(MessageToGuardian.class, this::receiveMessage).build();

    }

    private Behavior<GuardianMessage> receiveMessage(MessageToGuardian messageToGuardian) {

        getContext().getLog().info("Message received: {}",messageToGuardian.getMessage());

        return this;

    }

}

Akka is message driven so the guardian actor should be able to consume messages send to it. Therefore messages that implement the GuardianMessage interface are going to be processed.

By creating the actor the createReceive method is used in order to add handling of the messages that the actor should handle.

Be aware that when it comes to logging instead of spinning up a logger in the class use the

getContext().getLog()

Behind the scenes the log messages will have the path of the actor automatically added as akkaSource Mapped Diagnostic Context (MDC) value.

Last step would be to add the Main class.

package com.gkatzioura;

import java.io.IOException;

import akka.actor.typed.ActorSystem;

import lombok.extern.slf4j.Slf4j;

@Slf4j

public class Application {

    public static final String APP_NAME = "akka-java-app";

    public static void main(String[] args) {

        final ActorSystem<AppGuardian.GuardianMessage> appGuardian = ActorSystem.create(AppGuardian.create(), APP_NAME);

        appGuardian.tell(new AppGuardian.MessageToGuardian("First Akka Java App"));

        try {

            System.out.println(">>> Press ENTER to exit <<<");

            System.in.read();

        }

        catch (IOException ignored) {

        }

        finally {

            appGuardian.terminate();

        }

    }

}

The expected outcome is to have our Guardian actor to print the message submitted. By pressing enter the Akka application will terminate through the guardian actor.