Wednesday, December 30, 2020

Testing with Hoverfly and Java Part 5: XML and Xpath matchers

Previously we worked with some of the existing Hoverfly matchers like the regex, glob and exact.

Each one serves its purpose but we might want some rules that assist us with the format of the data exchanged through our requests.

On this blog we will focus on the matchers for xml.

Oracle Java Exam Prep, Oracle Java Tutorial and Material, Oracle Java Certification, Oracle Java Prep

The default xml matcher will compare the xml submitted with the xml expected. This means that the submitted xml shall be validated node by node value by value. New lines or any extra spaces as long as they don’t change the content that the xml carries will not prevent the request from being a success.

Let’s put our initial configuration that will make the xml match.

public static final String SUCCESS_RESPONSE = "<response>"
            + "<result>success</result>"
            + "</response>";
 
    private Hoverfly hoverfly;
 
    @BeforeEach
    void setUp() {
        var simulation = SimulationSource.dsl(service("http://localhost:8085")
                .post("/xml")
                .body(RequestFieldMatcher.newXmlMatcher("<document type=\"xml\">"
                        + "xml-request"
                        + "</document>"))
                .willReturn(success(SUCCESS_RESPONSE, "application/xml")));
 
        var localConfig = HoverflyConfig.localConfigs().disableTlsVerification().asWebServer().proxyPort(8085);
        hoverfly = new Hoverfly(localConfig, SIMULATE);
        hoverfly.start();
        hoverfly.simulate(simulation);
    }
 
    @AfterEach
    void tearDown() {
        hoverfly.close();
    }

So in our first example we will try to match the xml of our request with the xml expected.

@Test
    void testXmlExactMatch() {
        var client = HttpClient.newHttpClient();
 
        var exactRequest = HttpRequest.newBuilder()
                .uri(URI.create("http://localhost:8085/xml"))
                .POST(HttpRequest.BodyPublishers.ofString("  <document type=\"xml\">\n\n"
                        + "xml-request"
                        + "</document>\t"))
                .build();
 
        var exactResponse = client.sendAsync(exactRequest, HttpResponse.BodyHandlers.ofString())
                .thenApply(HttpResponse::body)
                .join();
 
        Assertions.assertEquals(SUCCESS_RESPONSE, exactResponse);
    }

As you see regardless of the new lines and the tabs, our request will be successful since the xml data do match.

Now let’s try to add a node to the xml.

@Test
    void testXmlNoMatch() {
        var client = HttpClient.newHttpClient();
 
        var exactRequest = HttpRequest.newBuilder()
                .uri(URI.create("http://localhost:8085/xml"))
                .POST(HttpRequest.BodyPublishers.ofString("  <document type=\"xml\">\n\n"
                        + "xml-request"
                        + "</document>\t<empty-node>ok</empty-node>"))
                .build();
 
        var exactResponse = client.sendAsync(exactRequest, HttpResponse.BodyHandlers.ofString())
                .join();
 
        Assertions.assertEquals(502, exactResponse.statusCode());
    }

The xml does not match thus it will fail.

Oracle Java Exam Prep, Oracle Java Tutorial and Material, Oracle Java Certification, Oracle Java Prep
Let’s focus to another problem. Since the data exchanged are dynamic, chances are that exact matches might not be possible. Also you might not need to focus on all the information submitted but just a specific section of the information exchanged. Therefore an XPath matcher becomes handy.

Will enhance the initial setup with an XPath rule.

@BeforeEach
    void setUp() {
        var simulation = SimulationSource.dsl(service("http://localhost:8085")
                .post("/xml")
                .body(RequestFieldMatcher.newXmlMatcher("<document type=\"xml\">"
                        + "xml-request"
                        + "</document>"))
                .willReturn(success(SUCCESS_RESPONSE, "application/xml"))
                .post("/xpath")
                .body(RequestFieldMatcher.newXpathMatcher("/document/payment[amount=1]"))
                .willReturn(success(SUCCESS_RESPONSE, "application/xml"))
        );
 
        var localConfig = HoverflyConfig.localConfigs().disableTlsVerification().asWebServer().proxyPort(8085);
        hoverfly = new Hoverfly(localConfig, SIMULATE);
        hoverfly.start();
        hoverfly.simulate(simulation);
    }

If there is a document node with a payment node and the value on the amount node is 1 there will be a match

Let’s go for a positive scenario

@Test
    void testXpathMatch() {
        var client = HttpClient.newHttpClient();
 
        var exactRequest = HttpRequest.newBuilder()
                .uri(URI.create("http://localhost:8085/xpath"))
                .POST(HttpRequest.BodyPublishers.ofString("  <document type=\"xml\">\n\n"
                        + "<payment><amount>142</amount></payment>"
                        + "<payment><amount>1</amount><currency>GBP</currency></payment>"
                        + "<payment>invalid</payment>"
                        + "</document>\t"))
                .build();
 
        var exactResponse = client.sendAsync(exactRequest, HttpResponse.BodyHandlers.ofString())
                .thenApply(HttpResponse::body)
                .join();
 
        Assertions.assertEquals(SUCCESS_RESPONSE, exactResponse);
    }

As expected we got a match.

Let’s go for a negative scenario.

@Test
    void testXpathNoMatch() {
        var client = HttpClient.newHttpClient();
 
        var exactRequest = HttpRequest.newBuilder()
                .uri(URI.create("http://localhost:8085/xpath"))
                .POST(HttpRequest.BodyPublishers.ofString("  <document type=\"xml\">\n\n"
                        + "<payment><amount>142</amount></payment>"
                        + "<payment><amount>no-match</amount><currency>GBP</currency></payment>"
                        + "<payment>invalid</payment>"
                        + "</document>\t"))
                .build();
 
        var exactResponse = client.sendAsync(exactRequest, HttpResponse.BodyHandlers.ofString())
                .join();
 
        Assertions.assertEquals(502, exactResponse.statusCode());
    }

That’s it we did use the xml and xpath matchers for the xml based data.

Monday, December 28, 2020

Java’s String.repeat Method in Action: Building PreparedStatement with Dynamic Number of Parameters

Oracle Java Exam Prep, Oracle Java Tutorial and Material, Oracle Java Preparation, Oracle Java Guides

Java’s String.repeat(int) method is an example of a “small” addition to Java (JDK 11) that I find myself frequently using and appreciating. This post describes use of JDK 11-introduced String.repeat(int) for easier custom generation of SQL WHERE clauses with the appropriate number of “?” parameter placeholders for use with PreparedStatements.

Many Java developers do not need to manually build PreparedStatements with the approprite number of parameter placeholders because they take advantage of a JPA implementation, other ORM framework, or library that handles it for them. However, the demonstrations in this post show how String.repeat(int) can make light work of any implementation that needs to build up a string with a specified number of repeated pieces.

Building SQL IN Condition with Dynamic Number of Parameters

A common approach used in Java applications for building a custom SQL SELECT statement that queries a particular database column against a collection of potential values is to use the IN operator and pass all potential matching values to that IN operator.

One Java implementation approach for building the IN operator portion of the SQL SELECT‘s WHERE clause is to iterate the same number of times as there are parameters for the IN operator and to use a conditional within that loop to determine the how to properly add that portion of the in-progress IN portion. This is demonstrated in the next code listing:

/**

 * Demonstrates "traditional" approach for building up the

 * "IN" portion of a SQL statement with multiple parameters

 * that uses a conditional within a loop on the number of

 * parameters to determine how to best handle each.

 *

 * @param columnName Name of database column to be referenced

 *    in the "IN" clause.

 * @param numberPlaceholders Number of parameters for which

 *    placeholder question marks ("?") need to be added.

 * @return The "IN" portion of a SQL statement with the

 *    appropriate number of placeholder question marks.

 */

public String generateInClauseTraditionallyOne(

   final String columnName, final int numberPlaceholders)

{

   final StringBuilder inClause = new StringBuilder();

   inClause.append(columnName + " IN (");

   for (int placeholderIndex = 0; placeholderIndex < numberPlaceholders; placeholderIndex++)

   {

      if (placeholderIndex != numberPlaceholders-1)

      {

         inClause.append("?, ");

      }

      else

      {

         inClause.append("?");

      }

   }

   inClause.append(")");

   return inClause.toString();

}

A second traditional approach for building up the IN clause to use a dynamic number of parameter placeholders is to again loop the same number of times as there are parameters, but append exactly the same new text each iteration. After iteration is completed, the extra characters are chopped off the end. This approach is shown in the next code listing:

/**

 * Demonstrates "traditional" approach for building up the

 * "IN" portion of a SQL statement with multiple parameters

 * that treats each looped-over parameter index the same and

 * the removes the extraneous syntax from the end of the

 * generated string.

 *

 * @param columnName Name of database column to be referenced

 *    in the "IN" clause.

 * @param numberPlaceholders Number of parameters for which

 *    placeholder question marks ("?") need to be added.

 * @return The "IN" portion of a SQL statement with the

 *    appropriate number of placeholder question marks.

 */

public String generateInClauseTraditionallyTwo(

   final String columnName, final int numberPlaceholders)

{

   final StringBuilder inClause = new StringBuilder();

   inClause.append(columnName + " IN (");

   for (int placeholderIndex = 0; placeholderIndex < numberPlaceholders; placeholderIndex++)

   {

      inClause.append("?, ");

   }

   inClause.delete(inClause.length()-2, inClause.length());

   inClause.append(")");

   return inClause.toString();

}

JDK 11 introduced a set of useful new String methods that include String.repeat(int). The String.repeat(int) method boils these approaches for generating a custom IN operator with dynamic number of parameter placeholders to a single line as shown in the next code listing:

/**

 * Demonstrates JDK 11 {@link String#repeat(int)} approach

 * for building up the "IN" portion of a SQL statement with

 * multiple parameters.

 *

 * @param columnName Name of database column to be referenced

 *    in the "IN" clause.

 * @param numberPlaceholders Number of parameters for which

 *    placeholder question marks ("?") need to be added.

 * @return The "IN" portion of a SQL statement with the

 *    appropriate number of placeholder question marks.

 */

public String generateInClauseWithStringRepeat(

   final String columnName, final int numberPlaceholders)

{

   return columnName + " IN (" + "?, ".repeat(numberPlaceholders-1) + "?)";

}

With the use of String.repeat(int), a single line accomplishes the task at hand and there’s no need for explicit looping or explicit instantiation of a StringBuilder.

Building SQL OR Conditions with Dynamic Number of Parameters

Multiple SQL or conditions can be used instead of IN to test against multiple values. This is a must if, for example, the number of paramaters is over 1000 and you’re using an Oracle database that only allows IN to support up to 1000 elements.

Oracle Java Exam Prep, Oracle Java Tutorial and Material, Oracle Java Preparation, Oracle Java Guides
As with use of the IN condition, two commonly used approaches for building up the OR conditions for a dynamic number of parameter placeholders are to either to loop with a condition checking that each entry’s output is written correctly as it’s written or to remove extraneous characters after looping. These two approaches are shown in the next code listing:

/**

 * Demonstrates "traditional" approach for building up the

 * "OR" portions of a SQL statement with multiple parameters

 * that uses a conditional within a loop on the number of

 * parameters to determine how to best handle each.

 *

 * @param columnName Name of database column to be referenced

 *    in the "OR" clauses.

 * @param numberPlaceholders Number of parameters for which

 *    placeholder question marks ("?") need to be added.

 * @return The "OR" portions of a SQL statement with the

 *    appropriate number of placeholder question marks.

 */

public String generateOrClausesTraditionallyOne(

   final String columnName, final int numberPlaceholders)

{

   final StringBuilder orClauses = new StringBuilder();

   for (int placeholderIndex = 0; placeholderIndex < numberPlaceholders; placeholderIndex++)

   {

      if (placeholderIndex != numberPlaceholders-1)

      {

         orClauses.append(columnName).append(" = ? OR ");

      }

      else

      {

         orClauses.append(columnName).append(" = ?");

      }

   }

   return orClauses.toString();

}

/**

 * Demonstrates "traditional" approach for building up the

 * "OR" portions of a SQL statement with multiple parameters

 * that treats each looped-over parameter index the same and

 * the removes the extraneous syntax from the end of the

 * generated string.

 *

 * @param columnName Name of database column to be referenced

 *    in the "OR" clauses.

 * @param numberPlaceholders Number of parameters for which

 *    placeholder question marks ("?") need to be added.

 * @return The "OR" portions of a SQL statement with the

 *    appropriate number of placeholder question marks.

 */

public String generateOrClausesTraditionallyTwo(

   final String columnName, final int numberPlaceholders)

{

   final StringBuilder orClauses = new StringBuilder();

   for (int placeholderIndex = 0; placeholderIndex < numberPlaceholders; placeholderIndex++)

   {

      orClauses.append(columnName + " = ? OR ");

   }

   orClauses.delete(orClauses.length()-4, orClauses.length());

   return orClauses.toString();

}

The use of String.repeat(int) makes this easy as well:

/**

 * Demonstrates JDK 11 {@link String#repeat(int)} approach

 * for building up the "OR" portions of a SQL statement with

 * multiple parameters.

 *

 * @param columnName Name of database column to be referenced

 *    in the "OR" clauses.

 * @param numberPlaceholders Number of parameters for which

 *    placeholder question marks ("?") need to be added.

 * @return The "OR" portions of a SQL statement with the

 *    appropriate number of placeholder question marks.

 */

public String generateOrClausesWithStringRepeat(

   final String columnName, final int numberPlaceholders)

{

   final String orPiece = columnName + " = ? OR ";

   return orPiece.repeat(numberPlaceholders-1) + columnName + " = ?";

}

Saturday, December 26, 2020

Debugging a Java Program with Eclipse

One of the benefits that Eclipse provides is the ability to run code interactively by using its integrated debugger. Examining variables and expressions while executing code step-by-step is an invaluable tool for investigating problems with your code. This excerpt from Chapter 2 of Eclipse in Action: A guide for Java developers provides an introduction to creating a Java project, running a Java program, and debugging it.

Creating a Java Project

When Eclipse is first started, it is in the Resource perspective, a set of panes for managing projects, folders, files, and other resources. In Eclipse parlance, each of these panes is called a view, and a complete set of views is called a perspective. In the Resource perspective, you can navigate or create resources by using the view at the top left, the Navigator view.

Before you can do anything else in Eclipse, such as creating a Java program, you need to create a Java project. To create a new Java project, follow these steps:

1. Right-click in the Navigator view to bring up a context menu and select New->Project.

2. In the New Project dialog box, Eclipse presents the project options: Java, Plug-in Development, and Simple. Because you want to create a Java program, select Java on the left side of the dialog box.

3. Select Java Project on the right. If you've installed other types of Java development plug-ins, various other types of Java projects may potentially be listed here (EJBs and servlets, for example). But the JDT that comes standard with Eclipse only offers support for standard Java applications, so you must choose the Java Project option.

4. Click Next to start the New Java Project Wizard. (A wizard is a set of dialog boxes that prompts you through a set of well-defined, sequential steps necessary to perform a specific task. This feature is used extensively throughout Eclipse.)

5. The first dialog box prompts you for a project name. This is a simple "Hello, world" example, so enter Hello. Clicking Next would take you to a dialog box that lets you change a number of Java build settings, but for this example you don't need to change anything.

6. Click Finish.

7. Eclipse notifies you that this kind of project is associated with the Java perspective and asks whether you want to switch to the Java perspective. Check the Don't Show Me This Message Again box and click Yes.

Creating a Java class

Once you've created a project for it to live in, you can create your first Java program. Although doing so is not necessary, it's a good practice to organize your Java classes into packages. It's conventional to use a domain name as the package name because this reduces the likelihood of name collisions—that is, more than one class with exactly the same name. You can use a registered domain name if you have one, but if not, you can use any convenient, unique, ad hoc name, especially for private use. Here, we'll use org.eclipseguide. To this, add a name for this particular project: hello. All together, the package name is org.eclipseguide.hello.

Follow these steps to create your Java program:

1. Right-click on the project and select New.Class to bring up the New Java Class Wizard.

2. The first field, Source Folder, is by default the project's folder—leave this as it is.

3. Enter org.eclipseguide.hello in the Package field.

4. In the class name field, enter HelloWorld.

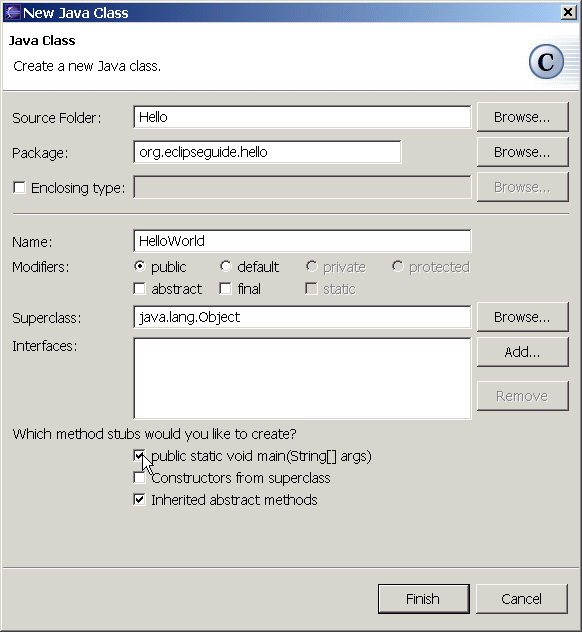
5. In the section Which Method Stubs Would You Like to Create?, check the box for public static void main(String[] args). The completed New Java Class dialog box is shown in Figure 1.

6. Click Finish, and the New Java Class Wizard will create the appropriate directory structure for the package (represented in the Navigator by the entry org.eclipseguide.hello under the Hello project) and the source file HelloWorld.java under this package name.

Oracle Java Study Material, Oracle Java Tutorial and Material, Oracle Java Guides, Java Career, Oracle Java Preparations

Figure 1: Creating the HelloWorld class using the New Java Class Wizard

The code that's automatically generated includes a method stub for main(). You need to add any functionality, such as printing your "Hello, world!" yourself. To make debugging more interesting, you'll add a separate method with a loop to print. Alter the code generated by Eclipse as follows:

  public class HelloWorld {

        public static void main(String[] args) {
               say("Hello, world!");
        }
        public static void say(String msg) {
               for (int i = 0; i < 3; i++) {
                   System.out.println(msg);
              }
        }
  }

Running the Java Program


You're now ready to run this program. There are several things you might want to consider when running a Java program, including the Java runtime it should use, whether it will take any command-line parameters, and, if more than one class has a main() method, which one to use. The standard way to start a Java program in Eclipse is to select Run->Run from the Eclipse menu. Doing so brings up a dialog box that lets you configure the launch options for the program; before running a program, you need to create a launch configuration or select an existing launch configuration.

For most simple programs, you don't need a special launch configuration, so you can use a much easier method to start the program: First, make sure the HelloWorld source is selected in the editor (its tab is highlighted in blue) and then do the following from the Eclipse menu:

1. Select Run->Run As->Java Application.

2. Because you've made changes to the program, Eclipse prompts you to save your changes before it runs the program. Click OK.

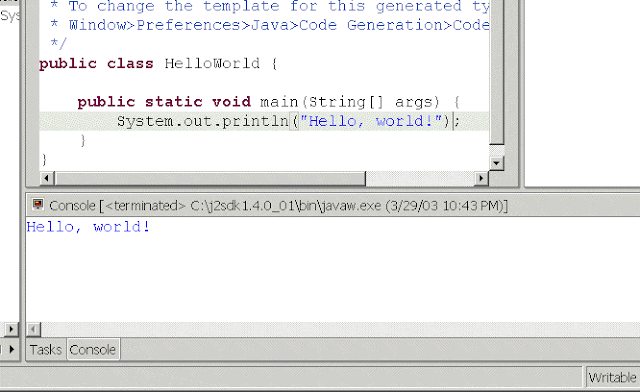
3. The Task view changes to a Console view and displays your program output (see Figure 2).

Oracle Java Study Material, Oracle Java Tutorial and Material, Oracle Java Guides, Java Career, Oracle Java Preparations

Figure 2: The Eclipse Console view displays the output from the HelloWorld program.

You may wonder why no separate step is required to compile the .java file into a .class file. This is the case because the Eclipse JDT includes a special incremental compiler and evaluates your source code as you type it. Thus it can highlight things such as syntax errors and unresolved references as you type. (Like Eclipse's other friendly features, this functionality can be turned off if you find it annoying.) If compilation is successful, the compiled .class file is saved at the same time your source file is saved.

Debugging the Java Program


Eclipse's ability to run the code interactively is one of its most powerful features. By using theJDT debugger, you can execute your Java program line by line and examine the value of variables at different points in the program, for example. This process can be invaluable in locating problems in your code.

To prepare for debugging, you need to set a breakpoint in your code so the debugger suspends execution and allows you to debug—otherwise, the program will run to completion without letting you do any debugging. To set a breakpoint, double-click in the gray margin on the left side of the editor, next to the call to say(). A blue dot will appear, indicating an active breakpoint.

Starting the program under the debugger is similar to running it. Eclipse provides two options: Use the full-service Run->Debug menu selection to use a launch configuration, or use the express Run->Debug As->Java Application selection if the default options are okay. Here, as before, you can use the latter.

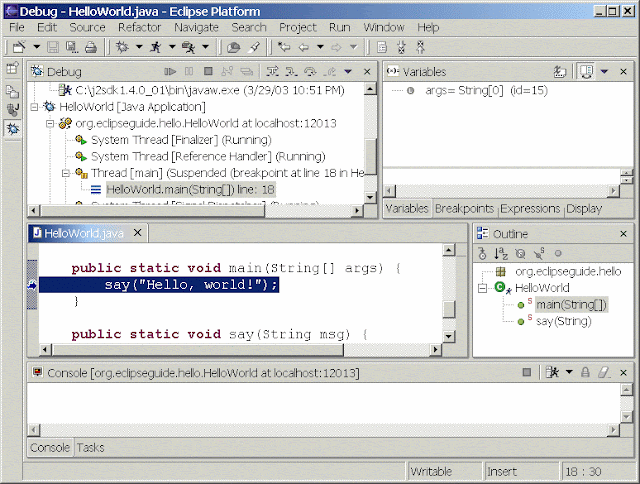
Make sure the source for HelloWorld is selected in the editor and select Run->Debug As->Java Application from the main menu. Eclipse will start the program, change to the Debug perspective, and suspend execution at the breakpoint (see Figure 3).

Oracle Java Study Material, Oracle Java Tutorial and Material, Oracle Java Guides, Java Career, Oracle Java Preparations

Figure 3: Debugging HelloWorld: Execution is suspended at the first breakpoint.

The Debug perspective includes several new views that are, not surprisingly, especially useful for debugging. First, at top left, is the Debug view (not to be confused with the Debug perspective to which it belongs), which shows the call stack and status of all current threads, including any threads that have already run to completion. Your program, which Eclipse started, has hit a breakpoint, and its status is shown as Suspended.

Stepping through code


In the title bar of the Debug view is a toolbar that lets you control the program's execution. The first few tool buttons, which resemble the familiar controls of electronic devices such as CD players, allow you to resume, suspend, or terminate the program. Several buttons incorporate arrows in their design; these allow you to step through a program a line at a time. Holding the mouse over each button in turn will cause tool tips to appear, identifying them as Step With Filters, Step Into, Step Over, Step Return, and so on.

For example, click the second step button, Step Into. Doing so executes the line of code that is currently highlighted in the editor area below the Debug view: the call to the say() method. Step Into, as the name suggests, takes you into the method that is called. After clicking Step Into, the highlighted line is the first executable line in say()—the for statement.

The Step With Filters button works the same as Step Into, but it's selective about what methods it will step into. You normally want to step only into methods in your own classes and not into the standard Java packages or third-party packages. You can specify which methods Step Filter will execute and return from immediately by selecting Window.Preferences.Java.Debug.Step Filtering and defining step filters by checking the packages and classes listed there. Taking a moment to set these filters is well worth the trouble, because Step With Filters saves you from getting lost deep in unknown code—something that can happen all too often when you use Step Into.

Evaluating variables and expressions


To the right of the Debug view is a tabbed notebook containing views that let you examine and modify variables and breakpoints. Select the Variables tab (if it isn't already selected). This view shows the variables in the current scope and their values; before entering the for loop, this view includes only the say() method's msg parameter and its value, "Hello, world!" Click either Step Over or Step Into to enter the for loop. (Both have the same effect here, because you don't call any methods in this line of code.) The Variables view will display the loop index i and its current value, 0.

Sometimes a program has many variables, but you're interested in only one or a few. To watch select variables or expressions, you can add them to the watch list in the Expression view. To do this, select a variable—i, for instance—by double-clicking on it in the editor, and then right-clicking on the selection and choosing Watch from the context menu. The variable (and its value, if it's in scope) will appear in the Expressions view.

One significant advantage of watching variables in the Variables and Expressions views over using print statements for debugging is that you can inspect objects and their fields in detail and change their values—even normally immutable strings. Return to the Variables view and expand the msg variable to show its attributes. One of these is a char array, value, which can be expanded to reveal the individual characters in the msg String. For example, double-click on the character H, and you will be prompted to enter a new value, such as J.

The Display view is in the same tabbed notebook. It allows you to enter any variables that are in scope, or arbitrary expressions including these variables. Select Display view and enter the following, for example:

msg.charAt(i)

To immediately evaluate this expression, you must first select it and then click the second Display view tool button (Display Result of Evaluating Selected Text), which displays the results in the Display view. It's usually better to click the first tool button (Inspect Result of Evaluating Selected Text), because it adds the expression to the Expressions view. Either way, the value displayed is not automatically updated as the variables in the expression change; but in the Expressions view, you have the option of converting the expression into a watch expression, which is updated as you step through the code. To do this, change to the Expressions view. Notice that the Inspect icon (a magnifying glass) appears next to the expression. Click on the expression and select Convert to Watch Expression from the context menu. The icon next to the expression will change to the Watch icon.

Let's go back to stepping through the code. You previously left the cursor at the call to System.out.println(). If you want to see the code for System.out.println(), you can click Step Into; otherwise, click Step Over to execute the System.out.println() method and start the next iteration of the for loop.

Below the editor area is another tabbed notebook, which includes a Console view. Program output appears here; if you made the earlier change to the variable msg, the line "Jello, world!" will appear. You can either continue to click Step Over until the loop terminates or, if you find this process tedious, click Step Return to immediately finish executing the say() method and return to the main() method. Or, just click the Resume button to let the program run to the end.

Friday, December 25, 2020

Constrast DataWeave and Java mapping operations

Oracle Java Tutorial and Material, Oracle Java Guides, Oracle Java Exam Prep, Oracle Java Career

Main points:

◉ DataWeave 2.0 provides mapping capabilities

◉ Java and DataWeave can achieve the same mappings

◉ DataWeave mapping operator is less verbose than Java

DataWeave map operator

The DataWeave 2.0 (Mule 4) map operator shares similarities with the map() method from Java’s Stream class.

Mapping is a transformative operation

The idea of mapping is to transform each element of an array and output a new array of transformed elements. An expression is provided that performs the transformation. It is applied to each element in the array and collected into another new array.

Apply a mapping to an array in Java

In Java, a transformative expression is applied by passing it to the map() method of the Stream class. It is applied in turn to each element of the array and collected to a new List. In the following code snippet the inline array is transformed into a stream so that mapping can be performed.

List<String> pets = Arrays.asList(

  new String[] { "cat", "dog", "fish" }

);

List<String> newPets = pets.stream()

  .map(e -> e.toUpperCase())

  .collect(Collectors.toList());

The transformation is performed by the lambda expression e -> e.toUpperCase() where the variable e represents each element in the array. The result of the transformation is added to a new List using a collector Collectors.toList().

There is a ‘short cut’ expression that you can use in place of the explicit lambda expression. It is String::toUpperCase, the above code would now look as follows.

pets.stream()

  .map(String::toUpperCase)

  .collect(Collectors.toList());

Apply a mapping to an array in DataWeave

In DataWeave a transformative expression is applied to each element of an array and outputted to a new array containing these new transformed elements.

var pets = ["cat", "dog", "fish"]

---

pets map upper($)

Oracle Java Tutorial and Material, Oracle Java Guides, Oracle Java Exam Prep, Oracle Java Career
The upper() function is applied to each element in the pets array and transformed. Each transformed element is put into a new array. This new array is the output of this operation. The dollar ($) symbol represents each element in the array as the map function iterates over the array. The upper() function is a lambda function from the dw::Core module. It is automatically imported into all DataWeave scripts.

Final thoughts

DataWeave has been designed to transform data and does so in a performant way. The code is concise and easy to understand. As you can see Java is more verbose but provides much more capabilities than data transformation.

Wednesday, December 23, 2020

Java – Get Time In MilliSeconds

Oracle Java Tutorial and Material, Oracle Java Certification, Oracle Java Prep

A quick guide to get the current date time in milliseconds using Date, Calendar and java 8 api classes.

1. Overview

In this tutorial, We’ll learn how to get the time in milliseconds in java. Time in milliseconds is the right way and format in storing into the database for date time columns. Because this is stored as Number type and which reduces the space than DateTime type in SQL.

Let us come to our topic today is getting the time milliseconds can be retrieved from Date, Calendar and java 8 api classes such Instant, ZonedDateTime classes.

2. Using java.util.Date

First, we’ll try with the simple way to get the time in milliseconds format is from Date class. Date class has a method getTime() which returns the milliseconds in long value for the given time or current time.

package com.javaprogramto.java8.dates.milliseconds;

import java.util.Date;

/**

 * Example to get time in milli seconds in java using util Date api

 * 

 * @author JavaProgramTo.com

 *

 */

public class MilliSecondsFromDate {

    public static void main(String[] args) {

        // Getting the current date from Date class.

        Date currentDate = new Date();

        // Getting the time in milliseconds.

        long milliSeconds = currentDate.getTime();

        // printing the values

        System.out.println("Current date : "+currentDate);

        System.out.println("Current date time in milliseconds : "+milliSeconds);

        // Creating the future date

        Date futureDate = new Date(2025, 01, 01, 02, 30, 50);

        // Getting the future date

        milliSeconds = futureDate.getTime();

        // printing the future date time values

        System.out.println("Future date : "+futureDate);

        System.out.println("Future date time in milliseconds : "+milliSeconds);

    }

}

Output:

Current date : Sat Dec 12 21:48:25 IST 2020

Current date time in milliseconds : 1607789905027

Future date : Sun Feb 01 02:30:50 IST 3925

Future date time in milliseconds : 61696501250000

3. Using java.util.Calendar

Next, use the Calendar class to get the time in milli seconds. This class has a method getTimeInMillis() which returns the milliseconds for the time.

package com.javaprogramto.java8.dates.milliseconds;

import java.util.Calendar;

import java.util.Locale;

/**

 * Example to get time in milli seconds in java using Calendar api

 * 

 * @author JavaProgramTo.com

 *

 */

public class MilliSecondsFromCalendar {

    public static void main(String[] args) {

        // Getting the current date from Calendar class.

        Calendar calendar = Calendar.getInstance();

        // Getting the time in milliseconds.

        long milliSeconds = calendar.getTimeInMillis();

        // printing the values

        System.out.println("Current calender time in milliseconds : "+milliSeconds);

        // Creating another calendar object for Canada locale

        Calendar canadaLocale = Calendar.getInstance(Locale.CANADA);

        // Getting the future date

        milliSeconds = canadaLocale.getTimeInMillis();

        // printing the future date time values

        System.out.println("Future date time in milliseconds : "+milliSeconds);

    }

}

Output:

Current calender time in milliseconds : 1607790439838
Future date time in milliseconds : 1607790439859

4. Using Java 8 API


Oracle Java Tutorial and Material, Oracle Java Certification, Oracle Java Prep

There are multiple ways to get the date time in milliseconds in java 8 date time api using Instant and ZonedDateTime classes.

Use toEpochMilli() method to get the date time in milli seconds epoch format.

package com.javaprogramto.java8.dates.milliseconds;
 
import java.time.Instant;
import java.time.ZonedDateTime;
 
/**
 * Example to get time in milli seconds in java 8 Using ZonedDateTime and Instant.
 * 
 * @author JavaProgramTo.com
 *
 */
public class MilliSecondsInJava8 {
 
    public static void main(String[] args) {
         
        // Getting milli seconds from ZonedDateTime class.
         
        // Creating zoned date time
        ZonedDateTime dateTime = ZonedDateTime.now();
         
        // getting the instant from zoned date time
        Instant instant = dateTime.toInstant();
         
        // Converting Instant time to epoch format milli seconds
        long timeInMilliSeconds = instant.toEpochMilli();
         
        // print the output
        System.out.println("Milli seconds from ZonedDateTime : "+timeInMilliSeconds);
         
        // Getting the milli seconds from Instant class.
        // Creating Instant object
        Instant instantTime = Instant.now();
         
        // Getting millis epoch value
        timeInMilliSeconds = instantTime.toEpochMilli();
         
        // printing
        System.out.println("Milli seconds from Instant : "+timeInMilliSeconds);
    }
}

Output:

Milli seconds from ZonedDateTime : 1607790957290
Milli seconds from Instant : 1607790957291

Monday, December 21, 2020

Java Program To Check Palindrome String Using Recursion

Oracle Java Tutorial and Material, Oracle Java Certifications, Java Exam Prep, Oracle Java Career

1. Overview

In this tutorial, We’ll learn how to check the string is palindrome using Recursive function in java.

String palindrome means if the string reversed value is equal to the original string.

Recursion means calling the one function from the same function. This is a computer programming concept and it is implemented in java.

2. Java String Palindrome Recursive example

Below example code is implemented using recursion approach. In that isPalindrome() method is getting called from the same method with substring value of original string.

Example: 

Step 1: Input string is : madam

Step 2: First call to isPalindrome(“madam”) – first and last character is same -> m == m -> true

Step 3: Next, calling the same isPalindrome(“ada”) with “ada” – first and last character same -> a == a -> true

Step 4: Next, again calling the same method isPalindrome() with “d” value. Now the first if condition checks that length of this string is 1 so it returns true. This value passed to the previous step where input is “ada”.

Step 5: Again from “ada” call returns true value to “madam” input call. So, finally it returns true to the main method.

All of these methods are placed inside a Runtime Stack and will be called back from top.

If the input is 1234, first and last character is not same so it comes to final return false. Hence, the string 1234 is not a palindrome.

package com.javaprogramto.programs.strings;

public class StringPalindromeRecursiveExample {

    public static void main(String[] args) {

        // input string 1234

        String string = "1234";

        /*

         * If function returns true then the string is palindrome otherwise not

         */

        if (isPalindrome(string))

            System.out.println(string + " is a palindrome");

        else

            System.out.println(string + " is not a palindrome");

        // input string 1234

        String string2 = "madam";

        /*

         * If function returns true then the string is palindrome otherwise not

         */

        if (isPalindrome(string2))

            System.out.println(string2 + " is a palindrome");

        else

            System.out.println(string2 + " is not a palindrome");


    }

    /**

     * Recursive function to check the string is palindrome or not.

     * 

     * @param s

     * @return

     */

    public static boolean isPalindrome(String s) {

        // if the string has one or zero characters then recursive call is stopped.

        if (s.length() == 0 || s.length() == 1)

            return true;

        // checking the first and last character of the string. if equals then call the

        // same function with substring from index 1 to length -1. Because substring

        // excludes the endIndex.

        // if these two values are not same then string is not Palindrome so this

        // returns false.

        if (s.charAt(0) == s.charAt(s.length() - 1))

            return isPalindrome(s.substring(1, s.length() - 1));

        // this statment is executed if and if only first and last character of string

        // at any time is not equal.

        return false;

    }

}

Output:

1234 is not a palindrome

madam is a palindrome

Friday, December 18, 2020

Converting Between LocalDate and SQL Date In Java 8

Oracle Java Exam Prep, Oracle Java Certification, Oracle Java Guides, Oracle Java Prep

A quick guide to convert between LocalDate and java.sql.Date objects in java 8 with examples.

1. Overview

In this tutorial, We’ll learn how to convert java.time.LocalDate to java.sql Date in java 8 and vice versa.

This is simple to do but when working jpa framework it is bit different to deal with the table column type.

First look at the simple conversions between LocalDate and sql Date objects in java. Next, look at the JPA problem.

2. Direction conversion between LocalDate and SQL Date

2.1 Convert LocalDate to SQL Date

Use direct method from sql Date.valueOf() method which takes the LocalDate object. So, We can pass the object of LocalDate.now() or LocalDate.of() method.

Look at the below example.

package com.javaprogramto.java8.dates.conversion.sql;

import java.sql.Date;

import java.time.LocalDate;

public class LocalDateToSQLDateExample {

    public static void main(String[] args) {

        // creating current local date using now() method and which will return the

        // curren date.

        LocalDate currentDate = LocalDate.now();

        // LocalDate to SQL date using valueOf() method.

        Date sqlDate = Date.valueOf(currentDate);

        // printing

        System.out.println("With current local date");

        System.out.println("LocalDate : " + currentDate);

        System.out.println("SQL Date : " + sqlDate);

        // working with different dates.

        LocalDate pastDate = LocalDate.of(1990, 01, 01);

        LocalDate futureDate = LocalDate.of(2050, 01, 01);

        // converting Local dates to sql dates

        Date pastSqlDate = Date.valueOf(pastDate);

        Date futureSqlDate = Date.valueOf(futureDate);

        System.out.println("\nWith different local dates");

        System.out.println("Past LocalDate : " + pastDate);

        System.out.println("Past SQL Date : " + pastSqlDate);

        System.out.println("Future LocalDate : " + futureDate);

        System.out.println("Future SQL Date : " + futureSqlDate);

    }

}

Output:

With current local date

LocalDate : 2020-12-04

SQL Date : 2020-12-04

With different local dates

Past LocalDate : 1990-01-01

Past SQL Date : 1990-01-01

Future LocalDate : 2050-01-01

Future SQL Date : 2050-01-01

If null value is passed to the Date.valueOf() method, it will throw NullPointerException.

LocalDate nullLocalDate = null;
Date nullDate = Date.valueOf(nullLocalDate);

Output:

Exception in thread "main" java.lang.NullPointerException
    at java.sql/java.sql.Date.valueOf(Date.java:291)
    at com.javaprogramto.java8.dates.conversion.sql.LocalDateToSQLDateExample.main(LocalDateToSQLDateExample.java:38)

2.2 Convert SQL Date to LocalDate

Use toLocalDate() method to convert sql date to time LocalDate in java 8.

package com.javaprogramto.java8.dates.conversion.sql;
 
import java.sql.Date;
import java.time.LocalDate;
 
public class SQLDateToLocalDateExample {
 
    public static void main(String[] args) {
 
        // Creating sql date
        Date sqlDate = Date.valueOf("2020-12-31");
         
        // converting sql date to localdate using toLocalDate() method.
        LocalDate localDate1 = sqlDate.toLocalDate();
 
        // printing the local date.
        System.out.println("Local Date 1 : "+localDate1);
    }
}

Output:

Local Date 1 : 2020-12-31

3. JPA Problem Solving AttributeConverter


If you are using the LocalDate as column type in the JPA entity and this is should be having some mapping to the the database columns type. For this type, we assume that sql Date is the right one for the column type. But, database can not recognize the type LocalDate and JPA will map this to blob type rather than java sql Date object.

Oracle Java Exam Prep, Oracle Java Certification, Oracle Java Guides, Oracle Java Prep
This is the problem now. To solve this, we should tell to JPA that if there is any column with LocalDate type, convert it into java.sql.Date when inserting into database and convert sql date to LocalDate while retrieving the records from database.

Java persistence api is added with AttributeConverter interface in jdk 1.7.

We need to implement AttributeConverter interface and need to specify the input object type and converted result object type.

This interface has two abstract methods convertToDatabaseColumn() and 
convertToEntityAttribute().

convertToDatabaseColumn() is to convert the LocalDate to sql date and saves into database.

convertToEntityAttribute() method is executed when fetching the records from database and converts into LocalDate.

We have used Optional inside these two methods to better handle null references to avoid null pointer exception.

import javax.persistence.AttributeConverter;
import javax.persistence.Converter;
import java.sql.Date;
import java.time.LocalDate;
import java.util.Optional;
 
@Converter(autoApply = true)
public class LocalDateConverterExample implements AttributeConverter<LocalDate, Date> {
 
 
    // converts LocalDate to sql date using valueOf() method
    @Override
    public Date convertToDatabaseColumn(LocalDate localDate) {
        return Optional.ofNullable(localDate)
          .map(Date::valueOf)
          .orElse(null);
    }
 
    // converts sql date to LocalDate using toLocalDate() method
    @Override
    public LocalDate convertToEntityAttribute(Date date) {
        return Optional.ofNullable(date)
          .map(Date::toLocalDate)
          .orElse(null);
    }
}

Observe the above code, We’ve used the @Converter annotation with element autoApply to true. That means apply this conversion is applied to all targeted types by the persistence provider.

But by default this property autoApply is set to false.

If there is more than one converter defined for the same target type, the Convert annotation should be used to explicitly specify which converter to use.

Thursday, December 17, 2020

Static vs Dynamic Binding in Java

Oracle Java Exam Prep, Oracle Java Certification, Oracle Java Career

Static Binding: The binding which can be resolved at compile time by compiler is known as static or early binding. Binding of all the static, private and final methods is done at compile-time.

Why binding of static, final and private methods is always a static binding?

Static binding is better performance wise (no extra overhead is required). Compiler knows that all such methods cannot be overridden and will always be accessed by object of local class. Hence compiler doesn’t have any difficulty to determine object of class (local class for sure). That’s the reason binding for such methods is static.

Let’s see by an example

public class NewClass { 

public static class superclass { 

static void print() 

System.out.println("print in superclass."); 

public static class subclass extends superclass { 

static void print() 

System.out.println("print in subclass."); 

public static void main(String[] args) 

superclass A = new superclass(); 

superclass B = new subclass(); 

A.print(); 

B.print(); 

Before scrolling further down, Guess the output of the above program?

Output:

print in superclass.

As you can see, in both cases print method of superclass is called. Lets see how this happens

◉ We have created one object of subclass and one object of superclass with the reference of the superclass.

◉ Since the print method of superclass is static, compiler knows that it will not be overridden in subclasses and hence compiler knows during compile time which print method to call and hence no ambiguity.

As an exercise, reader can change the reference of object B to subclass and then check the output.

Dynamic Binding: In Dynamic binding compiler doesn’t decide the method to be called. Overriding is a perfect example of dynamic binding. In overriding both parent and child classes have same method . Let’s see by an example

public class NewClass { 
public static class superclass { 
void print() 
System.out.println("print in superclass."); 

public static class subclass extends superclass { 
@Override
void print() 
System.out.println("print in subclass."); 

public static void main(String[] args) 
superclass A = new superclass(); 
superclass B = new subclass(); 
A.print(); 
B.print(); 

Output:

print in superclass.
print in subclass.

Oracle Java Exam Prep, Oracle Java Certification, Oracle Java Career
Here the output differs. But why? Let’s break down the code and understand it thoroughly.

◉ Methods are not static in this code.

◉ During compilation, the compiler has no idea as to which print has to be called since compiler goes only by referencing variable not by type of object and therefore the binding would be delayed to runtime and therefore the corresponding version of print will be called based on type on object.

Important Points


◉ private,  final and static members (methods and variables) use static binding while for virtual methods (In Java methods are virtual by default) binding is done during run time based upon run time object.

◉ Static binding uses Type information for binding while Dynamic binding uses Objects to resolve binding.

◉ Overloaded methods are resolved (deciding which method to be called when there are multiple methods with same name) using static binding while overridden methods using dynamic binding, i.e, at run time.

Wednesday, December 16, 2020

How to find if JVM is 32 or 64 bit from Java program

Oracle Java Tutorial and Material, Oracle Java Exam Prep, Oracle Java Guides, Oracle Java Prep, Oracle Java Certification

You can find JVM bit size e.g. 32 bit or 64 bit by using either running java command from the command prompt or by using System.getProperty() from Java program. The question is why do you want to know hardware or platform configuration while writing Java code which is supposed to write once and read anywhere(32 bit, 64 bit, etc)? Yes we don't really need to know whether JVM is 32 bit or 64 bit more often but there are many situations when this matters

Check if JVM is 32 or 64 bit from Java program:

1) Since in 32 bit JVM maximum heap size in Java can not be more than 4GB (theoretically) , if you can get JVM version from a script like running java command you can have different memory configuration for your application. Also, if there is any specific JVM options which only applicable to 64 bit JVM than you can set those.

2) If your Java application is using native libraries then you certainly want to know whether Java running on the host is 32 bit or 64 bit because native library may have different versions loaded for 32 bit or 64-bit architectures.

I am sure there could be some more practical reasons when you like to find JVM bit size or whether JVM is 64 bit or not

Now let's come to the second part of how to find if JVM is 32 bit or 64 bit in Java.

How to check if JVM is 32 or 64 bit in host

Oracle Java Tutorial and Material, Oracle Java Exam Prep, Oracle Java Guides, Oracle Java Prep, Oracle Java Certification
As I said earlier there are two different approaches either using Java system property like "sun.arch.data.model" or "os.arch" or by running java command from the script and checking its output for certain characters to identify whether JVM is 64 bit or not. let's see an example of different ways to find if JVM is 32 bit or 64 bit:

1) By using System property sun.arch.data.model:

You can find whether your JVM is 32 bit or 64 bit by calling System.getProperty("sun.arch.data.model") at least on Sun's hotspot JVM. I don't expect this to be run on any other Vendor-specific JVM but since most of the programmer or project uses Sun's hotspot JVM. this is a handy option. 

For 32 bit JVM "sun.arch.data.model" will be 32 and for 64 bit JVM, this would be 64. here is an example:

System.out.println("JVM Bit size: " + System.getProperty("sun.arch.data.model"));

Output:

JVM Bit size: 32 //JVM is 32 bit

JVM Bit size: amd64 //JVM is 64 bit

2) By using System.getProperty("os.arch")

"os.arch" is another System property which you can use to find whether installed JRE or JVM is 32 bit or 64 bit. by name it sounds that it will return operating system arch but you can still give it a try. Though I haven't tested on all different JVM, I have read that it can indeed return JVM Bitness.If you try this on 64 bit machine and 32 bit JVM combination than please let us know what does it return. here is what it returns in case of 32 bit JVM:

System.out.println("JVM Bit size: " + System.getProperty("os.arch"));

JVM Bit size: x86 //on 32 bit JVM

JVM Bit size: amd64 //on 64 bit JVM

3) java -d64 -version

This is another way of finding whether installed JRE or JVM is 64 bit or not but unfortunately, it

doesn't work with all windows version like Windows XP but it works fine on Windows 7. So you still

use it on Windows7 Machine for finding JVM bitness.

4) java -version

Plain old java -version reveals information about JVM bitness only if installed JRE is 64 bit, in case

of 32 bit JVM it doesn't provide any information related to architecture but in the case of 64 bit JVM it

prints :

C:\>java -version

java version "1.6.0_25"

Java(TM) SE Runtime Environment (build 1.6.0_25-b06)

Java HotSpot(TM) 64-Bit Server VM (build 20.0-b11, mixed mode)

while in case of 32 bit JVM it will print

C:\> java -version

java version "1.6.0_26"

Java(TM) SE Runtime Environment (build 1.6.0_26-b03)

Java HotSpot(TM) Client VM (build 20.1-b02, mixed mode, sharing)

That’s all on how to find if JVM is 32 bit or 64 bit from Java program and command prompt. As I said its particularly useful if you have a dependency on native libraries which has a different build for 32 bit or 64-bit architecture. Let me know if you have some more ways to find JVM is 64 bit or not, you can also share on which scenario you need to know JVM bitness.

Tuesday, December 15, 2020

AWS SDK 2 for Java and storing a Json in DynamoDB

Oracle Java Tutorial and Material, Oracle Java Certification, Oracle Java Career

AWS DynamoDB is described as a NoSQL key-value and a document database. In my work I mostly use the key-value behavior of the database but rarely use the document database features, however  the document database part is growing on me and this post highlights some ways of using the document database feature of DynamoDB along with introducing a small utility library built on top of AWS SDK 2.X for Java that simplifies using document database features of AWS DynamoDB

The treatment of the document database features will be very high level in this post, I will plan a follow up which goes into more details later

DynamoDB as a document database

So what does it mean for AWS DynamoDB to be treated as a document database. Consider a json representation of an entity, say something representing a Hotel:

{

    "id": "1",

    "name": "test",

    "address": "test address",

    "state": "OR",

    "properties": {

        "amenities":{

            "rooms": 100,

            "gym": 2,

            "swimmingPool": true                   

        }                    

    },

    "zip": "zip"

}

This json has some top level attributes like “id”, a name, an address etc. But it also has a free form “properties” holding some additional “nested” attributes of this hotel. 

A document database can store this document representing the hotel in its entirety OR can treat individual fields say the “properties” field of the hotel as a document. 

A naive way to do this will be to simply serialize the entire content into a json string and store it in, say for eg, for the properties field transform into a string representation of the json and store in the database, this works, but there are a few issues with it. 

1. None of the attributes of the field like properties can be queried for, say if I wanted to know whether the hotel has a swimming pool, there is no way just to get this information of of the stored content. 

2. The attributes cannot be filtered on – so say if wanted hotels with atleast 2 gyms, this is not something that can be filtered down to. 

A document database would allow for the the entire document to be saved, individual attributes, both top level and nested ones, to be queried/filtered on. 

So for eg, in the example of “hotel” document the top level attributes are “id”, “name”, “address”, “state”, “zip” and the nested attributes are “properties.amenities.rooms”, “properties.amenities.gym”, “properties.amenities.swimmingPool” and so on.

AWS SDK 2 for DynamoDB and Document database support

If you are writing a Java based application to interact with a AWS DynamoDB database, then you would have likely used the new AWS SDK 2 library to make the API calls. However one issue with the library is that it natively does not support a json based document model. Let me go into a little more detail here.  

From the AWS SDK 2 for AWS DynamoDB’s perspective every attribute that is saved is an instance of something called an AttributeValue. A row of data, say for a hotel, is a simple map of “attribute” names to Attribute values, and a sample code looks something like this:

val putItemRequest = PutItemRequest.builder()

    .tableName(TABLE_NAME)

    .item(

        mapOf(

            ID to AttributeValue.builder().s(hotel.id).build(),

            NAME to AttributeValue.builder().s(hotel.name).build(),

            ZIP to AttributeValue.builder().s(hotel.zip).build(),

            STATE to AttributeValue.builder().s(hotel.state).build(),

            ADDRESS to AttributeValue.builder().s(hotel.address).build(),

            PROPERTIES to objectMapper.writeValueAsString(hotel.properties),

            VERSION to AttributeValue.builder().n(hotel.version.toString()).build()

        )

    )

    .build()

dynamoClient.putItem(putItemRequest)

Oracle Java Tutorial and Material, Oracle Java Certification, Oracle Java Career
Here a map of each attribute to an AttributeValue is being created with an appropriate “type” of content, “s” indicates a string, “n” a number in the above sample.

There are other AttributeValue types like “m” representing a map and “l” representing a list.

The neat thing is that “m” and “l” types can have nested AttributeValues, which maps to a structured json document, however there is no simple way to convert a json to this kind of an Attribute Value and back.

So for eg. if I were to handle the raw “properties” of a hotel which understands the nested attributes, an approach could be this:

val putItemRequest = PutItemRequest.builder()

    .tableName(TABLE_NAME)

    .item(

        mapOf(

            ID to AttributeValue.builder().s(hotel.id).build(),

            NAME to AttributeValue.builder().s(hotel.name).build(),

            ZIP to AttributeValue.builder().s(hotel.zip).build(),

            STATE to AttributeValue.builder().s(hotel.state).build(),

            ADDRESS to AttributeValue.builder().s(hotel.address).build(),

            PROPERTIES to AttributeValue.builder()

                .m(

                    mapOf(

                        "amenities" to AttributeValue.builder()

                            .m(

                                mapOf(

                                    "rooms" to AttributeValue.builder().n("200").build(),

                                    "gym" to AttributeValue.builder().n("2").build(),

                                    "swimmingPool" to AttributeValue.builder().bool(true).build()

                                )

                            )

                            .build()

                    )

                )

                .build(),

            VERSION to AttributeValue.builder().n(hotel.version.toString()).build()

        )

    )

    .build()

Introducing the Json to AttributeValue utility library


This is exactly where the utility library that I have developed comes in. 
Given a json structure as a Jackson JsonNode it converts the Json into an appropriately nested AttributeValue type and when retrieving back from DynamoDB, can convert the resulting nested AttributeValue type back to a json. 
The structure would look exactly similar to the handcrafted sample shown before. So using the utility saving the “properties” would look like this:

val putItemRequest = PutItemRequest.builder()
    .tableName(TABLE_NAME)
    .item(
        mapOf(
            ID to AttributeValue.builder().s(hotel.id).build(),
            NAME to AttributeValue.builder().s(hotel.name).build(),
            ZIP to AttributeValue.builder().s(hotel.zip).build(),
            STATE to AttributeValue.builder().s(hotel.state).build(),
            ADDRESS to AttributeValue.builder().s(hotel.address).build(),
            PROPERTIES to JsonAttributeValueUtil.toAttributeValue(hotel.properties),
            VERSION to AttributeValue.builder().n(hotel.version.toString()).build()
        )
    )
    .build()
dynamoClient.putItem(putItemRequest)

and when querying back from DynamoDB, the resulting nested AttributeValue converted back to a json this way(Kotlin code in case you are baffled by the “?let”):

properties = map[PROPERTIES]?.let { attributeValue ->
    JsonAttributeValueUtil.fromAttributeValue(
        attributeValue
    )
} ?: JsonNodeFactory.instance.objectNode()

The neat thing is even the top level attributes can be generated given a json representing the entire Hotel type. So say a json representing a Hotel is provided:

val hotel = """
    {
        "id": "1",
        "name": "test",
        "address": "test address",
        "state": "OR",
        "properties": {
            "amenities":{
                "rooms": 100,
                "gym": 2,
                "swimmingPool": true                  
            }                    
        },
        "zip": "zip"
    }
""".trimIndent()
val attributeValue = JsonAttributeValueUtil.toAttributeValue(hotel, objectMapper)
dynamoDbClient.putItem(
    PutItemRequest.builder()
            .tableName(DynamoHotelRepo.TABLE_NAME)
            .item(attributeValue.m())
            .build()
    )