Monday, June 6, 2022

JVM c1, c2 compiler thread – high CPU consumption?

Core Java, JVM, Oracle Java Certification, Oracle Java Learning, Oracle Java Preparation, Java Tutorial and Material, Java Preparation Exam, Java Career, Java Jobs, Java Skills

c1, c2 compiler threads are created by Java virtual machine to optimize your application’s performance. Occasionally these threads will tend to consume high CPU. In this post, let’s learn little more about c1, c2 compiler threads and how to address their high CPU consumption.

After reading this post, terminologies like Hotspot JIT, c1 compiler threads, c2 compiler threads, code cache may not terrify you (as it used to terrify me in the past).

What is Hotspot JIT compiler?

Your application may have millions of lines of code. However only a small subset of code gets executed again & again. This small subset of code (also known as ‘Hotspot’) is responsible for your application performance. At runtime JVM uses this JIT (Just in time) compiler to optimize this hotspot code. Most of the time, code written by the application developers is not optimal. Thus, JVM’s JIT compiler optimizes the developer’s code for better performance. To do this optimization, JIT compiler uses C1, C2 compiler threads. 

What is Code Cache? 

Memory area that the JIT compiler uses for this code compilation is called ‘Code Cache’. This area resides outside of the JVM heap and metaspace. To learn about different JVM memory regions, you may refer to this video clip.

What is the difference between c1 & c2 compiler threads?

 During the early days of Java, there were two types of JIT compilers:

a. Client

b. Server

Based on what type of JIT compiler you want to use, appropriate JDKs have to be downloaded & installed. Say if you are building a desktop application, then JDK which has a ‘client’ JIT compiler needs to be downloaded. If you are building a server application, then JDK which has a ‘server’ JIT compiler needs to be downloaded.

Client JIT compiler starts compiling the code as soon as the application starts. Server JIT compiler will observe the code execution for quite some time. Based on the execution knowledge it gains, it will start doing the JIT compilation. Even though server JIT compilation is slow, code it produces will be far more superior and performant than the one produced by Client JIT compiler.

Today modern JDKs are shipped with both Client & Server JIT compilers. Both the compilers try to optimize the application code. During the application startup time, code is compiled using client JIT compiler. Later as more knowledge is gained, code is compiled using server JIT compiler. This is called Tiered compilation in JVM. 

JDK developers were calling them Client and Server JIT compilers, internally as c1 and c2 compilers. Thus the threads used by client JIT compiler are called c1 compiler threads. Threads used by the server JIT compiler are called c2 compiler threads.

c1, c2 compiler threads default size

Default number of c1, c2 compiler threads are determined based on the number of CPUs that are available on the container/device in which your application is running. Here is the table which summarizes the default number of c1, c2 compiler threads:

CPUs c1 threads   c2 threads
1 1 1
16 
32 
64 
128  10 
Fig: Default c1, c2 compiler thread count

You can change the compiler thread count by passing ‘-XX:CICompilerCount=N’ JVM argument to your application. One-third of the count you specify in ‘-XX:CICompilerCount’ will be allocated to the c1 compiler threads. Remaining thread count will be allocated to c2 compiler threads. Say suppose you are going to 6 threads (i.e., ‘-XX:CICompilerCount=6’), then 2 threads will be allocated to c1 compiler threads and 4 threads will be allocated to c2 compiler threads.

c1, c2 compiler thread High CPU consumption – potential solutions


Core Java, JVM, Oracle Java Certification, Oracle Java Learning, Oracle Java Preparation, Java Tutorial and Material, Java Preparation Exam, Java Career, Java Jobs, Java Skills
Sometimes you might see c1, c2 compiler threads to consume a high amount of CPU. When this type of problem surfaces, below are the potential solution to address it:

1. Do Nothing (if intermittent)

In your case, if your C2 compiler thread’s CPU consumption is only intermittently high and not continuously high, and it doesn’t hurt your application’s performance, then you can consider ignoring the problem.

2. -XX:-TieredCompilation

Pass this ‘-XX:-TieredCompilation’ JVM argument to your application. This argument will disable the JIT hotspot compilation. Thus CPU consumption will go down. However as side-effect your application’s performance can degrade

3. -XX:TieredStopAtLevel=N

If CPU spike is caused because of c2 compiler threads alone, you can turn-off c2 compilation alone. You can pass ‘-XX:TieredStopAtLevel=3’. When you pass this ‘-XX:TieredStopAtLevel’ argument with value 3, then only c1 compilation will be enabled and c2 compilation will be disabled. 

There are four tiers of compilations:

Compilation Level Description
Interpreted Code 
Simple c1 compiled code 
Limited c1 compiled code 
Full c1 compiled code 
4 C2 compiled code 

When you say ‘-XX:TieredStopAtLevel=3’ then code will be compiled only upto ‘Full c1 compiled code’ level. C2 compilation will be stopped.

4. -XX:+PrintCompilation

You can pass ‘-XX:+PrintCompilation’ JVM argument to your application. It will print details about your application’s compilation process. It will facilitate you to tune the compilation process further.

5. -XX:ReservedCodeCacheSize=N

Code that the Hotspot JIT compiler compiles/optimizes are stored in the code cache area of the JVM memory. Default size of this code cache area is 240MB. You can increase it by passing ‘-XX:ReservedCodeCacheSize=N’ to your application. Say if you want to make it as 512 MB, you can specify it like this: ‘-XX:ReservedCodeCacheSize=512m’. Increasing the code cache size has a potential to reduce the CPU consumption of the compiler threads.

6. -XX:CICompilerCount

You can consider increasing the C2 compiler threads by using the argument ‘-XX:CICompilerCount’. You can capture the thread dump and upload it to tools like fastThread, there you can see the number of C2 compiler threads. If you see less number of C2 compiler threads and you have more CPU processors/cores, you can increase the C2 compiler thread count by specifying ‘-XX:CICompilerCount=8’ argument.

Source: javacodegeeks.com

Friday, June 3, 2022

JVM

Introduction to JVM and JVM languages

Java Virtual Machine (or JVM for short) is a platform-dependent software that allows you to execute programs written in languages like Java. Languages such as Scala and Kotlin utilize JVM for execution and are also often referred to as JVM languages for this reason. Code written in these languages is often identified via their file extensions such as .java and .scala. Compiling source files of these languages results in .class files, which are a special representation of your source code and contain information necessary for successful execution. Each class file begins with the magic number 0xCAFEBABE, which helps identify this format.

This is how a class file is represented as per the Java Virtual Machine Specification:

ClassFile {

    u4             magic;

    u2             minor_version;

    u2             major_version;

    u2             constant_pool_count;

    cp_info        constant_pool[constant_pool_count-1];

    u2             access_flags;

    u2             this_class;

    u2             super_class;

    u2             interfaces_count;

    u2             interfaces[interfaces_count];

    u2             fields_count;

    field_info     fields[fields_count];

    u2             methods_count;

    method_info    methods[methods_count];

    u2             attributes_count;

    attribute_info attributes[attributes_count];

}

Note: The sizes are represented as values of type ux, where x is an exponent of 2. For example, u2 is a value that takes up 2 bytes or 16 bits, and u4 is 4 bytes or 32 bits. You can use javap to generate a readable representation of a class file.

javac Main.java

javap -c -v Main

Constant Pool

The constant pool of a class is a sort of a key-value store containing entries for things like String constants, as well as references to all classes and methods that are referenced by the class. The type of each constant pool entry is indicated by a single byte falling in the integral range [1, 18], often referred to as a “constant pool tag”.

Consider the following snippet:

/ Main.java

class Foo {

    public void bar() {

    }

}

public class Main {

    public static void main(String[] args) {

        Foo f = new Foo();

        f.bar();

        String lang = "java";

    }

}

The constant "java" is stored in the constant pool as:

#11 = Utf8    java

You can generalize the format as:

#index = type   value

You will also find information on classes and methods used within this class in its constant pool:

// Main.class

#6  = Utf8              ()V

#7  = Class             #8             // Foo

#8  = Utf8              Foo

#9  = Methodref         #7.#3          // Foo.'<init>':()V

#10 = Methodref         #7.#11         // Foo.bar:()V

#11 = NameAndType       #12:#6         // bar:()V

#12 = Utf8              bar

Class references (Indicated by the Class type) are composed only of one simple Utf8 entry, signifying the name of the referenced class. Method references (MethodRef entries) are more complex, and are of the form <Class>.<NameAndType>. The NameAndType entry is again composed of two Utf8 entries, i.e. the name of the method and its descriptor.

Any entry that references another entry will contain an index pointing to that other entry. For example, at index 7 is this entry: #7 = Class #8 // Foo. This entry refers to a class whose name is contained in index 8. The entry in index 8 is a Utf8 entry with the name of the class, Foo.

Any index referenced by some entry in the constant pool must be a valid index of only that constant pool.

Introduction to bytecode representation

The readable representation of the bytecode for the main method in the above example obtained via javap is:

0: new           #7                  // class Foo

3: dup

4: invokespecial #9                  // Method Foo.'<init>':()V

7: astore_1

8: aload_1

9: invokevirtual #10                 // Method Foo.bar:()V

12: ldc          #13                 // String java

14: astore_2

15: return

The comments you see here are clarifications inserted by javap and do not appear in the constant pool.

Each line of a method’s representation describes a single bytecode instruction in the following format:

offset: instruction arg1, arg2

You may have noticed that the instruction offsets shown here are discontinuous. The first instruction is at 0, while the second one starts at 3. This is because instructions may have any number of operands embedded in bytecode. For example, the invokespecial instruction requires one 2-byte operand. Similarly, the new instruction at the start takes a 2-byte operand which occupies space represented by the offsets 1 and 2, which is why 3 is the next available offset for an instruction.

Note: Bytecode is represented as a byte array and its offsets are not the same as constant pool indices.

Method invocation

JVM uses certain instructions such as invokevirtual, invokespecial, and invokestatic to invoke methods depending on their nature. For example, constructors are invoked via invokespecial, static methods via invokestatic, and other methods via invokevirtual. Instructions such as invokeinterface and invokedynamic fall outside this blog’s scope.

Let’s take a closer look at the invokevirtual instruction in the listing for main:

9: invokevirtual #10 // Method Foo.bar:()V

In the example above, invokevirtual is at offset 9. It takes one 2 byte operand, whose contents are located at offsets 10 and 11. invokevirtual‘s operand is interpreted as the index of a MethodRef entry in the class’s constant pool. The value of the index specified is 10, meaning the tenth entry in the constant pool. javap has helpfully included the value of that entry for us as a comment — Method Foo.bar:()V. We now have all the information required for the JVM to invoke the specified method, Foo.bar(). Arguments are passed to the invoked method beforehand by pushing values onto the operand stack using instructions from the *const and *load families.

Note: Here, we say *load because this instruction can be considered to be an entire family of instructions. Depending on its prefix we can interpret it as loading an integer, a floating point constant, or even an object reference. The same principle applies to the *const family, except with only integer and floating point types (And, as a special case of a constant value, null). Examples of instructions in this family are: aload, iload, fload, etc.

Control flow

if conditions, loops, and unconditional jumps are important parts of control flow. Let’s take a look at how the JVM executes each of these.

Pre-requisites: Local array and stack

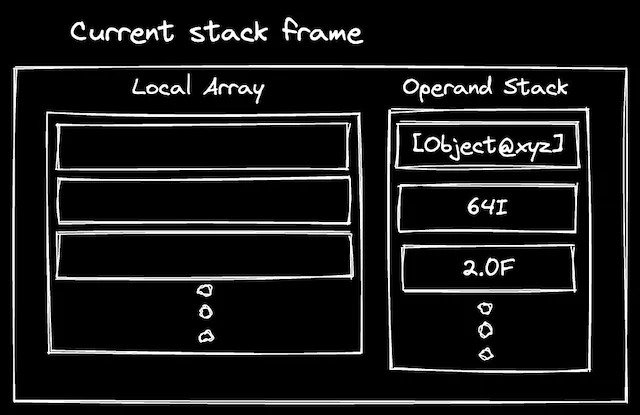
Every method has a small space allocated to it within the Java call stack called a frame. Frames store local variables, the operand stack for the method and also the address of the constant pool of the method’s containing class.

JVM, JVM languages, Core Java, Oracle Java Exam Prep, Oracle Java Preparation, Oracle Java Certification, Java Skills, Java News
A simplified view of a method’s stack frame

The operand stack is, as its name indicates, a stack structure. It is used to store input and output data for instructions. For example, the iadd instruction expects two integer values to be present in the operand stack beforehand. It pops its operands from the stack, adds them, and then pushes the result back onto the operand stack for future instructions to use.

A method’s parameters, and any local variables declared within it will have a predetermined slot in the corresponding stack frame’s local variable array. For instance methods (non-static methods), the first entry in the local variable array will always be a reference to the object referred to by the this pointer. The referenced object and the method’s declared arguments must first be pushed onto the operand stack of the calling method.

JVM, JVM languages, Core Java, Oracle Java Exam Prep, Oracle Java Preparation, Oracle Java Certification, Java Skills, Java News
Image of calling method’s operand stack with arguments pushed to it

When invokevirtual is called, the number of values to pop from the operand stack is calculated based on the invoked method’s descriptor. That same number of values, (plus one more for the this pointer) are popped from the operand stack. These values are then placed into the local variable array of the new frame, with the first entry always being the this pointer, followed by the arguments in their declared order.

JVM, JVM languages, Core Java, Oracle Java Exam Prep, Oracle Java Preparation, Oracle Java Certification, Java Skills, Java News
Copying arguments from operand stack to method’s local array

Once the arguments are copied over, the JVM sets the program counter to the offset of the first instruction of the method and starts executing bytecode again. When the end of the method is reached, the current frame is discarded and the JVM returns control flow to the next instruction after invokevirtual. Any returned value is popped off the operand stack of the invoked method and pushed onto the operand stack of the previous method to be used by subsequent instructions.

If condition

Consider the following snippet and its bytecode:

int i = 0;
if (i == 0) {
    i++;
}

// Explanatory comments added for better understanding
0: iconst_0               // Push const `0` to stack
1: istore_1               // Pop value off the stack and store it in local array at pos `1`
2: iload_1                // Push value from local array at pos `1` to stack
3: ifne          9        // Compare it against `0` and if not equals to 0, continue execution from offset `9`
6: iinc          1, 1     // Increment the value in local array at pos `1` by `1`
9: return                 // End of method

Instructions such as ifeq, ifne, iflt, ifge, ifgt, and ifle are used when a variable (for example x in this case) is being compared against 0. These instructions pop the value off the stack, compare it against 0 and if the condition holds true, the control jumps to the specified offset. Instructions such as if_icmpxx (where xx is [eq, neq, lt, gt, ge, le]) work by popping off arguments off the stack and then comparing them.

Loops

Consider the following snippet and its bytecode:

for (int i = 0; i <= 10; i++) {
    //
}

// Explanatory comments added for better understanding
0: iconst_0                // Push `0` to stack
1: istore_1                // Pop an int value, i.e. `0` and store it in local array at pos `1`
2: iload_1                 // Load value from local array at pos `1` onto the stack
3: bipush        10        // Push const `10` to stack
5: if_icmpgt     14        // Pop both the values, i.e. `0` and `10` and compare. If true, continue exec from offset `14`
8: iinc          1, 1      // Increment value at local array pos `1` by `1`.
11: goto         2         // Go to offset `2` and repeat instructions until the loop condition evaluates to false
14: return

A loop is just a set of statements executed until the specified condition evaluates to false. The bytecode generated is more or less similar to the one that we’ve seen previously. The only difference is that the goto instruction is used to jump to a previous offset and resume execution, i.e. to execute previously executed statements thereby essentially keeping the loop running.

JVM is one of the most exciting platforms out there. What we’ve seen so far in this blog is a tiny fraction of its working and internals. If you wish to further delve into JVM and its technicalities, consider getting started with The Java Virtual Machine Specification.

Source: javacodegeeks.com

Monday, May 30, 2022

Quiz yourself: Declaring and accessing Java modules


Imagine you are developing a date/time manipulation framework. The framework module is named date.time.utils and contains classes in the com.acme.utils package. The Java Date/Time API is located in the java.time package, which is in the java.base module.

Oracle Java, Core Java, Java Development, Oracle Java Certification, Oracle Java Career, Java Skills, Java Jobs, Java Preparation, Java Prep, Oracle Java Certification Exam

Which of the following steps is mandatory to properly define your module for your clients? Choose one.

A. Add the following to the date.time.utils module descriptor:
requires transitive java.base;

B. Add the following to the date.time.utils module descriptor:
requires java.base;
Also inform your clients to add the following in their modules:
requires java.base;

C. Add the following to the date.time.utils module descriptor:
exports date.time.utils;

D. Add the following to the date.time.utils module descriptor:
exports com.acme.utils;

Answer. The question provides the required information that the Java Date/Time API belongs to the java.base module, and you should already know that the java.base module is always implicitly required by any other module.

The question investigates how a module makes elements of itself available for other modules to use. It’s important to know that elements declared in a module are effectively hidden inside that module unless they are deliberately and expressly made accessible to clients of the module.

Option A suggests adding a requires transitive dependency on the java.base module. This directive would declare that the date.time.utils module, and any module using it, requires java.base. However, java.base is always implicitly required for all modules.

The requires transitive directive also states that clients of this module automatically have access to the exported features of the module required by this module. But again, since all modules have implicit access to java.base, this directive has no value in this case.

In addition to the lack of effect of the suggested directive, nothing in option A actually grants clients of this module the chance to use anything inside the module. Because of this, option A is incorrect.

Option B is very similar to option A, only differing in the absence of the transitive modifier and the admonition that users of this library should expressly add a dependency on java.base. Since java.base is always implicitly required, both actions listed here are without effect. Further, neither action does anything to grant access to elements of the module to users, so option B is also incorrect.

Option C suggests adding an exports directive, but that directive appears to refer to a module name. The compiler treats what follows the exports keyword as a package. It is an error to try to export a package that does not exist, and because no package in this example has the same name as that module name, option C is incorrect.

Option D correctly describes the only required step for the described scenario—and, in general, for any module whose classes are expected to be used outside that module—which is to add one or more exports directives that specify a package that should be accessible to external clients of the module. The simplest module definition for this question’s scenario will follow the guidance provided by option D and will look like the following:

module date.time.utils {
    exports com.acme.utils ;
}

Conclusion. The correct answer is option D.

Source: oracle.com

Sunday, May 29, 2022

You don’t need an application server to run Jakarta EE applications

Depending on the requirements, you can do well with Helidon, Piranha, or Hammock.

Jakarta EE (formerly Java EE) and the concept of an application server have been intertwined for so long that it’s generally thought that Jakarta EE implies an application server. This article will look at whether that’s still the case—and, if Jakarta EE isn’t an application server, what is it?

Let’s start with definitions. The various Jakarta EE specifications use the phrase application server but don’t specifically define it. The phrase is often used in a way where it would be interchangeable with terms such as runtime, container, or platform. For instance, the specification documents from the following specs mention things like the following:

◉ Jakarta authorization: “The Application server must bundle or install the PolicyContext class…”

◉ Jakarta messaging: “A ServerSessionPool object is an object implemented by an application server to provide a pool of ServerSession objects…”

◉ Jakarta connectors: “This method is called by an application server (that is capable of lazy connection association optimization) in order to dissociate a ManagedConnection…”

The Jakarta EE 9 platform specification doesn’t explicitly define an application server either, but section 2.12.1 does say the following:

A Jakarta EE Product Provider is the implementor and supplier of a Jakarta EE product that includes the component containers, Jakarta EE platform APIs, and other features defined in this specification. A Jakarta EE Product Provider is typically an application server vendor, a web server vendor, a database system vendor, or an operating system vendor. A Jakarta EE Product Provider must make available the Jakarta EE APIs to the application components through containers.

The term container is equivalent to engine, and very early J2EE documents speak about the “Servlet Engine.”

Thus, the various specification documents do not really specify what an application server is, and when they do mention it, it’s basically the same as a container or runtime. In practice, when someone speaks about an application server, this means something that includes all of the following:

◉ It is separately installed on the server or virtual machine.

◉ It listens to networking ports after it is started (and typically includes an HTTP server).

◉ It acts as a deployment target for applications (typically in the form of a well-defined archive), which can be both deployed and undeployed.

◉ It runs multiple applications at the same time (typically weakly isolated from each other in some way).

◉ It has facilities for provisioning resources (such as database connections, messaging queues, and identity stores) for the application to consume.

◉ It contains a full-stack API and the API’s implementation for consumption by applications.

In addition, an application server may include the following:

◉ A graphical user interface or command-line interface to administer the application server

◉ Facilities for clustering (so load and data can be distributed over a network)

Pushback against the full-fledged application server

The application server model has specific advantages when shrink-wrapped software needs to be deployed into an organization and integrated with other software running there. In such situations, for example, an application server can eliminate the need for users to authenticate themselves with every application. Instead, the application server might use a central Lightweight Directory Access Protocol (LDAP) service as its identity store for employees, allowing applications running on the application server to share that service.

This model, however, can be less ideal when an organization develops and operates its own public-facing web applications. In that case, the application needs to exert more control. For instance, instead of using the same LDAP service employees use, the organization’s customers would have a separate registration system and login screen implemented by the developers.

Here, an application server can be an obstacle because part of the security would need to be done outside of the application, often by an IT operations (Ops) team, who may not even know the application developers.

For example, an application server that hosts production applications is often shielded from the developer (Dev) team and is touched by only the Ops team. However, some problems on the server really belong in the Dev domain because they apply to in-house application development. This can lead to tickets that bounce between the Dev and Ops teams as the Dev team tries to steer the actions that only the Ops team is allowed to perform. (Note: The DevOps movement is an attempt to solve this long-standing problem.)

Another issue concerns the installed libraries within the application server. The exact versions of these the libraries, and the potential need to patch or update them, is often a Dev concern. For instance, the Ops team manages routers, networks, Linux servers, and so on and that team might not be very aware of the intricate details of Mojarra 2.3.1 versus Mojarra 2.3.2 or the need to patch the FacesServlet implementation.

Modern obsolescence: Docker and Kubernetes

The need for having an installed application server as the prime mechanism to share physical server resources started to diminish somewhat with the rise of virtual servers. A decade ago, you might see teams deploying a single application to a single dedicated application server running inside a virtual server. This practice, though, was uncommon enough that in 2013 the well-known Java EE consultant Adam Bien wrote a dedicated blog post about this practice that received some pushback. One of the arguments against Bien’s idea was that running an entire (virtual) operating system for a single application would waste resources.

Almost exactly at the same time as Bien wrote his post, the Docker container platform was released. Containers run on a single operating system and, therefore, largely take the resource-wasting argument away. While containers themselves had been around since the 1970s, Docker added a deployment model and a central repository for container images (Docker Hub) that exploded in popularity.

With a deployment tool at hand, and the knowledge that fewer resources are wasted, deploying an application server running a single application finally went mainstream. Specifically, the native deployment feature and, above all, the undeployment feature of an application server are not really used, because most Docker deployments are static.

In 2015 the Kubernetes container orchestration system appeared, and it quickly became popular for managing many instances of (mostly) Docker containers. For Java EE application servers, Kubernetes means that Java EE’s native clustering facilities are not really used, because tasks such as load balancing are now managed by Kubernetes.

Around the same time, the serverless microservices execution model became more popular with cloud providers. This meant that the deployment unit didn’t need its own HTTP server. Instead, the deployment unit contained code that is called by the serverless server of the cloud provider. The result was that for such an environment, the built-in HTTP server of a Java EE or Jakarta EE application server is not needed anymore. Obviously, such code needs to provide an interface the cloud provider can call. There’s currently no standard for this, though Oracle is working with the Cloud Native Computing Foundation on a specification for this area.

The Jakarta EE APIs

Without deployments, without running multiple applications, without an HTTP server, and without clustering, a Jakarta EE application server is essentially reduced to the Jakarta EE APIs.

Interestingly, this is how the Servlet API (the first Java EE API) began. In its early versions, servlet containers had no notion of a deployed application archive and they didn’t have a built-in HTTP server. Instead, servlets were functions that were individually added to a servlet container, which was then paired with an existing HTTP server.

Despite some initial resistance from within the Java EE community, the APIs that touched the managed-container application server model started to transition to a life outside the application server. This included HttpServletRequest#login, which began the move away from the strict container-managed security model, and @DataSourceDefinition, which allowed an application to define the same type of data source (and connection pool) that before could be defined only on the application server.

In Java EE 8 (released in 2017), application security received a major overhaul with Jakarta Security, which had an explicit goal of making security fully configurable without any application server specifics.

For application servers, several choices are available, such as Oracle WebLogic Server.

What if you’re not looking for a full application server? Because there is tremendous value in the Jakarta EE APIs themselves, several products have sprung up that are not application servers but that do provide Jakarta EE APIs. Among these products are Helidon, Piranha Cloud, and Hammock, which shall be examined next.

Project Helidon

Project Helidon is an interesting runtime that’s not an application server. Of the three platforms I’ll examine, it’s the only one fully suitable for production use today.

Helidon is from Oracle, which is also known for Oracle WebLogic Server—one of the first application servers out there (going back all the way to the 1990s) and one that best embodies the application server concept.

Helidon is a lightweight set of libraries that doesn’t require an application server. It comes in two variants: Helidon SE and Helidon MP (MicroProfile).

Helidon SE. Helidon SE does not use any of the Servlet APIs but instead uses its own lightweight API, which is heavily inspired by Java functional programming. The following shows a very minimal example:

WebServer.create(

    Routing.builder()

      .get(

          "/hello",

          (request, response) -> response.send("Hi!"))

      .build())

      .start();

Here’s an example that uses a full handler class, which is somewhat like using a servlet.

WebServer.create(

    Routing.builder()

           .register(

               "/hello",

               rules -> rules.get("/", new HelloHandler()))

           .build())

           .start();

public class HelloHandler implements Handler {

    @Override

    public void accept(ServerRequest req, ServerResponse res) {

        res.send("Hi");

    }

}

In the Helidon native API, many types are functional types (one abstract method), so despite a class being used for the Handler in this example to contrast it to a servlet, a lambda could have been used. By default, Helidon SE launches an HTTP server in these examples at a random port, but it can be configured to use a specific port as well.

Helidon MP. With Helidon MP, you declare a dependency to Helidon in the pom.xml file and add it to the Helidon parent POM. You then write normal MicroProfile/Jakarta EE code (for the Jakarta EE libraries that Helidon MP supports). After the build, you get a runnable JAR file including your code. A minimal example for such a pom.xml file looks as follows:

<project xmlns="http://maven.apache.org/POM/4.0.0"

    xmlns:xsi=

        "http://www.w3.org/2001/XMLSchema-instance"

    xsi:schemaLocation=

        "http://maven.apache.org/POM/4.0.0 http://maven.apache.org/xsd/maven-4.0.0.xsd">

    <modelVersion>4.0.0</modelVersion>

    <parent>

        <groupId>io.helidon.applications</groupId>

        <artifactId>helidon-mp</artifactId>

        <version>2.2.2</version>

        <relativePath />

    </parent>

    <groupId>com.example</groupId>

    <artifactId>example</artifactId>

    <version>1.0</version>

    <dependencies>

        <dependency>

            <groupId>io.helidon.microprofile.bundles</groupId>

            <artifactId>helidon-microprofile</artifactId>

        </dependency>

    </dependencies>

    <build>

        <plugins>

            <plugin>

                <groupId>org.apache.maven.plugins</groupId>

                <artifactId>maven-dependency-plugin</artifactId>

                <executions>

                    <execution>

                        <id>copy-libs</id>

                    </execution>

                </executions>

            </plugin>

        </plugins>

    </build>

</project>

This runnable JAR file neither contains nor loads the Helidon libraries. Instead, those libraries are referenced via META-INF/MANIFEST.MF to be in the /libs folder relative to where the executable JAR file exists.

After building, such as by using the mvn package, you can run the generated JAR file using the following command:

java -jar target/example.jar

This command will start the Helidon server, and this time you do get a default port at 8080. Besides the MicroProfile APIs, which is what Helidon focuses on primarily, the following Jakarta EE APIs are supported:

◉ Jakarta CDI: Weld

◉ Jakarta JSON-P/B: Yasson

◉ Jakarta REST: Jersey

◉ Jakarta WebSockets: Tyrus

◉ Jakarta Persistence: EclipseLink, Hibernate

◉ Jakarta Transactions: Narayana

Piranha Cloud

Piranha Cloud is a relatively new project; although it started as a very low-key project a couple of years ago, it didn’t pick up pace until October 2019, as you can see in Figure 1, which shows the GitHub commit graph.

Oracle Java Exam Prep, Core Java, Oracle Java Certification, Oracle Java Career, Oracle Java Skills, Oracle Java Certified, Java Preparation
Figure 1. The GitHub commit graph for Piranha Cloud

As of mid-April 2021, Piranha was not yet production-ready, and it is mostly of interest to developers who want to see how a Jakarta EE and MicroProfile runtime is being built and is evolving.

Piranha comes in four versions: Nano, Embedded, Micro, and Server. Each version adds features essentially following the list mentioned earlier for application server functionality. Figure 2 is a high-level overview of the Piranha architecture with respect to the four versions.

Oracle Java Exam Prep, Core Java, Oracle Java Certification, Oracle Java Career, Oracle Java Skills, Oracle Java Certified, Java Preparation
Figure 2. The Piranha Cloud architecture

Here’s more detail about each version.

Piranha Nano. Piranha Nano essentially runs only a single servlet on a flat classpath, forgoing several servlet features, for example, many of the listeners and support for sessions. It’s therefore specifically suited for serverless computing using a familiar Servlet API that’s a subset of the full API. This means servlets created for Piranha Nano will run on other servlet containers as well, but Nano will not run all regular servlet applications.

Piranha Nano is programmatically set up, for instance, from a main() method in a regular Java class. Here is a somewhat contrived Hello World example; running this from a main method will yield “Hello, World!”

ByteArrayOutputStream outputStream = new ByteArrayOutputStream();

new NanoPiranhaBuilder()
    .servlet("HelloWorldServlet", new HttpServlet() {
        protected void doGet(HttpServletRequest request, HttpServletResponse response)
            throws IOException, ServletException {
            response.getWriter().print(“Hello, World!”);
        }})
    .build()
    .service(
        new NanoRequestBuilder()
            .method("GET")
            .servletPath("/index.html")
            .build(),
        new NanoResponseBuilder()
            .outputStream(outputStream)
            .build()
    );

System.out.println(outputStream.toString());

As mentioned earlier, Piranha Nano will not run every existing servlet. It can run Jakarta Server Pages and Apache Wicket pages.

Piranha Embedded. Like Piranha Nano, Piranha Embedded runs on a flat classpath and is programmatically set up. It supports the full Servlet API—well, that’s the goal. As of the time of this writing, it passes about 92% of the Jakarta EE 9.1 Servlet TCK (Technology Compatibility Kit).

Piranha Embedded doesn’t start an HTTP server. Requests and responses can be programmatically created and passed in, but there are also various convenience methods using default versions of those. Using the programmatic API, a representation of a web application archive (WAR) is created, and the API can create elements such as web.xml when needed. No classes or JAR files need to be added. Because of the flat classpath, those are directly available to Piranha Embedded from the classpath used by the code that embeds it.

Because of this, Piranha Embedded can be used in the same way as a mocking framework for various Jakarta libraries, with the important difference that it’s testing against an actual implementation. Here’s an example.

System.out.println(
    new EmbeddedPiranhaBuilder()
        .stringResource("/index.xhtml", """
            <!DOCTYPE html>

            <html lang="en" xmlns:h="http://xmlns.jcp.org/jsf/html">
                <h:head>
                    <title>Hello Jakarta Faces</title>
                </h:head> 
                <h:body>
                    Hello Jakarta Faces
                </h:body>
            </html>
            """)
        .initializer(MojarraInitializer.class)
        .buildAndStart()
        .service("/index.xhtml")
        .getResponseAsString());

In this example, a resource named index.xhtml with a simple Facelets message as content is set in the root of a temporary web application. In addition to this single resource, a ServletContainerInitializer is set; in this example, it’s one that initializes Mojarra (a Jakarta Server Faces implementation). Mojarra itself is on the classpath of this code.

The buildAndStart() runs the initializer, causing Mojarra to start and install the FacesServlet mapped to *.xhtml. No HTTP server is started. When the code calls the service() method for index.xhtml, this results in an EmbeddedRequest being created and passed into the EmbeddedPiranha code, eventually reaching the FacesServlet code. This servlet will then try to find index.xhtml via the internal ServletContext, which will return the content set via the builder used in the code above. Mojarra then processes the template and writes the response, which is the object returned by the service() method.

If you need more control over the request and even the response, you can create those objects yourself and pass them into the service method.

EmbeddedPiranha piranha =
    new EmbeddedPiranhaBuilder()
    .stringResource("/index.xhtml", """
        <!DOCTYPE html>

        <html lang="en" xmlns:h="http://xmlns.jcp.org/jsf/html">
            <h:head>
                <title>Hello Jakarta Faces</title>
            </h:head>
            <h:body>
                Hello Jakarta Faces
            </h:body>
        </html>
        """)
    .initializer(MojarraInitializer.class)
    .buildAndStart();

EmbeddedRequest request =
    new EmbeddedRequestBuilder()
        .contextPath("")
        .servletPath("/index.html")
        .build();
EmbeddedResponse response = new EmbeddedResponse();

piranha.service(request, response);

Piranha Micro. Piranha Micro builds on the same core as Piranha Embedded, but it adds several major components, including an isolating class loader, the ability to run full WAR files, an optional HTTP server, the ability to run from the command line, and an extension mechanism for Jakarta EE and Jakarta MP components. When no such extension is specified, Piranha Micro uses a default extension that supports the following minimal set of Jakarta EE components:

◉ Jakarta Servlet (and transitive dependencies of Jakarta Server Pages and Jakarta Expression Language)
◉ Jakarta Security (and transitive dependencies of Jakarta Authentication and Jakarta Authorization)
◉ Jakarta CDI (and transitive dependencies for Jakarta DI and Jakarta Interceptors)

Unlike many other servlet containers, Piranha Micro does not include a native security implementation on top of which the Jakarta security APIs are layered. Instead, Jakarta Security directly provides the implementation for servlet security. This means, for example, that the FORM authentication mechanism configured in web.xml is backed by the same code as the one configured by @FormAuthenticationMechanismDefinition.

For programmatic and embedded usage, Piranha Micro’s isolating class loader is an important asset. It fully shields the code running within Piranha Micro from the environment in which it is embedded. This is very useful for those situations where, for instance, CDI beans and service loaders from the environment should not be picked up by the code running within Piranha Micro. It’s a trade-off, though, because the full isolation makes any communication between the embedding and embedded code more difficult. Plus, there’s a potential higher cost in memory usage.

Piranha Micro uses ShrinkWrap as its native format to handle WAR files. ShrinkWrap is easy to use to programmatically create archives of all kinds, and it directly connects to tools such as the Arquillian microservices test suite, which uses the same archive format.

Using a builder similar to the one used by Piranha Embedded, you can mimic the example used above but this time using Piranha Micro.

System.out.println(new MicroEmbeddedPiranhaBuilder()
    .archive(
        ShrinkWrap
            .create(WebArchive.class)
              .addAsWebResource(new StringAsset( """
                  <!DOCTYPE html>

                  <html lang="en" xmlns:h="http://xmlns.jcp.org/jsf/html">
                      <h:head>
                          <title>Hello Jakarta Faces</title>
                      </h:head> 
                      <h:body>
                          Hello Jakarta Faces
                      </h:body>
                  </html>
                  """), "index.xhtml")
              .addAsWebInfResource(EmptyAsset.INSTANCE, "faces-config.xml")
              .addAsLibraries(
                  Maven.resolver()
                       .resolve(
                           "org.glassfish:jakarta.faces:3.0.0",
                           "jakarta.websocket:jakarta.websocket-api:2.0.0")
                       .withTransitivity().as(JavaArchive.class)))
    .buildAndStart()
    .service("/index.xhtml")
    .getResponseAsString());

This code creates a ShrinkWrap archive containing the same Facelet as in the previous example, but it also creates an empty faces-config.xml to trigger the initialization of Jakarta Server Faces and it includes Mojarra (a Jakarta Server Faces implementation JAR file) in the archive.

Using the same ShrinkWrap API, you can load an existing WAR file from disk, add individual files from disk, add copies of classes from the classpath, and so on.

For command-line usage, a JAR file named piranha-micro.jar is available, which can be used to start a web application from a file, for example. This version starts an HTTP server by default. Using it looks as follows:

java -jar piranha-micro.jar --war someapp.war

The default port is 8080, so assuming the archive shown in the example above was saved to someapp.war on disk, you would be able to request the same page using the following:

wget localhost:8080/index.xhtml

An interesting aspect of piranha-micro.jar is that it has the feel of a hollow JAR file (prepackaged runtime with all its dependencies in one JAR file), but it’s actually a loader. The JAR file contains its own (shaded) copy of Maven, which it uses to load the Piranha Micro core classes and dependencies, as well as any extensions. Furthermore, piranha-micro.jar contains ShrinkWrap to load a .war from a file or, in exploded form, from a directory. Dependency JAR files and the application archive are loaded and executed from memory, which provides a particular advantage: Contrary to some hollow JAR solutions, no unpacking to a temporary folder is needed.

Piranha Server. As its name implies, Piranha Server comes closest to a traditional application server, although with a twist.

Like a traditional application server, Piranha Server is the only member of the Piranha family that is installed, that functions as a deployment target, and that runs multiple applications. But if those traditional products support a hollow JAR version, that hollow JAR version is technically speaking (almost) the full server, with the server facilities just hidden. For Piranha Server, it’s the other way around.

The Piranha Server variant is a small shell that starts an HTTP server and instantiates an embedded Piranha Micro instance (without an HTTP server, obviously) for each deployed application. Because of the strongly isolating class loader used by a Piranha Micro instance, each application uses its own version of the Jakarta EE libraries. This is significantly different from a traditional Jakarta EE server, where those libraries are loaded once and shared by every application that is deployed.

Because it loads a fresh set of Jakarta EE libraries for each application, Piranha Server can support different versions of Jakarta EE simultaneously, as shown in Figure 3.


Oracle Java Exam Prep, Core Java, Oracle Java Certification, Oracle Java Career, Oracle Java Skills, Oracle Java Certified, Java Preparation
Figure 3. The architecture of Piranha Server running instances of Piranha Micro

Piranha Server obviously uses much more memory when running multiple applications than a traditional application server would, especially when many applications are deployed (say, tens or even hundreds). However, it uses fewer resources than running many servlet runtimes, each with a single application.

By the way, Piranha Server can be configured to use Piranha Embedded instead of Piranha Micro, thus allowing the applications to share the Jakarta EE libraries, as shown in Figure 4. A future variant of Piranha Server will allow you to mix Piranha Micro and Piranha Embedded applications.

Oracle Java Exam Prep, Core Java, Oracle Java Certification, Oracle Java Career, Oracle Java Skills, Oracle Java Certified, Java Preparation
Figure 4. The architecture of Piranha Server running instances of Piranha Embedded

Hammock


Hammock was one of first runtimes to use the Java EE libraries without being a full-fledged application server. The Hammock project was started in 2014 by John Ament as a combination of RESTEasy (Jakarta REST), Undertow (Jakarta Servlet), and Weld (Jakarta CDI).


Hammock is not an application server. It has no concept of EJB support, it doesn’t support any of the management extensions or deployment requirements. It doesn’t run WAR files, it uses uber-jars to have a simple executable or can be deployed exploded.

Hammock thus focuses on the uber-JAR concept, where a developer adds Hammock as a dependency to a project, and the build then results in a runnable JAR file that contains both Hammock and the application code. With Hammock, there is no concept whatsoever of installing anything, functioning as a deployment target, or running multiple applications.

Something that sets Hammock aside is that it started to support alternative implementations for all the Jakarta APIs that it uses via pluggable Maven dependencies, such as ws.ament.hammock:bootstrap-weld3 for CDI.

Hammock supports the following:

◉ Jakarta CDI: Weld, OpenWebBeans
◉ Jakarta JSON-P: Johnzon
◉ Jakarta Servlet: Tomcat, Undertow, Jetty
◉ Jakarta REST: CFX, Jersey, RESTEasy
◉ Jakarta Persistence: Hibernate, EclipseLink, OpenJPA
◉ Jakarta Messaging: Artemis

Hammock was among the first products to support the initial MicroProfile specification (which consisted only of Java EE APIs then). It added support for later MicroProfile versions by incorporating Apache components.

Source: oracle.com

Friday, May 27, 2022

The not-so-hidden gems in Java 18: The JDK Enhancement Proposals

Five of Java 18’s JEPs add new features or major enhancements. See what they do and how they work.

Java 18 was officially released in March, and it included nine implemented JDK Enhancement Proposals (JEPs).

This article covers five of the JEPs in Java 18. The companion article, “The hidden gems in Java 18: The subtle changes,” goes over Java 18’s small improvements and changes that aren’t reflected in those JEPs. It also talks about the four JEPs that are incubators, previews, and deprecations.

Because these articles were researched prior to the March 22 general availability date, I used the Java 18 RC-build 36 jshell tool to demonstrate the code. However, if you would like to test the features, you can follow along with me by downloading the latest release candidate (or the general availability version), firing up a terminal window, checking your version, and running jshell, as follows. Note that you might see a newer version of the build.

[mtaman]:~ java -version

 openjdk version "18" 2022-03-22

 OpenJDK Runtime Environment (build 18+36-2087)

 OpenJDK 64-Bit Server VM (build 18+36-2087, mixed mode, sharing)

[mtaman]:~ jshell --enable-preview

|  Welcome to JShell -- Version 18

|  For an introduction type: /help intro

jshell>

The nine JEPs in the Java 18 release as are follows:

◉ JEP 400: UTF-8 by default

◉ JEP 408: Simple Web Server

◉ JEP 413: Code snippets in Java API documentation

◉ JEP 416: Reimplement core reflection with method handles

◉ JEP 417: Vector API (third incubator)

◉ JEP 418: Internet address resolution service provider interface

◉ JEP 419: Foreign Function and Memory API (second incubator)

◉ JEP 420: Pattern matching for switch (second preview)

◉ JEP 421: Deprecate finalization for removal

Two of the JEPs are incubator features, one is a preview, and is one is a deprecation, that is, a JEP that prepares developers for the removal of a feature. In this article, I’ll walk through the other five JEPs, and I will not explore the incubators, the preview, and the deprecation.

JEP 400: UTF-8 by default

UTF-8 is a variable-width character encoding for electronic communication and is considered the web’s standard character set (charset). It can encode all the characters of any human language.

The Java standard charset determines how a string is converted to bytes and vice versa. It is used by many methods of the JDK library classes, mainly when you’re reading and writing text files using, for example, the FileReader, FileWriter, InputStreamReader, OutputStreamWriter, Formatter, and Scanner constructors, as well as the URLEncoder encode() and decode() static methods.

Prior to Java 18, the standard Java charset could vary based on the runtime environment’s language settings and operating systems. Such differences could lead to unpredictable behavior when an application was developed and tested in one environment and then run in another environment where the Java default charset changed.

Consider a pre-Java 18 example that writes and reads Arabic text. Run the following code on Linux or macOS to write Arabic content (which means “Welcome all with Java JEP 400”) to the Jep400-example.txt file:

private static void writeToFile() {

   try (FileWriter writer = new FileWriter("Jep400-example.txt");

   BufferedWriter bufferedWriter = new BufferedWriter(writer)) {

      bufferedWriter.write("مرحبا بكم في جافا جيب ٤٠٠");

      }

   catch (IOException e) {

   System.err.println(e);

   }

}

Then read the file back using a Windows system and the following code:

private static void readFromFile() {

   try (FileReader reader = new FileReader("Jep400-example.txt");

   BufferedReader bufferedReader = new BufferedReader(reader)) {

      String line = bufferedReader.readLine();

      System.out.println(line);

      }

   catch (IOException e) {

   System.err.println(e);

   }

}

The output will be the following:

٠رحبا ب٠٠٠٠جا٠ا ج٠ب Ù¤Ù Ù

This rubbish output happens because, under Linux and macOS, Java saves the file with the default UTF-8 encoding format, but Windows reads the file using the Windows-1252 encoding format.

This problem becomes even worse when you mix text in the same program by writing the file using an older facility, FileWriter, and then reading the contents using newer I/O class methods such as Files writeString(), readString(), newBufferedWriter(), and newBufferedReader(), as in the following:

private static void writeReadFromFile() {

   try (FileWriter writer = new FileWriter("Jep400-example.txt");

   BufferedWriter bufferedWriter = new BufferedWriter(writer)) {

      bufferedWriter.write("مرحبا بكم في جافا جيب ٤٠٠");

      bufferedWriter.flush();

      var message = Files.readString(Path.of("Jep400-example.txt"));

      System.out.println(message);

      }

   catch (IOException e) {

   System.err.println(e);

   }

}

Running the program under Linux and macOS will print the Arabic content without any problem, but doing so on Windows will print the following:

????? ??? ?? ???? ??? ???

These question marks are printed because newer APIs don’t respect the default OS character set and always used UTF-8; so in this case, the file is written with FileWriter using the Windows-1252 charset. When Files.readString(Path.of("Jep400-example.txt")) reads back the file, the method use UTF-8 regardless of the standard charset.

The best solution is to specify the charset when you’re reading or writing files and when calling all methods that convert strings to bytes (and vice versa).

You might think another solution is to set the default charset with the file.encoding system property, as follows:

var fileWriter = new FileWriter("Jep400-example.txt", StandardCharsets.UTF_8);

var fileReader = new FileReader("Jep400-example.txt", StandardCharsets.UTF_8);

Files.readString(Path.of("Jep400-example.txt"), StandardCharsets.UTF_8);

What happens?

[mtaman]:~ java -Dfile.encoding=US-ASCII FileReaderWriterApplication.java

?????????????????????????????????

The result is rubbish because the FileWriter respects the default encoding system property, while Files.readString() ignores it and uses UTF-8. Therefore, the correct encoding should be used to run correctly with -Dfile.encoding=UTF-8.

The goal of JEP 400 is to standardize the Java API default charset to UTF-8, so that APIs that depend on the default charset will behave consistently across all implementations, operating systems, locales, and configurations. Therefore, if you run the previous snippets on Java 18, the code will produce the correct contents.

JEP 408: Simple Web Server

Many development environments let programmers start up a rudimentary HTTP web server to test some functionality for static files. That capability comes to Java 18 through JEP 408.

The simplest way to start the web server is with the jwebserver command. By default, this command listens to localhost on port 8000. The server also provides a file browser to the current directory.

[mtaman]:~ jwebserver 

Binding to loopback by default. For all interfaces use "-b 0.0.0.0" or "-b ::".

Serving /Users/mohamed_taman/Hidden Gems in Java 18/code and subdirectories on 127.0.0.1 port 8000

URL http://127.0.0.1:8000/

If you visit http://127.0.0.1:8000/, you will see a directory listing in your web browser, and in the terminal you will see the following two lines:

127.0.0.1 - - [06/Mar/2022:23:27:13 +0100] "GET / HTTP/1.1" 200 -

127.0.0.1 - - [06/Mar/2022:23:27:13 +0100] "GET /favicon.ico HTTP/1.1" 404 –

You can change the jwebserver defaults with several parameters, as follows:

[mtaman]:~ jwebserver -b 127.1.2.200 -p 9999 -d /tmp -o verbose 

Serving /tmp and subdirectories on 127.0.0.200 port 9999

URL http://127.0.0.200:9999/

Here are a few of the parameters.

◉ -b specifies the IP address on which the server should listen.

◉ -p changes the port.

◉ -d changes the directory the server should serve.

◉ -o configures the log output.

For a complete list of configuration options, run jwebserver -h.

The web server is simple, as its name implies, and has the following limitations:

◉ Only the HTTP GET and HEAD methods are allowed.

◉ The only supported protocol is HTTP/1.1.

◉ HTTPS is not provided.

The API. Fortunately, you can extend and run the server programmatically from the Java API. That’s because jwebserver itself is not a standalone tool; it is a wrapper that calls java -m jdk.httpserver. This command calls the main() method of the sun.net.httpserver.simpleserver.Main class of the jdk.httpserver module, which, in turn, calls SimpleFileServerImpl.start(). This starter evaluates the command-line parameters and creates the server via SimpleFileServer.createFileServer().

You can start a server via Java code as follows:

// Creating the server

HttpServer server = SimpleFileServer.createFileServer(new InetSocketAddress(9999), Path.of("\tmp"), OutputLevel.INFO);

// Starting the server

server.start();

With the Java API, you can extend the web server. For example, you can make specific file system directories accessible via different HTTP paths, and you can implement your handlers to use your choice of paths and HTTP methods, such as PUT and POST. Check the JEP 408 documentation for more API details.

JEP 413: Code snippets in Java API documentation

Prior to Java 18, if you wanted to integrate multiline code snippets into Java documentation (that is, into Javadoc), you had to do it tediously via <pre> ... </pre> and sometimes with {@code ...}. With these tags, you must pay attention to the following two points:

◉ You can’t put line breaks between <pre> and </pre>, which means you may not get the formatting you want.

◉ The code starts directly after the asterisks, so if there are spaces between the asterisks and the code, they also appear in the Javadoc.

Here’s an example that uses <pre> and </pre>.

/**

  * How to read a text file with Java 8:

  *

  * <pre><b>try</b> (var reader = Files.<i>newBufferedReader</i>(path)) {

  *    String line = reader.readLine();

  *    System.out.println(line);

  * }</pre>

  */

This code will appear in the Javadoc as shown in Figure 1.

JDK Enhancement Proposals, Oracle Java Exam Prep, Oracle Java Certification, Java Career, Java Jobs, Java Skills, Java News, Java Process, Oracle Java Preparation Exam

Figure 1. Example using <pre> and </pre>

Here’s an example that uses <pre> and {@code ...}.

/**
     * How to read a text file with Java 8:
     *
     * <pre>{@code try (var reader = Files.newBufferedReader(path)) {
     *    String line = reader.readLine();
     *    System.out.println(line);
     * }}</pre>
     */

Figure 2 shows the output Javadoc.

JDK Enhancement Proposals, Oracle Java Exam Prep, Oracle Java Certification, Java Career, Java Jobs, Java Skills, Java News, Java Process, Oracle Java Preparation Exam

Figure 2. Example using <pre> and {@code}

The difference between the two examples is that in the first example with <pre>, you can format the code with HTML tags such as <b> and <i>, but in the second example with {@code}, such tags would not be evaluated but instead the code would be displayed as is.

JEP 413 introduces the @snippet tag for Javadoc’s standard doclet to simplify the inclusion of example source code in the API documentation. Among the goals of JEP 413 are the following:

◉ Facilitating the validation of source code fragments by providing API access to those fragments; however, correctness is the author’s responsibility

◉ Enabling modern styling, such as syntax highlighting and the automatic linkage of names to declarations

◉ Promoting better IDE support for creating and editing snippets

Using the @snippet tag, you can rewrite the example from Figure 1, which used the <pre> tag, as follows:

/**
     * How to read a text file with Java 8:
     * {@snippet :
     *  try (var reader = Files.newBufferedReader(path)) {
     *      String line = reader.readLine();
     *      System.out.println(line);
     *  }
     * }
     */

Figure 3 shows how this rewritten code would appear in the Javadoc.

JDK Enhancement Proposals, Oracle Java Exam Prep, Oracle Java Certification, Java Career, Java Jobs, Java Skills, Java News, Java Process, Oracle Java Preparation Exam

Figure 3. Example using @snippet

You can do more with @snippet. For instance, you can highlight parts of the code using @highlight. The following code highlights the readLine() method within the second line of code:

/**
     * How to read a text file with Java 8:
     * {@snippet :
     *  try (var reader = Files.newBufferedReader(path)) {
     *      String line = reader.readLine(); // @highlight substring="readLine()"
     *      System.out.println(line);
     *  }
     * }
     */

The output Javadoc appears as shown in Figure 4.

JDK Enhancement Proposals, Oracle Java Exam Prep, Oracle Java Certification, Java Career, Java Jobs, Java Skills, Java News, Java Process, Oracle Java Preparation Exam

Figure 4. Example using @highlight

Within the block marked with @highlight and @end below, you can highlight all the words beginning with line by using type="…", which can specify one of the following: bold, italic, or highlighted (with a colored background):

/**
     * How to read a text file with Java 8:
     * {@snippet :
     * // @highlight region regex="\bline\b" type="highlighted"
     * try (var reader = Files.newBufferedReader(path)) {
     *     String line = reader.readLine();
     *     System.out.println(line);
     *  }
     * // @end
     * }
     */

Then the code would appear in the Javadoc as shown in Figure 5.

JDK Enhancement Proposals, Oracle Java Exam Prep, Oracle Java Certification, Java Career, Java Jobs, Java Skills, Java News, Java Process, Oracle Java Preparation Exam

Figure 5. Example using type=

Using @link, you can link a part of the text, such as Files.newBufferedReader, to its Javadoc. Note that the colon at the end of the line with the @link tag is essential in this case, and it means that the comment refers to the next line.

/**
     * How to read a text file with Java 8:
     * {@snippet :
     * // @link substring="Files.newBufferedReader" target="Files#newBufferedReader" :
     * try (var reader = Files.newBufferedReader(path)) {
     *      String line = reader.readLine();
     *      System.out.println(line);
     * }
     * }
     */

Figure 6 shows how the code would appear in the Javadoc.

JDK Enhancement Proposals, Oracle Java Exam Prep, Oracle Java Certification, Java Career, Java Jobs, Java Skills, Java News, Java Process, Oracle Java Preparation Exam

Figure 6. Example using @link

You could also write the comment at the end of the following line, just like in the first @highlight example, or you could use @link and @end to specify a part within which all occurrences of Files.newBufferedReader should be linked.

JEP 416: Reimplement core reflection with method handles


Sometimes I want to do Java reflection, such as reading a private id field of a Person object’s class via reflection.

package org.java.mag.j18.reflection;

import lombok.Builder;
import lombok.Data;

@Data
@Builder
public class Person {
    private Long id;
    private String name;
}

Surprisingly, there are two ways to do that. First, I can use core reflection, as follows:

private static Long getLongId(Object obj) throws Exception {
          Field id = obj.getClass().getDeclaredField("id");
          id.setAccessible(true);
          return (Long) id.get(obj);
      }

Alternatively, I can use method handles, as shown below.

private static Long getLongId2(Object obj) throws Exception {
          VarHandle handle =
                 MethodHandles.privateLookupIn(Person.class, MethodHandles.lookup())
                        .findVarHandle(Person.class, "id", Long.class);
          return (Long) handle.get(obj);
      }

If you call both options from main, you’ll see that they print the same value, verifying that they both work.

public static void main(String[] args) throws Exception {
   Person person = Person.builder()
                  .id(2L)
                  .name("Mohamed Taman")
                  .build();

   System.out.println("Person Id (Core reflection): " + getLongId(person));
   System.out.println("Person Id (method handles): " + getLongId2(person));
      }

Person Id (Core reflection): 2
Person Id (method handles):  2

A third hidden option happens under the hood: leveraging additional native JVM methods used by the core reflection for the first few calls after starting the JVM. After a while, the JVM begins compiling and optimizing the Java reflection bytecode.

Maintaining all three of these options would necessitate a significant amount of effort from the JDK team. As a result, the core reflection reimplementation with method handles, as in JEP 416, now reimplements lang.reflect.Method, Constructor, and Field on top of java.lang.invoke method handles. The use of method handles as the underlying mechanism for reflection reduces the maintenance and development costs of the java.lang.reflect and java.lang.invoke APIs; thus, it is good for the future of the platform.

JEP 418: Internet address resolution service provider interface


JEP 418 enhances the currently limited implementation of java.net.InetAddress by developing a service provider interface (SPI) for hostname and address resolution. The SPI allows java.net.InetAddress to use resolvers other than the operating system’s native resolver, which is usually set up to use a combination of a local hosts file and the domain name system (DNS).

Here are the benefits of providing Java with name and address resolution SPI resolvers.

◉ It enables the seamless integration of new emerging network protocols such as DNS over Quick UDP Internet Connections (QUIC), Transport Layer Security (TLS), or HTTPS.

◉ Customization gives frameworks and applications more control over resolution results and the ability to retrofit existing libraries with a custom resolver.

◉ It would allow Project Loom to work more efficiently. The current InetAddress API resolution operation blocks an OS call, which is a problem for Loom’s user-mode virtual threads. Platform threads cannot service other virtual threads while waiting for a resolution operation to be completed. Therefore, an alternative resolver could directly implement the DNS client protocol without blocking.

◉ It would allow developers more control of hostname and address resolution results when prototyping and testing, which is often required.

Here’s a quick example that doesn’t use the new JEP 418 SPI to obtain all the IP addresses of a hostname (blogs.oracle.com). You can use one of the InetAddress class methods, such as getByName(String host) or getAllByName(String host). For reverse lookups (to get the IP address of the hostname), use getCanonicalHostName() or getHostName(), as follows:

public static void main(String[] args) throws UnknownHostException {
    InetAddress[] addresses = InetAddress.getAllByName("blogs.oracle.com");
    System.out.println("address(es) = " + Arrays.toString(addresses));
}

By default, InetAddress uses the operating system’s resolver, and on my computer this code prints the following:

Address(es) = [ blogs.oracle.com/2.17.7.152, 
                       blogs.oracle.com/2a02:26f0:b5:18a:0:0:0:a15, 
                       blogs.oracle.com/2a02:26f0:b5:18d:0:0:0:a15]

Next, try that sample task using an SPI in Java 18 to change the resolution address for internal use. First, create a resolver by implementing the interface java.net.spi.InetAddressResolver.

public class MyInetAddressResolver implements InetAddressResolver {
    @Override
    public Stream<InetAddress> lookupByName(String host, LookupPolicy lookupPolicy) throws UnknownHostException {
        return Stream.of(InetAddress.getByAddress(new byte[]{127, 0, 0, 4}));
    }

    @Override
    public String lookupByAddress(byte[] addr) {
        return null;
    }
}

This code implements preliminary functionality, but it doesn’t support reverse lookups. Therefore implement a resolver provider by implementing java.net.spi.InetAddressResolverProvider, which returns an instance of a previously implemented resolver by its get() method, as follows:

import java.net.spi.InetAddressResolver;
import java.net.spi.InetAddressResolverProvider;

public class MyInetAddressResolverProvider extends InetAddressResolverProvider {
    @Override
    public InetAddressResolver get(Configuration configuration) {
        return new MyInetAddressResolver();
    }

    @Override
    public String name() {
        return "Java Magazine Internet Address Resolver Provider";
    }
}

Finally, register this resolver SPI to be used by the JDK by creating a file with the name java.net.spi.InetAddressResolverProvider under the META-INF/services folder, adding to the file the following entry: org.java.mag.j18.intaddr.MyInetAddressResolverProvider.

Run the same code in the main method as before, and you should see the following output:

addresses = [/127.0.0.4]

Source: oracle.com