Friday, March 11, 2022

Use Python and R in your Java applications with GraalVM

GraalVM directly supports Python and R, and this opens the world of dynamic scripting and data science libraries to your Java projects.

GraalVM is an open source project from Oracle that includes a modern just-in-time (JIT) compiler for Java bytecode, allows ahead-of-time (AOT) compilation of Java code into native binaries, provides a rich tooling ecosystem, and supports fast execution and integration of other languages.

GraalVM supports Python and R (among other languages), which opens the world of dynamic scripting and data science libraries to Java projects. Since scripting languages do not need a compilation step, applications written for GraalVM can allow users to easily extend them using any dynamic language supported by GraalVM. These user scripts are then JIT compiled and optimized with the Java code to provide optimal performance.

This article demonstrates how a Java application can be enhanced with the polyglot capabilities of GraalVM, using a Micronaut chat application as an example.

Get started with Micronaut

Micronaut is a microservice framework that works well with GraalVM. For the sake of clarity, this article will keep things simple by using one of the Micronaut examples, a simple chat app using WebSockets. This app provides chat rooms with topics. A new user can join any chat room by just browsing at http://localhost:8080/#/{topicName}/{userName}. Under the hood, the app is a WebSocket server.

Imagine you designed such an application for a customer and now this customer asks for rich, programmable customization options. Running on GraalVM, this can be very simple indeed. Look at the following message validation in the example chat app:

private Predicate<WebSocketSession> isValid(String topic) {

   return s -> topic.equalsIgnoreCase(s.getUriVariables().get("topic", String.class, null));

}

Right now, the validation ensures that messages sent from one chat room are broadcast only to the users connected to the same chat room; that is, the topic that the sender is connected to matches that of the receiver.

The power of GraalVM’s polyglot API makes this more flexible! Instead of a hardcoded predicate, write a Python function that will act as a predicate. Something like this will do exactly the same.

import java

def is_valid(topic):

  return lambda s: topic.lower() == s.getUriVariables().get("topic", java.lang.String, None).lower()

For testing it, put it in a static String PYTHON_SOURCE and then use it as follows:

private static final String PYTHON_SOURCE = /* ... */;

private Context polyglotContext = Context.newBuilder("python").allowAllAccess(true).build();

private Predicate<WebSocketSession> isValid(String topic) {

   polyglotContext.eval("python", PYTHON_SOURCE);

   Value isValidFunction = polyglotContext.getBindings("python").getMember("is_valid");

   return isValidFunction.execute(topic).as(Predicate.class);

}

That’s it! So, what is happening here?

The Python code defines a new function, is_valid, which accepts an argument and defines a nested function that creates a closure over that argument. The nested function also accepts an argument, a WebSocketSession. Even though it is not typed, and that argument is a plain old Java object, you can call Java methods seamlessly from Python. Argument mapping from Python None to Java null is handled automatically by GraalVM.

Here, you’ll see that the Java code has been extended with a private context field that represents the entry point into the polyglot world of GraalVM. You just create a new context with access to the Python language in which your script runs. However, because it’s not wise to allow scripts to do whatever they want, GraalVM offers sandboxing to restrict what a dynamic language can do at runtime. (More about that will come in a future article.)

The isValid function evaluates the Python code. Python code evaluated like this is run in the Python global scope, which you can access with the getBindings method. The GraalVM API uses the Value type to represent dynamic language values to Java, with various functions to read members, array elements, and hash entries; to test properties, such as whether a value is numeric or represents a string; or to execute functions and invoke methods.

The code above retrieves the is_valid member of the global scope. This is the Python function object you have defined, and you can execute it with the topic String. The result is again of type Value, but you need a java.util.function.Predicate. GraalVM has your back here, too, and allows casting dynamic values to Java interfaces. The appropriate methods are transparently forwarded to the underlying Python object.

Wrapping Python scripts into beans

Of course, hardcoding Python code strings and manually instantiating polyglot contexts is not the proper way to structure a Micronaut app. A better approach is to make the context and engine objects available as beans, so they can be injected to other beans managed by Micronaut. Since you cannot annotate third-party classes, go about this by implementing a Factory, as follows:

@Factory

public class PolyglotContextFactories {

    @Singleton

    @Bean

    Engine createEngine() {

        return Engine.newBuilder().build();

    }

    @Prototype

    @Bean

    Context createContext(Engine engine) {

        return Context.newBuilder("python")

                .allowAllAccess(true)

                .engine(engine)

                .build();

    }

}

Each instance of the GraalVM polyglot context represents an independent global runtime state. Different contexts appear as if you had launched separate Python processes. The Engine object can be thought of as a cache for optimized and compiled Python code that can be shared between several contexts and thus warmup does not have to be repeated as new contexts are created.

Micronaut supports injection of configuration values from multiple sources. One of them is application.yml, which you can use to define where the Python code lives, as follows:

micronaut:

   application:

      name: websocket-chat

scripts:

   python-script: "classpath:scripts/script.py"

You can then access this script and expose its objects in another bean, as follows:

@Factory

@ConfigurationProperties("scripts")

public class PolyglotMessageHandlerFactory {

    private Readable pythonScript;

    public Readable getPythonScript() { return pythonScript; }

    public void setPythonScript(Readable script) { pythonScript = script; }

    @Prototype

    @Bean

    MessageHandler createPythonHandler(Context context) throws IOException {

        Source source = Source.newBuilder("python", pythonScript.asReader(), pythonScript.getName()).build();

        context.eval(source);

        return context.getBindings("python").getMember("ChatMessageHandler").as(MessageHandler.class);

    }

}

As before, you should expect a certain member to be exported in the Python script, but this time you are casting it to a MessageHandler interface. The following is how that is defined:

public interface MessageHandler {

   boolean isValid(String sender, String senderTopic, String message, String rcvr, String rcvrTopic);

   String createMessage(String sender, String message);

}

You can use this interface in the chat component.

@ServerWebSocket("/ws/chat/{topic}/{username}")

public class ChatWebSocket {

    private final MessageHandler messageHandler;

  // ...

    public ChatWebSocket(WebSocketBroadcaster broadcaster, MessageHandler messageHandler) {

        // ...

    }

  // ...

    @OnMessage

    public Publisher<String> onMessage(String topic, String username, String message, WebSocketSession s) {

        String msg = messageHandler.createMessage(username, message);

        // ...

    }

Phew! That was a lot. But now you have the flexibility to provide different scripts in the application config, and you’ll have the polyglot context only created and the script only run as needed by the app. The contract for the Python script is simply that it must export an object with an isValid and a createMessage function to match the Java MessageHandler interface. Besides that, you can use the full power of Python in message transformations.

class ChatMessageHandler:

    def createMessage(sender, msg):

        match = re.match("/([^ ]+)", msg)

        if match:

            try:

                if match.group(1) == "=":

                    return f"You sent a command with arguments: {msg.split()[-1]}"

                else:

                    return "Unknown command!"

            except:

                return f"Error during command execution: {sys.exc_info()[0]}"

        return f"[{sender}] {msg}"

    def isValid(sender, senderTopic, message, receiver, receiverTopic):

        return senderTopic == receiverTopic

What’s going on? This defines two functions on a class, ChatMessageHandler, to match the Java interface. The code exports the class object (not an instance!) to the polyglot bindings, so that the Java code can pick it up. The validation code is essentially the same just simplified due to different arguments.

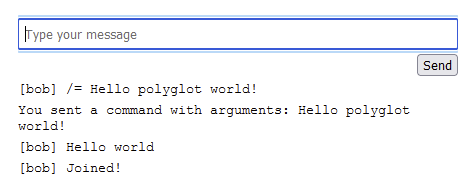
The createMessage transformation, however, is more interesting. Many chat systems treat a leading slash / specially, allowing bots or extended chat commands to be run like in a command-line interface. You can provide the same here, by matching such commands. Right now, the chat supports exactly one command, /=, which simply echoes its argument, as seen in Figure 1.
Oracle Java, Java Exam Prep, Oracle Java Certification, Java Career, Java Job, Java Skill
Figure 1. The simple chat application simply echoes an input.

Next, you’ll see how to use this flexibility to enhance the chat application with plotting for serious work chats—and with funny GIF files pulled straight from an online service for a less serious chat experience.

Finding cat pictures in Python and plotting image metadata with R


Nothing supports an argument in an online discussion more than a nice graph. You can extend the script with a command that draws a simple scatterplot from provided numbers. The syntax will be /plot followed by a whitespace-separated list of numbers.

There are numerous Python packages that provide plotting functionality. Unfortunately, none are in the standard Python library. You’ll learn how to install and use third-party Python packages shortly, but for now, you can use another superpower of GraalVM: language interoperability.

Among the languages supported by GraalVM is R, the language often used for statistical computing and graphics. With R you do not need to install any additional third-party packages to create the plot. Start with altering the way you build the context instances by adding another permitted language, as follows:

@Prototype
@Bean
Context createContext(Engine engine) {
    return Context.newBuilder("python", "R")
              // ...
              build();
}

Next, define an R function, toPlot, that takes the list of numbers as a string and returns the desired plot, again as a string containing a scalable vector graphics (SVG) markup.

library(lattice)

toPlot <- function(data) {
    y = scan(textConnection(data))
    x <- seq_along(y)
    svg('/dev/null', width=5, height=3)
    print(xyplot(y~x))
    return (svg.off())
}

export('toPlot', toPlot)

The last line adds the R function to the set of symbols shared between all the languages running within one context. Call this set the polyglot bindings. Here is how to access and use this R function in your Python code that is called from Java.

from polyglot import import_value
r_plot = import_value('toPlot')

def transform_message(sender, msg):
    match = SLASH_COMMAND_RE.match(msg)
    if match:
        try:
            command = match.group(1)
            args = msg.split(maxsplit=1)[1]
            if command == "img":
            # ...
            elif command == "plot":
                return r_plot(args)

This uses the import_value function provided by the built-in polyglot package. This function imports values that have been exposed to the polyglot bindings. The object that the import_value function returns is still the R function, but in most scenarios, you can work with it as if it were a regular Python function.

In this case, you can invoke the function, passing in a Python string again; R can process Python strings just fine. To stitch this together with your Java code, you will only need to evaluate the R script before evaluating the Python script. For this you will add one more configuration value—the R script—to be used in the factory that creates the polyglot MessageHandler service.

# application.yml
# ...
scripts:
    python-script: "classpath:scripts/script.py"
    r-script: "classpath:scripts/plot.R"

// Java code:
@Factory
@ConfigurationProperties("scripts")
public class PolyglotMessageHandlerFactory {
    Readable pythonScript;
    Readable rScript;  // new field for the configuration value

    @Bean
    @ThreadLocal
    MessageHandler createPythonHandler(Context context) throws IOException {
        // Evaluate the R script and continue as before
        Source rSource = Source.newBuilder("R", rScript.asReader(), rScript.getName()).build();
        context.eval(rSource);
     
        Source pySource = ...
        context.eval(pySource);
        // ...

Also note that this adds the ThreadLocal scope, because unlike Python, R is a single-threaded language and does not support concurrent access from multiple threads. Because you already decoupled your application to individual Micronaut beans, changing the application so that the Python code is executed in a separate context for each Java thread is this simple!

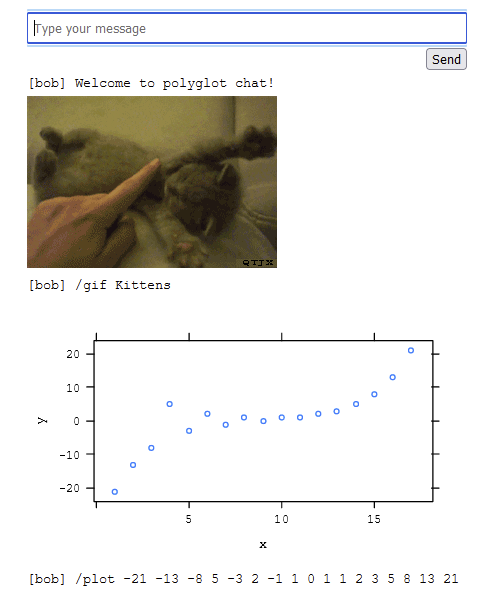
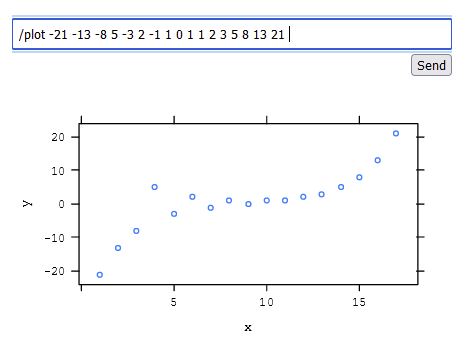
Now, you can use a proper command to plot the 17 bidirectional Fibonacci numbers around 0, as shown in Figure 2.

Oracle Java, Java Exam Prep, Oracle Java Certification, Java Career, Java Job, Java Skill
Figure 2. R is used to plot a Fibonacci sequence.

Adding external packages to GraalVM


Python’s packages are on the Python Package Index (PyPI) site, where you can find a nice package to interface with Giphy, the humorous GIF search service. But how do you bundle packages with the application? You certainly do not want to have to install them systemwide, or even globally, for the GraalVM installation.

Python developers recommend using virtual environments, or venv, to bundle project dependencies. This works on GraalPython (GraalVM’s Python runtime) as well. To install the package, run the following code:

$GRAALVM_HOME/bin/graalpython -m venv src/main/resources/chat_venv
source src/main/resources/chat_venv/bin/activate
pip install giphypop
deactivate

This will first create a venv called chat_venv, which is the recommended way to isolate Python package sets. You then activate this chat_venv in the current shell, making any subsequent Python commands work in that environment. Thus, when you install the giphypop package on the third line, it gets installed into the chat_venv folder rather than messing with installationwide packages.

In application.yml, add a key-value, python-venv: "classpath:venv/pyvenv.cfg", under the scripts section. This file was automatically created when you created the venv and is a useful marker file for the application to find its environment.

micronaut:
    application:
        name: websocket-chat
scripts:
    python-script: "classpath:scripts/script.py"
    python-venv: "classpath:chat_venv/pyvenv.cfg"

Next, modify the context creation to tell Python to use this venv by passing two new Python options:

@Factory
@ConfigurationProperties("scripts")
public class PolyglotContextFactories {
    String pythonVenv;

    // ...

    @Bean
    Context createContext(Engine engine, ResourceResolver r) throws URISyntaxException {
        Path exe = Paths.get(r.getResource(pythonVenv).get().toURI()).resolveSibling("bin").resolve("exe");
        return Context.newBuilder("python", "R")
                .option("python.ForceImportSite", "true")
                .option("python.Executable", exe.toString())
    // ...

These two options are important to make the embedded Python code behave as if it had been launched from a shell where the venv was activated. The standard library Python site package is automatically imported when you launch any Python on the command line but not when you embed Python.

The first option, python.ForceImportSite, enables importing the site package even while you are embedding Python. The package code queries the current executable path and determines if that was launched from a venv folder. That is why the second option, python.Executable, is there: to pretend to the Python code that the executable is actually inside the venv—even though really you are running a Java process. This is all possible because Python’s package system is set up to use the file system for the implicit discovery of package paths.

To use the service, simply update script.py as follows:

# ...

def transform_message(sender, msg):
    match = SLASH_COMMAND_RE.match(msg)
    if match:
        try:
            command = match.group(1)
            args = msg.split(maxsplit=1)[1]
            # ...
            elif command == "gif":
                import giphypop
                gif = giphypop.Giphy().translate(phrase=args)
                return f"<img src='{gif.media_url}'/>" if gif else "No GIF found"
            # ...

The convenience of many Python packages is now right at your fingertips. You can also strip a few megabytes off the venv by removing some folders, if size becomes important; however, a few megabytes of Python source files are to be expected in any case.

Figure 3 shows the finished chat application, with all the message handlers in use.

Oracle Java, Java Exam Prep, Oracle Java Certification, Java Career, Java Job, Java Skill

Figure 3. The completed chat application using Python and R

Source: oracle.com

Wednesday, March 9, 2022

Curly Braces #2: The design phase in Agile Java development

When it comes to the design of agile projects, the goal is to keep everything as simple as possible, while encouraging experimentation.

When you form a startup business, it’s a good strategy to spend money slowly, with the goal of generating revenue quickly. This is also a great one-line summary of the Agile method of software development. If time is your currency, spend it on only the most important tasks, and get something into production early to serve your users. This is well understood. But I still often hear the question, “Where does the software design phase fit into the Agile development process?” This is the topic I’ll explore here, especially as it relates to Java development.

Extreme Programming

With two-week or three-week sprints, it may seem challenging to find time for proper software architecture and design. To answer this challenge, I turn to a precursor of Agile, Extreme Programming (XP), as described in Kent Beck’s book, Extreme Programming Explained. In his book, Beck suggests a design strategy with goals that are aligned with both the process and the overall project goals. As far as I can see, Agile agrees with this strategy.

Just as it’s a myth that there’s little to no planning with the Agile development process, it’s a myth that Agile doesn’t account for design. For example, I’ve been part of more planning and retrospective meetings with projects that follow the Agile process than with any other process. Agile has enabled me to continually think about and consider software design with each sprint. This is quite the opposite of the waterfall software development process, where you consider design only once early in the process.

The notion of “sprint zero,” to me, is another myth. By definition, taking an arbitrary amount of time at the beginning of a project to design or build a backlog isn’t a sprint and runs counter to Agile. It’s effectively water-scrum-fall, a compromise.

There’s a better way to do Agile, and that’s to focus on simplicity.

Some things are inherently complex by their nature, but often complexity has simplicity at its base. The theory for design in Agile is to have just enough design to meet your immediate goals.

I believe in this approach, but I’ll admit there is a risk: If your design is too simple, technical debt can accumulate. There may be sprints where a concerted, collaborative effort is needed to make larger design decisions. However, it’s important to ensure that you’re always doing just the amount of design that’s needed.

Here are some strategies to employ; some are general, but some are Java-specific.

Have a continuous design strategy

It’s best to have a design strategy that carries through to each sprint. The strategy should enforce design concepts that are in line with the project goals and are easily communicated to team members. I’m in favor of small bouts of design with each sprint to continually improve the project structure. However, design is not an ad hoc process. The following elements of a good design strategy should be reinforced with each sprint:

◉ Reduce dependencies. Changes should be localized whenever possible, thus limiting their potential adverse effects.

◉ Consider cross-cutting facilities. Grow the common codebase as more features and components are added over time.

◉ Minimize abstraction. Add abstractions only as needed. (A funny story is recounted in Too Blue! by Dennis Andrews: In the early days of the IBM PC, if IBM identified the need for someone to begin a new role, instead of hiring just one person, the company would start a whole new department in anticipation of growing demand.)

◉ Choose simplicity. To handle both current and future needs, go with simple designs that are easily communicated.

◉ Emphasize collaboration. Communicate intent as you design and code for each sprint. If you cannot easily explain what you plan, consider a simpler approach.

◉ Define the test stories. Stories should include user requirements, new feature descriptions, and detailed directions on how to test the features. After all, if you cannot describe how to test something, how can you be sure you’re properly describing what is to be built? Usually when you describe the test process, you consider how to implement the feature accurately. The result will be a design that’s complete but also concise.

Agile, design, Java, and you

Good software design is key to long-term project success and to maintaining team morale, no matter the language or platform. Still, there are some approaches that apply particularly well to Java projects.

Encourage experimentation. Your Agile process needs to account for experimentation and even encourage it—not on every sprint, perhaps, but certainly experimentation can be helpful throughout the development lifecycle.

For example, the Java ecosystem is rich, and this means you may need to consider the use of one open source or commercial package among many, such as which NoSQL database to use or which storage paradigm to adopt. To make the best decisions, you might need to try the alternatives. This suggests dedicating a sprint, now and then, to conduct experiments.

That said, be realistic. Imagine a possible design decision to build your own NoSQL database for future flexibility. Experimenting with building a NoSQL database engine is likely not the best use of time.

Whereas past development practices stressed designing your own core capabilities to anticipate potential possibilities, Agile doesn’t necessarily support this. Something unanticipated may come along, such as the rise in graph databases, which better suits your application and data. If you built your own NoSQL database, switching means you have wasted all that effort. Or worse, making a big investment writing, debugging, and tuning a NoSQL database engine may delay the move to a graph database that’s perhaps a superior choice, due to an all-too-human desire to justify your prior investment.

Consider design by contract. Java interfaces are used to define contracts, and many developers know this. Contracts serve as a layer of abstraction, because they help break dependencies between discrete classes. In other words, if you write your code to interfaces, you can change the implementing classes without affecting those that use them. This is known as interface decoupling and is directly in line with Agile’s rule of simplicity, with a goal of limiting the side effects of code changes.

For example, say you are implementing an automated barista for a very busy coffee shop. There are different types of beans to use and different brewing methods depending on the order. You can write the Barista class to use different classes directly, each representing the different coffee beans and makers. It is better to abstract the implementations using interfaces: CoffeeBean and CoffeeMaker.

Although the details within the classes are different, each class implements the same set of methods. Therefore, the correct classes can be supplied to the Barista constructor, see the two lines that begin with the keyword new.

public class Barista {

    CoffeeBean coffeeBeans = null;

    CoffeeMaker coffeeMaker = null;

    public Barista(CoffeeBean beans, CoffeeMaker maker) {

        // …

    }

    public boolean brew() {

        coffeeMaker.brew( coffeeBeans );

    }

}

// …

Barista barista = new Barista( 

    new EspressoBeans(), 

    new EspressoMaker() ); 

barista.brew();

The result is a system that’s easy to extend, sprint by sprint, to automate the creation of new coffee drinks.

Avoid cyclic dependencies. Interface decoupling can result in risky dependencies, especially when you’re building software in small, rapid changes.

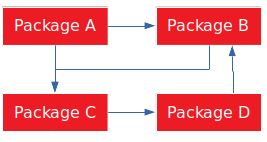
For example, consider a project that uses four Java packages: A, B, C, and D. Package A has dependencies on packages B and C. Package B has a dependency on package C. Package D has a dependency on Package B (see Figure 1).

In this scenario, what if package C later adds a dependency on package D? You have a nasty cyclic dependency between them.

Oracle Java Development, Oracle Java Exam Prep, Oracle Java Learning, Java Career, Java Skills, Java Jobs
Figure 1. Cyclic dependency in Java packages

This scenario may seem contrived, but it’s more common than you might think in complex applications. It can result in build issues and side effects when making changes to a package and its classes. Cyclic dependencies can easily sneak up on you in an Agile project involving many developers, but proper design effort applied at every sprint will help to avoid it.

Apply the dependency inversion principle (DIP). With DIP, you create the right level of abstraction to avoid highly coupled classes yet allow them to be used together in ways that make sense to break cyclic dependencies.

Specifically, DIP says the following:

◉ High-level components should not import from lower-level components.
◉ Abstractions hide details.
◉ Use interfaces.

In the example in Thorben Janssen’s article on DIP, the familiar topic of coffee is used with the CoffeeBean interface from the earlier code example. However, DIP is important when you consider how CoffeeBean objects are used. They can be ground, brewed, or even eaten as snacks.

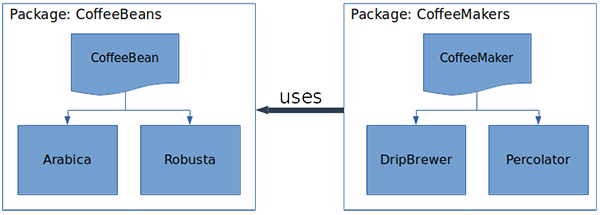
Sticking with the traditional notion of making drinkable coffee, you will need a CoffeeMaker object that uses CoffeeBean objects. Since there are many different types of coffeemakers, this application defines an interface also, as shown in Figure 2.

Oracle Java Development, Oracle Java Exam Prep, Oracle Java Learning, Java Career, Java Skills, Java Jobs
Figure 2. DIP, with strict relationship rules, avoids cyclic dependencies.

With DIP, it’s important to keep the relationships proper. Although CoffeeMakers depend on CoffeeBeans, CoffeeBeans should be written with no knowledge of the types of different CoffeeMakers, nor should beans be partial to how they’re roasted, ground, and otherwise prepared.

Implement scalability through tiers. Following simple design strategies so far will help you design for scale later, when you need that scale. With interfaces and DIP, you can easily insert tiers within your codebase as growth requires it without much rework.

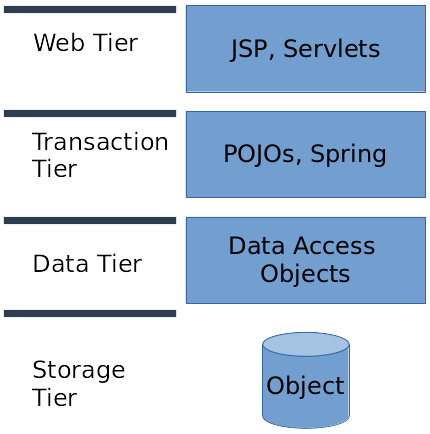
For example, early in the implementation of a web application, you may choose JavaServer Pages that write directly to a database. As the project progresses, you might find it’s better to have a thin data tier to abstract your storage choice. As usage grows, you may choose to add yet another tier to offload transaction processing, and so on (see Figure 3).

Oracle Java Development, Oracle Java Exam Prep, Oracle Java Learning, Java Career, Java Skills, Java Jobs
Figure 3. An example of a typical multitiered web application

I find with a distributed architecture, such as components spread across tiers, using a form of messaging middleware helps. It allows you to reduce dependencies and remove tight coupling using anonymous publish-subscribe messaging, asynchronous communication, and reliability. You can use REST, Java Message Service, the Data Access Object pattern, WebSockets, a cloud service, or an edge protocol such as MQTT, for example. This approach helps you design, code, and deploy components independently, increasing your agility. (A useful overview of tiered software design is “Distributed multitiered applications.”)

Source: oracle.com

Monday, March 7, 2022

Curly Braces #1: Java and a project monorepo

In his debut Java Magazine column, Eric Bruno explores the benefits of keeping all your project elements in a single Git repository.

[Welcome to “Curly Braces,” Eric Bruno’s new Java Magazine column. Just as braces (used, for example, in if, while, and for statements) are critical elements that surround your code, the focus of this column will be on topics that surround Java development. Some of the topics will be familiar while others will be novel—and the goal will be to help you think more deeply about how to build Java applications. —Ed.]

Core Java, Oracle Java Preparation, Oracle Java Certification, Oracle Java Guides, Oracle Java Skills, Oracle Java Jobs

I recently explored a fairly new concept in code repository organization that some large companies have adopted, called the monorepo. This is a subtle shift in how to manage projects in systems such as Git. But from what I’ve seen, some people have strong feelings about monorepos one way or the other. As a Java developer, I believe there are some tangible benefits to using a monorepo.

First, I assume nearly everyone agrees that IDEs make it easy to build and test a multicomponent application. Whether you’re building a series of microservices, a set of libraries, or an application with distributed components, it’s straightforward to use NetBeans, IntelliJ IDEA, or Eclipse to import them, build dependencies, deploy, and run the result. As for external dependencies, tools such as Maven and Gradle handle them well.

It’s straightforward and common to have a single script to build a project and all its dependent projects, pull down external dependencies, and then deploy and even run the application.

By contrast, managing Git repositories is a tedious process to me. Why can’t I have an experience similar to an IDE across source code repositories? Well, I can and you can, and that’s the reason for the monorepo movement.

What is a monorepo, and why should you care?

Overall, I feel a monorepo helps to overcome some of the nagging polyrepo issues that bother me. The act of cloning multiple repos, configuring permissions, dealing with pushes across separate Git repos and directories, forgetting to push to one repo when I’ve updated code across more than one…phew. That is tedious and exhausting.

With the monorepo, you ideally place all of your code—every application, every microservice, every library, and so on—into a single repository. Only one.

Developers then pull down the entire bundle and operate on that one repo going forward.

Even as developers work on different applications, they’re working from the same Git repository, which means all pull requests, all branches and merges, tags, and so on take place against that one repo.

This has the advantage that you clone one repository for your entire organization’s codebase, and that’s it. That means no more tedium related to multiple repos, as described above. It also has other benefits, such as the following:

◉ Avoiding silos: Because they pull down the source for all internal applications and libraries, all developers have the means to make code changes and, indeed, they should be expected to. This removes silos, where only certain developers are permitted to maintain the code.

◉ Fewer pull requests: If you change a library, its interface, one or more applications that use that library, or the related documentation, you need only one pull request and merge with the monorepo compared to multiple requests if the elements lived in separate repos. This is sometimes referred to as an atomic commit.

◉ Transparency: I once worked for a company whose main application consisted of dozens and dozens of individual Java projects. Depending on what you were trying to do, you needed to choose combinations of these projects. (In a way, these were a simple form of microservices.) Occasionally I needed to discover which additional Git repo I needed to clone to make things work, and that wasn’t always easy. With a monorepo, all of the code is in your local tree.

◉ Code awareness: Due to transparency, there’s reduced risk of code duplication.

◉ Improved structure: I’ve seen different approaches to structuring a monorepo, but a common one is to create subdirectories for the different types of codebases, such as apps, libs, or docs. Each application resides within its own subdirectory under apps, each library resides under libs, and so on. This approach also helps because documentation is kept with the code in the repo.

◉ Continuous integration/continuous delivery (CI/CD): GitHub Actions helps resolve many tooling issues with monorepos. Specifically, GitHub supports code owners with scoped workflows for project management and permissions. Atlassian also provides tips for monorepos and GitLab does as well. Other tools are available to support monorepos. However, you can get by very well with just Maven or Gradle.

Monorepo and Maven for Java projects

A monorepo advantage specific to Java projects is improved dependency management. Since you’re likely to have all your organization’s applications and libraries locally, any changes to a dependency in an application (other than the one you’re focused on) will be built locally and tests will run locally as well. This process will highlight potential conflicts and the need for regression testing earlier during development before binaries are rolled out to production.

Here’s how the monorepo concept affects Maven projects. Of course, Maven isn’t aware of your repo structure, but using a monorepo does affect how you organize your Java projects; therefore, Maven is involved.

For instance, it’s common to structure a monorepo (and the development directory structure) as follows:

<monorepo-name>

|–apps

| |–app1

| |–app2

|–libs

| |–librarybase

| |–library1

| |–library2

|–docs

However, you can structure your monorepo any way you wish, with directories named frontend, backend, mobile, web, microservices, devops, and so on.

To support the monorepo hierarchy, I use Maven modules. For instance, at the root of the project, I define a pom.xml file with modules for apps and libs. Listing 1 is a partial listing that shows root-level modules.

Listing 1.

<?xml version="1.0" encoding="UTF-8"?>

<project xmlns="http://maven.apache.org/POM/4.0.0" xmlns:xsi="http://www.w3.org/2001/XMLSchema-instance"

         xsi:schemaLocation="http://maven.apache.org/POM/4.0.0 http://maven.apache.org/xsd/maven-4.0.0.xsd">

    <modelVersion>4.0.0</modelVersion>

    <groupId>com.ericbruno</groupId>

    <artifactId>root</artifactId>

    <version>${revision}</version>

    <packaging>pom</packaging>

    <properties>

        <revision>1.0-SNAPSHOT</revision>

        <project.build.sourceEncoding>UTF-8</project.build.sourceEncoding>

        <maven.compiler.source>15</maven.compiler.source>

        <maven.compiler.target>15</maven.compiler.target>

    </properties>

    <modules>

        <module>libs</module>

        <module>apps</module>

    </modules>

Within each of the subdirectories, such as libs and apps, there are pom.xml files that define the set of library and application modules, respectively. As shown in Listing 2, the pom.xml file for the set of library modules is straightforward and goes within the libs subdirectory.

Listing 2.

<?xml version="1.0" encoding="UTF-8"?>

<project xmlns="http://maven.apache.org/POM/4.0.0" xmlns:xsi="http://www.w3.org/2001/XMLSchema-instance"

         xsi:schemaLocation="http://maven.apache.org/POM/4.0.0 http://maven.apache.org/xsd/maven-4.0.0.xsd">

    <modelVersion>4.0.0</modelVersion>

    <parent>

        <groupId>com.ericbruno</groupId>

        <artifactId>root</artifactId>

        <version>${revision}</version>

    </parent>

    <groupId>com.ericbruno.libs</groupId>

    <artifactId>libs</artifactId>

    <packaging>pom</packaging>

    <modules>

        <module>LibraryBase</module>

        <module>Library1</module>

        <module>Library2</module>

    </modules>

</project>

The pom.xml file for applications is more involved. To avoid consuming local disk space, and to avoid long compile times, you might decide to keep only a subset of your organization’s applications locally. This is not recommended, because you lose some of the benefits of a monorepo, but due to resource constraints, you may have no choice. In such cases, you can omit application subdirectories as you see fit. However, to avoid build errors in your Maven scripts, you can use Maven build profiles, which contain <activation> property sections with <file> and <exists> properties, as shown in Listing 3.

Listing 3.

<?xml version="1.0" encoding="UTF-8"?>

<project xmlns="http://maven.apache.org/POM/4.0.0" xmlns:xsi="http://www.w3.org/2001/XMLSchema-instance"

         xsi:schemaLocation="http://maven.apache.org/POM/4.0.0 http://maven.apache.org/xsd/maven-4.0.0.xsd">

    <modelVersion>4.0.0</modelVersion>

    <parent>

        <groupId>com.ericbruno</groupId>

        <artifactId>root</artifactId>

        <version>${revision}</version>

    </parent>

    <groupId>com.ericbruno.apps</groupId>

    <artifactId>apps</artifactId>

    <packaging>pom</packaging>

    <profiles>

        <profile>

            <id>App1</id>

            <activation>

                <file>

                    <exists>App1/pom.xml</exists>

                </file>

            </activation>

            <modules>

                <module>App1</module>

            </modules>

        </profile>

        <profile>

            <id>App2</id>

            <activation>

                <file>

                    <exists>App2/pom.xml</exists>

                </file>

            </activation>

            <modules>

                <module>App2</module>

            </modules>

        </profile>

    </profiles>

</project>

The sample monorepo in Listing 3 contains only two applications: App1 and App2. There are Maven build profiles defined for each, which causes the existence of each application’s separate pom.xml file to be checked before the profile is activated. In summary, only the applications that exist on your local file system will be built, no Maven errors will occur, and you don’t need to change the Maven scripts. This works well with Git’s concept of sparse checkouts, as explained on the GitHub blog.

Note: Alternatively, you can drive Maven profile activation by checking for the lack of a file using the <missing> property, which can be combined with <exists>.

In the sample monorepo, available in my GitHub repository here, I created two libraries, both of which extend a base library using Java interfaces and Maven modules and profiles. For example, whereas LibraryBase is a standalone Maven Java project, Library1 depends on it. As you can see, LibraryBase is denoted as a Maven dependency in the pom.xml for Library1.

...

<dependency>

    <groupId>com.ericbruno</groupId>

    <artifactId>LibraryBase</artifactId>

    <version>1.0-SNAPSHOT</version>

    <type>jar</type>

</dependency>

...

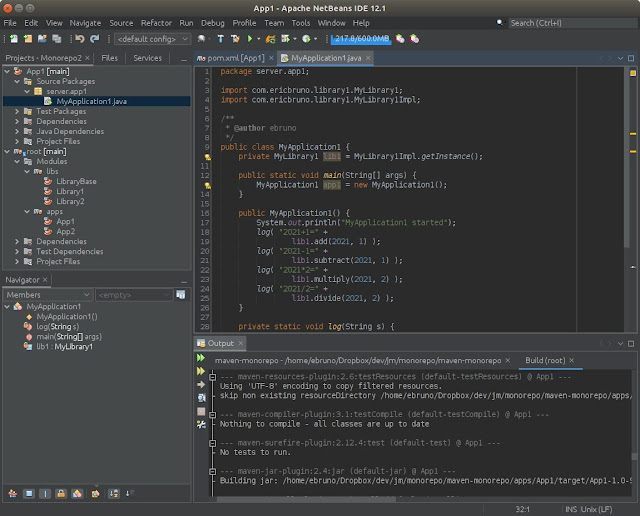
You can open the root monorepo pom.xml file as a Maven Java project within NetBeans, and all the modules will be listed in a hierarchy (see Figure 1). You can build the entire set of libraries and applications from this root project. You can also double-click a module—such as App1 in this example—and that project will load separately so you can edit its code.

Core Java, Oracle Java Preparation, Oracle Java Certification, Oracle Java Guides, Oracle Java Skills, Oracle Java Jobs
Figure 1. A monorepo root Maven project with an individual module loaded in NetBeans

Oh, a final tip: Remember to rename your master branch to main, because that’s a more inclusive word.

Some monorepo challenges to overcome


There are two sides to every story, and a monorepo has some challenges as well as benefits.

As discussed earlier, there could potentially be a lot of code to pull down and keep in sync. This can be burdensome, wasteful, and time-consuming.

Fortunately, there’s an easy way to handle this, as I’ve shown, by using build profiles. Other challenges, as written about by Matt Klein, include potential effects on application deployment, the potential of tight coupling between components, concerns over the scalability of Git tools, the inability to easily search through a large local codebase, and some others.

In my experience, these perceived challenges can be overcome, tools can and are being modified to handle growing codebases, and the benefits of a monorepo, as explained by Kenneth Gunnerud, outweigh the drawbacks.

Source: oracle.com

Friday, March 4, 2022

Understanding the constant pool inside a Java class file

Oracle Java Certification, Core Java, Java Career, Java Preparation, Oracle Java Skills, Oracle Java Guides

Taking a deep dive into the class file’s symbol table

Design implications of Java’s switch statements and switch expressions

The venerable class file is the JVM’s fundamental unit of execution. Every Java class produces a file that contains considerable data as well as executable bytecodes that implement the behavior. Class files are generated by the javac compiler and can be run in the following three modes:

◉ Standalone mode, provided they contain a main() method

◉ Bundled with other classes into JAR, EAR, or WAR files, which are simply zipped collections of classes and data items

◉ Bundled into modules and then into executable images via tools such as jlink

When it comes time to execute a specific class, the JVM locates the class file and loads it. The loading process involves parsing the file into its various fields and then placing the parsed data in a convenient format into the JVM’s method area. This is an area shared across threads where variables and methods, among other items, can be looked up.

The class file format has changed little over the releases of Java: It consists of a file header, some bytes identifying the Java version that generated the class file, a significant area called the constant pool (which I discuss shortly), additional data fields, the methods, and finally a series of attributes.

Over the years, the changes brought by various releases have not altered the layout of the class file, but they have changed the data items and especially the attributes stored in the class file. Because the original layout was extensible, these changes happened without disruption. To ensure safe execution, the bytes identifying the Java version in the file prevent older versions of the runtime from executing class files with newer features.

Introducing the constant pool

One of the most important sections of a class file is the constant pool, which is a collection of entries that serve as a symbol table of sorts for the class. The constant pool contains the names of classes that are referenced, initial values of strings and numeric constants, and other miscellaneous data crucial to proper execution.

You can learn a lot by looking at the constant pool for the following simple class: 

class Hello {

    public static void main( String[] args ) {

        for( int i = 0; i < 10; i++ )

            System.out.println( "Hello from Hello.main!" );

  }

}

To see the constant pool, use the javap class file disassembler included in the JDK. Running javap with the verbose -v option prints a wealth of detail about the class, including the constant pool and the bytecode for all the methods. Running javap -v Hello.class, I get a listing of 83 lines. Here is the constant pool portion of that output.

   #1 = Methodref          #6.#16         // java/lang/Object."<init>":()V

   #2 = Fieldref           #17.#18        // java/lang/System.out:Ljava/io/PrintStream;

   #3 = String             #19            // Hello from Hello.main!

   #4 = Methodref          #20.#21        // java/io/PrintStream.println:(Ljava/lang/String;)V

   #5 = Class              #22            // Hello

   #6 = Class              #23            // java/lang/Object

   #7 = Utf8               <init>

   #8 = Utf8               ()V

   #9 = Utf8               Code

  #10 = Utf8               LineNumberTable

  #11 = Utf8               main

  #12 = Utf8               ([Ljava/lang/String;)V

  #13 = Utf8               StackMapTable

  #14 = Utf8               SourceFile

  #15 = Utf8               Hello.java

  #16 = NameAndType        #7:#8          // "<init>":()V

  #17 = Class              #24            // java/lang/System

  #18 = NameAndType        #25:#26        // out:Ljava/io/PrintStream;

  #19 = Utf8               Hello from Hello.main!

  #20 = Class              #27            // java/io/PrintStream

  #21 = NameAndType        #28:#29        // println:(Ljava/lang/String;)V

  #22 = Utf8               Hello

  #23 = Utf8               java/lang/Object

  #24 = Utf8               java/lang/System

  #25 = Utf8               out

  #26 = Utf8               Ljava/io/PrintStream;

  #27 = Utf8               java/io/PrintStream

  #28 = Utf8               println

  #29 = Utf8               (Ljava/lang/String;)V

The numbers on the left are simply the entry number for the items. Note that the first entry is #1, not #0. There is a dummy entry implicit at slot 0 that is never referenced. The second column gives the type of entry, the third column contains the value of the entry, and the data after the // characters is javap’s helpful way of telling you what’s being referred to. I’ll clarify this shortly.

Perhaps the most striking thing about this listing is the frequency of entry type Utf8, which is an internal-only format used in the Java class to represent string data. (Technically, this entry slightly diverges from the UTF-8 standard to eliminate 0x00 bytes; for all other intents, it’s a UTF-8 encoding.)

All the other entries in this constant pool eventually resolve to one of the Utf8 entries. Let’s see that in practice: There are four entries of type Class. Let’s take the first one (entry #5). That entry points to entry #22, which is a Utf8 entry with the value Hello, which is the name of the class being examined. As mentioned in the previous paragraph, by showing it after the double slashes of entry #5javap, helpfully saves you from having to jump around to get this value.

The internal referencing between entries can become complicated. For example, the MethodRef entry for #4 is a reference to a method. It eventually points to the println() method, which is called in the original code. The MethodRef entry points to two additional entries, as follows:

◉ First is #20, which is the class name. This name is shown using the JVM’s internal format in which the dots that usually separate the parts of a class’s name are replaced by forward slashes.

◉ The second is #21, which points to a NameAndType record. This record points to two other Utf8 entries, which give the name of the method and its signature.

When you string together the class name, method name, and signature, you get the following output, which is also shown to the right of the double slashes for slot #4:

java/io/PrintStream.println(Ljava/lang/String;)V

(I removed the colon, which was inserted by javap for readability.) This string is worthy of careful examination. The first thing that stands out is the part in parentheses that begins with an L and ends with a semicolon. The parentheses express the type of parameters the method accepts. The descriptors for primitive types are

◉ B (byte)

◉ C (char)

◉ D (double)

◉ F (float)

◉ I (int)

◉ J (long)

◉ S (short)

◉ Z (Boolean)

If the code used the form of println() that accepted a float, the signature would be (F)V. This example, however, sends a string to println(); the string is not a primitive but rather an object. Objects are expressed by L followed by the name of the class that defines their type, followed by a semicolon. Therefore, the method expects to be passed a string. The method returns nothing, which is communicated by V (for void) after the closing parenthesis.

Note that arrays are shown using opening brackets for each dimension, followed by the type of the array. The signature for main(), which takes an array of strings, is

([Ljava/lang/String;)V

Note the opening bracket inside the opening parenthesis.

Returning to the program, you’ll notice that the Java source code called System.out.println(), while the function pointed to here is Java.io.PrintStream.println(). That is because System.out is a static field. It’s of type PrintStream, whose println() static method is being called here. This transmutation is conveyed by entry #2 in the constant pool.

Now, look at entry #1, a MethodRef (method reference) to an <init>()V method in java.lang.Object. This is the default constructor that the compiler inserts into classes that don’t declare their own constructor. When a class fails to have a constructor, the compiler goes to its superclass looking for one. If the superclass doesn’t have one, the JVM looks at that superclass’ superclass, and so on up the chain. If no superclass has a constructor, the compiler will eventually get to the topmost object in the hierarchy, java.lang.Object, and use its constructor.

The constructor has the name <init>, which you’ll notice is a name that cannot appear in Java code, because method names are not allowed to begin with the < symbol. This last constraint is a signal that this call was inserted by the compiler and not derived from user code. An interesting side note is that the compiler creates this constructor for a class automatically—even for a class whose only method is the static main(), meaning the constructor is not called.

In the bytecode, the Utf8, MethodRef, and so forth are single-byte tags that identify the record that follows. There are more tags than shown in the listing. These include tags for each of the primitive types (typically used to initialize static versions of the data item), method handles, module and package entries, and specialized entries to handle invokedynamic instructions. The complete list of constant pool tags is in the JVM Specification document section 4.4.

Constant pool entries refer to each other using a two-byte unsigned value. In theory, this would imply that the largest constant pool could have 65,534 entries (the unsigned two-byte maximum less the initial dummy entry), but such is not the case. Entries for longs and doubles occupy two slots in the constant pool, with the second slot being unused and inaccessible (this is enforced by the JVM).

This design added complexities to JVM implementations and is gently lamented in the JVM Specification document section 4.4.5: “In retrospect, making 8-byte constants take two constant pool entries was a poor choice.” This kind of candor makes the documentation a pleasure to read.

In practice, constant pools rarely if ever threaten to breach the maximum. For example, the java.math.BigDecimal class is a massive entity with an amazing 167 methods and 37 initialized fields. Its constant pool has 1,533 entries, which is a lot but nowhere near the permitted maximum.

Using the constant pool

Earlier in this article, I referred to the constant pool as a symbol table of sorts, which is how it’s used by executing methods. Look at the bytecode for the main() method in the previous program.

 0: iconst_0

 1: istore_1

 2: iload_1

 3: bipush        10

 5: if_icmpge     22

 8: getstatic     #2  // Field java/lang/System.out:Ljava/io/PrintStream;

11: ldc           #3  // String Hello from Hello.main!

13: invokevirtual #4  // Method java/io/PrintStream.println:(Ljava/lang/String;)V

16: iinc          1, 1

19: goto          2

22: return

Methods consist of one-byte instructions (hence the term bytecode) followed by zero or more arguments. The arguments are either values or references to entries in the constant pool. This listing, which is generated by javap, consists of a left column that shows the location of the current bytecode instruction as an offset from 0, a second column showing the bytecode instruction, and a third column that contains any arguments; also, as before, javap has put helpful resolutions of values behind double slashes.

The first three instructions load a zero, which is the count of completed loops, into a local variable and onto the Java stack, and then bipush pushes a 10 onto the stack. This 10 represents the maximum number of loop iterations in the original Java code. A comparison between the two is made, as follows:

◉ If the counter is greater than or equal to 10, the code jumps to instruction #22, which is a return statement that exits the function. Because the function being returned is main(), it ends the program.

◉ However, if 10 iterations of the loop have not occurred, the logic drops to the following getstatic instruction at position #8, which fetches the object System.out. (All that the bytecode knows is that it’s fetching a field specified by constant pool entry #2.) Looking this up, as shown previously, refers to constant pool entries #17 and #18, which point to a java.io.PrintStream object named out.

The next instruction, ldc, loads the string located at constant pool entry #3 and puts it onto the stack.

The following instruction, invokevirtual, calls the println() method of java.io.PrintStream as specified in constant pool entry #4. Per the previous discussion of this entry, it expects a string, which it finds on the stack of the calling function. After printing the string, the remaining code increments the counter previously initialized to 0 and runs through the loop again.

The use of comparisons and jumps that depend on the result of the compare instruction is how the Java compiler encodes loops. This will be familiar to assembly language programmers.

Class files in practice

Everything I’ve described so far is roughly how the JVM works in its initial parse of a class and first run through the main() method. Subsequent runs are far more optimized than that process. Why? A performant JVM could not afford on every iteration of the loop to look up constant pool entry #2, then from there jump to entries #17 and #18, and from there go to fetch the pointed-to object.

In fact, there is a runtime constant pool, which is an optimized representation of the parsed entries. For example, it might replace the reference of entry #2 with a direct link to the object to be fetched, saving several lookups in the process.

Likewise, method lookups are accelerated by a variety of tricks. For example, let’s return to the BigDecimal class I mentioned earlier. It has 137 methods, which are accessed in the method area of the JVM, where they were placed by the class loader.

A problem is that the constant pool tells you only the name and the signature of the method. To find it initially, the JVM must search to find the method it’s looking for. To accelerate the search, the JVM creates a data structure called the MTable (for method table), which holds the name of the methods and pointers to their bytecodes. The MTable also contains the names of all methods in superclasses with the corresponding pointers. In this way, the climb through superclasses discussed earlier is resolved by a single lookup.

The MTable can be used for other things. For example, I’m presently working on the Jacobin project, which is writing a more-than-minimal JVM in the Go language. The project uses the MTable for purposes such as redirecting the Jacobin JVM to use a function written in Go rather than in its Java counterpart. This is done by sticking an entry into the MTable using the method name and signature as the key and a pointer to the Go code as the value. This is useful especially for operating system APIs (which are often written in native code) and for performance optimization.

Easy to parse

The constant pool is designed to be easy to parse quickly. For this reason, all values are stored in strings, which for some readers will come as a surprise. Indeed, even the values to initialize fields to are stored as strings and must be converted from strings to their binary representation. For example, many source code files of the JDK use a serial number to validate serialization of the class. Looking at an example from NumberException.java, the code starts with just such a static field.

static final long serialVersionUID = -2848938806368998894L;

In the javap output for this class, this number is represented in the constant pool as

#20 = Long               -2848938806368998894l

When the class loader comes across this value, it converts it into a binary format and thereby makes it ready for use.

A happy consequence of values, types, and class references being passed as strings is that when you look at a javap decompilation of a class, it’s comparatively easy to understand what you’re looking at.

Source: oracle.com

Wednesday, March 2, 2022

Sentiment analysis in Java: Analyzing multisentence text blocks

Sentiment Analysis in Java, Oracle Java, Java Exam Prep, Java Certification, Oracle Java Prep Exam, Java Skills, Java Jobs, Java Preparation

One sentence is positive. One sentence is negative. What’s the sentiment of the entire text block?

This article

Sentiment analysis tells you if text conveys a positive, negative, or neutral message. When applied to a stream of social media messages from an account or a hashtag, for example, you can determine whether sentiment is overall favorable or unfavorable. If you examine sentiments over time, you can analyze them for trends or attempt to correlate them against external data. Based on this analysis, you could then build predictive models.

This is the second article in a series on performing sentiment analysis in Java by using the sentiment tool integrated into Stanford CoreNLP, an open source library for natural language processing (NLP).

In the first article, “Perform textual sentiment analysis in Java using a deep learning model,” you learned how to use this tool to determine the sentiment of a sentence from very negative to very positive. In practice, however, you might often need to look at a single aggregate sentiment score for the entire text block, rather than having a set of sentence-level sentiment scores.

Here, I will describe some approaches you can use to perform analysis on an arbitrarily sized text block, building on the Java code presented in the first article.

Scoring a multisentence text block

When you need to deal with a long, multisentence text block (such as a tweet, an email, or a product review), you might naturally want to have a single sentiment score for the entire text block rather than merely receiving a list of sentiment scores for separate sentences.

One simple solution is to calculate the average sentiment score for the entire text block by adding the sentiment scores of separate sentences and dividing by the number of sentences.

However, this approach is not perfect in most cases since different sentences within a text block can affect the overall sentiment differently. In other words, different sentences within a block may have varying degrees of importance when you calculate the overall sentiment.

There is no single algorithm for identifying the most-important sentences that would work equally well for all types of texts; perhaps that is why Stanford CoreNLP does not provide a built-in option for identifying the overall sentiment of a multisentence text block.

Fortunately, you can manually code such functionality to work best for the type of text you are dealing with. For example, text samples of the same type usually have something in common when it comes to identifying the most-important sentences.

Imagine you’re dealing with product reviews. The most-important statements—from the standpoint of the overall review sentiment—typically can be found at the beginning or the end of the review. The first statement usually expresses the main idea of the review, and the last one summarizes it. While this may not be true for every review, a significant portion of them look exactly like that. Here is an example.

I would recommend this book for anyone who wants an introduction to natural language processing. Just finished the book and followed the code all way. I tried the code from the resource website. I like how it is organized. Well done.

The Stanford CoreNLP sentiment classifier would identify the above sentences as follows:

Sentence: I would recommend this book for anyone who wants an introduction to natural language processing.

Sentiment: Positive(3)

Sentence: Just finished the book and followed the code all way.

Sentiment: Neutral(2)

Sentence: I tried the code from the resource website.

Sentiment: Neutral(2)

Sentence: I like how it is organized.

Sentiment: Neutral(2)

Sentence: Well done.

Sentiment: Positive(3)

As you can see, the first and the last sentences suggest that the review is positive. Overall, however, the number of neutral sentences in the review outnumber the positive statements, which means that an arithmetic linear average, where you give the same weight to each sentence, does not seem to be a proper way to calculate the overall sentiment of the review. Instead, you might want to calculate it with more weight assigned to the first and the last sentences, as implemented in the example discussed below.

The weighted-average approach

Continuing with the sample Java program introduced in the first article, add the following getReviewSentiment() method to the nlpPipeline class, as follows:

import java.util.*;

...

    public static void getReviewSentiment(String review, float weight)

    {

        int sentenceSentiment;

      int reviewSentimentAverageSum = 0;

        int reviewSentimentWeightedSum = 0;

        Annotation annotation = pipeline.process(review);        

        List<CoreMap> sentences = annotation.get(CoreAnnotations.SentencesAnnotation.class);

        int numOfSentences = sentences.size();

        int factor = Math.round(numOfSentences*weight);

        if (factor == 0) {

            factor = 1;

        }

        int divisorLinear = numOfSentences;

        int divisorWeighted = 0;

        for (int i = 0; i < numOfSentences; i++)

        {

           Tree tree = sentences.get(i).get(SentimentAnnotatedTree.class);

          sentenceSentiment = RNNCoreAnnotations.getPredictedClass(tree); 

            reviewSentimentAverageSum = reviewSentimentAverageSum + sentenceSentiment;

            if(i == 0 || i == numOfSentences -1) { 

                reviewSentimentWeightedSum = reviewSentimentWeightedSum + sentenceSentiment*factor;

                divisorWeighted += factor;

            }

            else

            {

                reviewSentimentWeightedSum = reviewSentimentWeightedSum + sentenceSentiment;

                divisorWeighted += 1;

            }

        }

        System.out.println("Number of sentences:\t\t" + numOfSentences);

        System.out.println("Adapted weighting factor:\t" + factor);

        System.out.println("Weighted average sentiment:\t" + Math.round((float) reviewSentimentWeightedSum/divisorWeighted));

        System.out.println("Linear average sentiment:\t" + Math.round((float) reviewSentimentAverageSum/divisorLinear));

    }

The getReviewSentiment() method shown above illustrates how to calculate the overall sentiment of a review using two approaches, calculating both a weighted average and the linear average for comparison purposes.

The method takes the text of a review as the first parameter. As the second, you pass a weighting factor to apply to the first and the last sentences when calculating the overall review sentiment. The weighting factor is passed in as a real number in the range [0, 1]. To apply the scale to fit a particular review, you recalculate the weighting factor by multiplying the passed value by the number of sentences in the review, thus calculating the adapted weighting factor.

To test the getReviewSentiment() method, use the following code:

public class OverallReviewSentiment 

{

    public static void main(String[] args) 

    {

         String text = "I would recommend this book for anyone who wants an introduction to natural language processing. Just finished the book and followed the code all way. I tried the code from the resource web site. I like how it is organized. Well done.";

   nlpPipeline.init();

   nlpPipeline.getReviewSentiment(text, 0.4f);

    }

}

This example passes in 0.4 as the weighting factor, but you should experiment with the value passed in. The higher this value, the more importance is given to the first and last sentences in the review.

To see this approach in action, recompile the nlpPipeline class and compile the newly created OverallReviewSentiment class. Then, run OverallReviewSentiment, as follows:

$ javac nlpPipeline.java

$ javac OverallReviewSentiment.java

$ java OverallReviewSentiment

This should produce the following results:

Number of sentences: 5

Adapted weighting factor: 2

Weighted average sentiment: 3

Linear average sentiment: 2

As you can see, the weighted average shows a more relevant estimate of the overall sentiment of the review than the linear average does.

Sequential increases in weight ratios

When it comes to storylike texts that cover a sequence of events spread over a time span, the importance of sentences—from the standpoint of the overall sentiment—often increases as the story goes. That is, the most important sentences in the sense of having the most influence on the overall sentiment conveyed by the story are typically found at the end, because they describe the most-recent episodes, conclusions, or experiences.

Consider the following tweet:

The weather in the morning was terrible. We decided to go to the cinema. Had a great time.

The sentence-level sentiment analysis of this story gives the following results:

Sentence: The weather in the morning was terrible.

Sentiment: Negative(1)

Sentence: We decided to go to the cinema.

Sentiment: Neutral(2)

Sentence: Had a great time.

Sentiment: Positive(3)

Although the tweet begins with a negative remark, the overall sentiment here is clearly positive due to the final note about time well spent at the movies. This pattern also works for reviews where customers describe their experience with a product much like a story, as in the following example:

I love the stories from this publisher. They are always so enjoyable. But this one disappointed me.

Here is the sentiment analysis for it:

Sentence: I love the stories from this publisher.

Sentiment: Positive(3)

Sentence: They are always so enjoyable.

Sentiment: Positive(3)

Sentence: But this one disappointed me.

Sentiment: Negative(1)

As you can see, more comments here are positive, but the entire block has an overall negative sentiment due to the final, disapproving remark. As in the previous example, this suggests that in a text block like this one, later sentences should be weighted more heavily than earlier ones.

For the ratio, you might use the index value of each sentence in the text, taking advantage of the fact that a later sentence has a greater index value. In other words, the importance increases proportionally to the index value of a sentence.

A matter of scale

Another important thing to decide is the scale you’re going to use for sentiment evaluation of each sentence, as the best solution may vary depending on the type of text blocks you’re dealing with.

To evaluate tweets, for example, you might want to employ all five levels of sentiment available with Stanford CoreNLP: very negative, negative, neutral, positive, and very positive.

When it comes to product review analysis, you might choose only two levels of sentiment—positive and negative—rounding all other options to one of these two. Since both the negative and the positive classes in Stanford CoreNLP are indexed with an odd number (1 and 3, respectively), you can tune the sentiment evaluation method discussed earlier to round the weighted average being calculated to its nearest odd integer.

To try this, you can add to the nlpPipeline class as follows:

public static void getStorySentiment(String story)

    {

        int sentenceSentiment;

        int reviewSentimentWeightedSum = 0;

        Annotation annotation = pipeline.process(story);        

        List<CoreMap> sentences = annotation.get(CoreAnnotations.SentencesAnnotation.class);

        int divisorWeighted = 0;

        for (int i = 1; i <= sentences.size(); i++)

        {

           Tree tree = sentences.get(i-1).get(SentimentAnnotatedTree.class);

          sentenceSentiment = RNNCoreAnnotations.getPredictedClass(tree); 

            reviewSentimentWeightedSum = reviewSentimentWeightedSum + sentenceSentiment*i;

            divisorWeighted += i;

        }

        System.out.println("Weighted average sentiment:\t" + (double)(2*Math.floor((reviewSentimentWeightedSum/divisorWeighted)/2) + 1.0d));

    }

Test the above method with the following code:

public class OverallStorySentiment 

{

  public static void main(String[] args) 

  {

                String text = "The weather in the morning was terrible. We decided to go to the cinema.  Had a great time.";

    nlpPipeline.init();

    nlpPipeline.getStorySentiment(text);

  }

}

Recompile nlpPipeline and compile the newly created OverallStorySentiment class, and run OverallStorySentiment as follows:

$ javac nlpPipeline.java

$ javac OverallStorySentiment.java

$ java OverallStorySentiment

The result should look as follows:

Weighted average sentiment: 3.0

This test uses a single sample text to test the sentiment-determining method discussed here. For an example of how to perform such a test against a set of samples, refer back to the first article in this series.

Source: oracle.com