Wednesday, December 8, 2021

Microservice, monolith, microlith

Microservice, monolith, microlith, Core Java, Oracle Java Certification, Oracle Java Guides, Oracle Java Preparation, Oracle Java Learning, Oracle Java Career

A proposal to overcome the limitations of both monolith and microservices applications

Download a PDF of this article

As a training consultant, I often deal with very practical questions about microservices: What are they? What is so special about microservices? What are some of the best-justified and beneficial use cases for microservices?

Often, these questions are answered in quite a partial manner, with answers greatly depending on one’s past experiences and personal preferences. Answers range from “everything should be a microservice” to “one should avoid microservices like the plague,” with various degrees of cautionary approaches in between.

Despite the availability of multiple answers, I’ve found they generally lack scientific precision, representing points of view rather than hard facts. Indeed, many recommendations were essentially personal experience testimonies that describe the success or failure of specific cases of microservice implementations.

This article seeks to present something entirely different from such anecdotal evidence. I’ll explore some hard facts from an ocean of perspectives and points of view about the nature and applicability of microservices.

Defining microservices

Let’s start with a definition of what a microservice actually is. Oh, wait: There is no definition—at least there is no definition that is universally recognized. Instead, there are many competing definitions that appear to share a number of similarities. Instead, here are commonly recognized characteristics to define a microservice.

◉ Microservices are characterized as micro or small in size. This implies a small deployment footprint, making it easier to test, deploy, maintain, and scale a microservice application. Smaller application size is aimed at a shorter and thus cheaper production cycle and more flexible scalability.

◉ Microservices are described as loosely coupled, suggesting that each such application ought to be a self-contained unit of business logic that is not dependent on other applications. Loose coupling also means that a microservice application should be capable of being independently versioned and deployed.

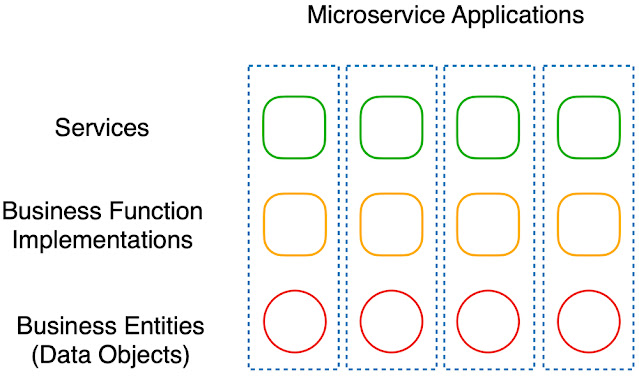
◉ Each microservice should be developed and owned by a small team utilizing a technology stack of its choice. This approach promotes tight development focus on a relatively small subset of business functions, resulting in more precise and capable business logic implementation. (See Figure 1).

Microservice, monolith, microlith, Core Java, Oracle Java Certification, Oracle Java Guides, Oracle Java Preparation, Oracle Java Learning, Oracle Java Career
Figure 1. Microservice application architecture

Defining monoliths


A microservice does not exist only to satisfy its own requirements but is a part of an extensive collection of services. Together these services meet the business requirements of an organization that owns these services.

Consider large enterprisewide business applications, which are often described as monoliths. Unfortunately, much like a microservice, the term monolith is not strictly defined, so I’ll have to resort to describing the characteristics again.

◉ A monolith is characterized as a large application that implements many different business functions across the enterprise. A similar amount of business logic that many microservices provide can be implemented by a single monolith application, but the development of a larger application would take longer. The monolith will likely be harder to maintain than a group of microservices, and it would be less flexible when it comes to available scalability options.

◉ Components within a monolith application could be tightly coupled, suggesting that internally a monolith application would have many dependencies between its parts. Of course, this does not necessarily have to be the case, because the number of dependencies greatly relies on specific design and architecture choices. Still, it is certainly more likely that internal dependencies would exist, simply because creating such dependencies is less of a hurdle for an application developer when all code belongs to the same application anyway.

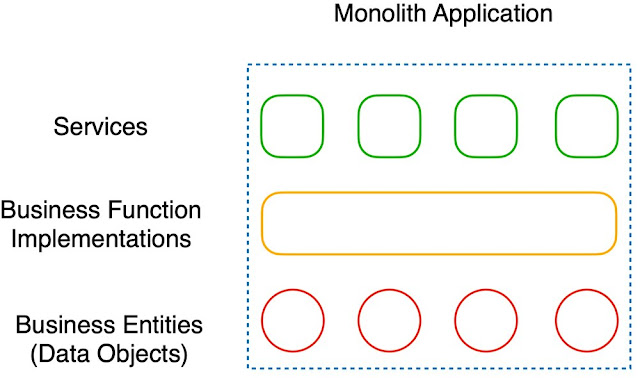
◉ Monolith development is a collective effort of many programmers and designers, making the development cycle longer, but it may promote a consistent design approach across many different business functions. Using a common technology stack across the enterprise can simplify maintenance and development. Unlike the polyglot approach promoted by microservice advocates, monolith development does not allow flexibility for design and architecture decisions that would be the best fit for a specific subset of business functions implementations. (See Figure 2.)

Microservice, monolith, microlith, Core Java, Oracle Java Certification, Oracle Java Guides, Oracle Java Preparation, Oracle Java Learning, Oracle Java Career
Figure 2. Monolith application architecture

Common misconceptions


Here are some common misconceptions regarding microservices and monolith architectures.

Service granularity. The term service granularity describes the distribution of business functions and features across a number of services. For example, consider a business function that needs to create a description of a scientific experiment and to record measurements for this experiment. This business function can be implemented as a single service operation that handles a single large business object combining all the properties of an experiment and all associated measurements. Such an implementation approach is usually described as a coarse-grained service design.

An alternative approach is known as a fine-grained service design. The exact same business function can be implemented as a number of different service operations, separately handling smaller data units such as an experiment or a measurement. Notice that the difference is in the number of service operations it takes to represent a given amount of business functions. In other words, both approaches implement the same unit of logic but expose it as a different number of services.

The problem is that the granularity of the service is often confused with the concept of a microservice: Basically, a fine-grained service design is not necessarily implemented as a microservice, while a coarse-grained service is not necessarily synonymous with a monolith implementation.

The key to understanding why these are not synonymous concepts is linked to one of the most fundamental properties of a service, which is that a service invoker should not be able to tell anything about the service implementation. Therefore, it makes no difference to the service consumer exactly how a service is implemented behind the scenes. Whether it’s a monolith or not, service consumers should not be able to tell the difference anyway.

To resolve this confusion, I propose to use the phrase implementation granularity instead of service granularity, where implementation granularity could be described as either fine-grained or coarse-grained. This focuses on defining the actual complexity and size of the application behind a service interface. The idea of the implementation granularity should be helpful to clarify the confusion. You could essentially describe a microservices approach as based on fine-grained implementation design, and which allows the developers to deliver services of any granularity, if that is convenient.

The issue has to do with the implication that microservices must be implemented as small-sized applications, which could be described as a fine-grained implementation design.

Remember that small size and loose coupling are important microservices characteristics that are considered to be beneficial because of the shorter production cycle, flexible scalability, independent versioning, and deployment. However, these benefits should not be considered automatically granted.

Data fragmentation. One unintended consequence of a fine-grained application implementation is data fragmentation. A loosely coupled design implies that each microservice application has its own data storage that contains information owned by this specific application.

Another implication of the loosely coupled design is that different applications should not use distributed transactions or a two-phase commit to synchronize their data in order to maintain a high degree of separation between microservice applications. This approach introduces the problem of data fragmentation and the potential lack of consistency.

Consider the case when a given microservice application needs information owned by another microservice application. What if the solution is simply to allow one application to invoke another to obtain or synchronize required pieces of information? This could work, but what if a given service experiences performance problems or an outage? This would inevitably have a cascading effect on any other dependent services, leading to larger outages and overall performance degradation. Such an approach may work for a small number of applications, but the larger the set of such applications, the greater the risks to their performance and availability.

Thus, consider another solution that addresses the data consistency and fragmentation implications. For example, what if each microservice application caches information that it needs from other applications?

Caching should provide some degree of autonomy for each application, contributing to its capability to be isolated and self-sustained. However, caching also means that applications would have to be designed, considering that the latest data state may not always be available. Different distributed caching and data-streaming solutions could be utilized to automate the handling of information replication. Finally, each application has to provide data state tracking and undo behaviors instead of the distributed transaction coordination.

Inevitably, these issues lead to design complications, making each microservice application not as simple as it appears at first glance.

Furthermore, each development team that works on a particular microservice cannot really remain in a state of perfect isolation but has to maintain data dependencies with other applications.

In other words, microservices architecture does not appear to actually deliver on the promise of completely solving the dependency issues experienced by monoliths. Instead, data consistency and integrity management are shifted from being an internal concern of a single monolith application to a shared responsibility among many microservice development teams.

Versioning. Another problem arises from the promise of independent versioning capabilities for each microservice application. In more complex service interaction scenarios, functional dependencies had to be considered along with the data dependencies.

Imagine a service in which the internal implementation had been modified. Such modification may not necessarily cause any changes to the service interface or the shape and format of its data. Many developers would not consider such implementation modifications as having any consequences that would require the production of a new version of the service and thus would not notify the dependent application developers of these changes.

However, such modifications may affect the semantics of how the service interprets its data, leading to a discrepancy between microservice applications.

For example, consider the implications of a change in the interpretation of a specific value. Suppose an application that records measurements considers an inch to be a default unit of measure, and other applications may rely on this to be the default value. An internal change may lead to the centimeter being implied to be the default value instead of an inch. This could have a knock-on effect on any other microservice applications, which—all things considered—could even be dangerous. Yet, the chances are that developers of these other systems may not be any wiser about said change.

This shows that in any nontrivial application interaction scenario, microservices characteristics should not be automatically assumed as purely beneficial.

Monoliths and microservices face similar problems


Businesses face the exact same functional and data integration problems regardless of the choice of architecture. Because both monoliths and microservices must address them anyway, the question really is in understanding the benefits and drawbacks of each approach.

◉ A monolith offers data and functional consistency as an integral part of its centralized design and the unified development approach at the cost of scalability and flexibility.

◉ Microservices offer a significant degree of development autonomy yet shift the responsibility to resolve data and functional consistency problems to many different independent development teams, which could be a very precarious coordination task.

Perhaps a balanced approach aiming to embrace benefits and mitigate drawbacks of both microservices and monolith architectures could be the way forward. In my opinion, the most critical factor is the idea of the implementation granularity, as discussed earlier.

REST services are by far the most common form of representing microservices applications, and most of the use case examples for REST services focus on each such service representing a single business entity. This approach results in extremely fine-grained application implementations.

Consider the increase in the number of dependencies between such applications because of the need to maintain data cohesion across so many independently managed business entities.

However, strictly speaking, the microservices architecture does not require such a fine level of implementation granularity. In fact, microservices are usually described as focused on a single business capability, which is not necessarily the same as a single business entity, because a number of business entities can be used to support a single business capability.

Typically, such entities form data groups that exhibit very close ties and a significant number of dependencies. Using these data groupings as a guiding principle to decide on the implementation granularity of applications should result in a smaller number of microservice applications that are better isolated from each other. Each such application would not truly be micro compared to the one-application-per-entity structure, but the application would not be a single monolith that incorporates the entirety of the enterprise functions.

This approach should reduce the need to synchronize information across applications and, in fact, may have a positive effect on the overall system performance and reliability.

Business capability. What constitutes a single business capability? It obviously sounds like a set of commonly used business functions, but that is still a rather vague definition. It’s worth considering the way business functions use data as a grouping principle. For example, data could be grouped as a set of data objects produced in a context of a specific business process and having common ownership.

Common ownership implies that there is a specific business unit that is responsible for a number of business entities. Common ownership also implies that business decisions within this unit define the semantic context for these entities, changes that may affect their data structure and, most importantly, define a set of business functions that are responsible for creating, updating, and deleting this data.

Other business units may wish to read the same information, but they mostly act as consumers of this data rather than producers. Thus, each application would be responsible for its own subset of business entities and would be capable of performing all required transactions locally, without a need for distributed transaction coordination or two-phase commit operations.

Of course, data replication across applications would still be required for data caching purposes to improve the individual application autonomy. However, the overhead of maintaining a set of read-only data replicas is significantly smaller than the overhead of maintaining multidirectional data synchronization. Also, there would be a need to perform fewer data replications because of the overall reduction in the number of applications.

Data ownership. In large enterprises, the question of data ownership could be difficult to resolve and would require some investment into both data and business process analysis. Understanding a larger context of information helps to determine where data originates as well as the possible consumer of this data. This analysis picture has to represent a much broader landscape than that of an individual microservice application.

Practically speaking, in addition to a number of development teams dedicated to the production of specific applications, an extra group of designers and analysts has to be established to produce and maintain an integrated enterprise data model, assist in scoping individual applications, and reconcile any discrepancies between all other development teams.

As you can see, this approach proposes to borrow some monolith application design characteristics but use them differently, not aiming to produce a single enterprisewide application but rather support the integration of many applications, each focused on implementing their specific business capabilities.

Furthermore, this approach aims at ensuring that service application boundaries are well-defined and maintained, and it suggests criteria to establish such boundaries based on data ownership principles. There are even some interesting APIs, such as GraphQL, that can support these integration efforts.

Nomenclature. There is one more problem to resolve: What should we call this architecture? Should it still be called microservices, even though some business capabilities may own a relatively large number of entities, and thus some applications may turn out not to actually be that small?

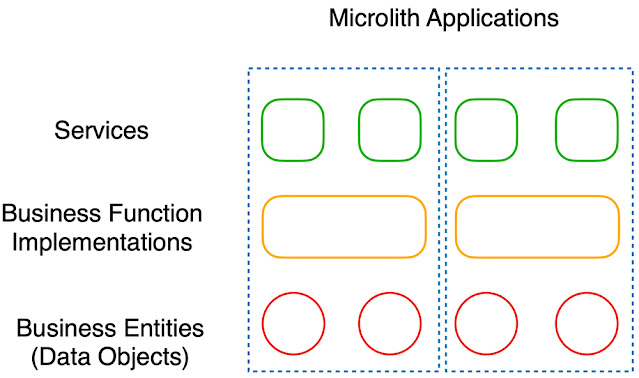
I want to suggest calling such an approach a microlith architecture to indicate a hybrid nature of the strategy that attempts to combine the benefits of both microservices and monolith architectures. The actual word microlith means a small stone tool such as a prehistoric arrowhead or a needle made of stone. I like the sense of practicality projected by this term. (See Figure 3.)

Microservice, monolith, microlith, Core Java, Oracle Java Certification, Oracle Java Guides, Oracle Java Preparation, Oracle Java Learning, Oracle Java Career
Figure 3. Microlith application architecture

I’m sure many would agree that the best design and architecture decisions are based on practical cost-benefit analysis rather than blindly following abstract principles.

Source: oracle.com

Monday, December 6, 2021

Binary bit manipulation and CAN bus hardware interfaces in Java

You can use libraries such as BigInteger and BitSet to help you understand the messages on a hardware bus.

Download a PDF of this article

I’ve been part of a wide range of projects in my career, from very large enterprise development in Java to real-time and embedded microcontroller work using other platforms. When you need to interface with hardware devices at a low level, you often need to read and manipulate individual bits from software, which is sometimes affectionately referred to as bit banging. While most programmers don’t think of using Java for this, it’s not only possible but, as you’ll see, it’s very straightforward.

Here are some reasons to bang the bits.

◉ Perform low-level protocol programming

◉ Communicate directly with hardware without device drivers

◉ Work with constrained devices such as embedded microcontrollers

If you’re doing any work with a modern connected vehicle (the quintessential IoT device, in my opinion) you’ll need to learn to communicate with the vehicle’s components over the vehicle’s controller area network (CAN), usually referred as the CAN bus. That’s how everything is linked, including sensors—from seat belt and door status to all the electronic control units (ECUs), to more-sophisticated devices for autonomous control.

Given that CAN bus messages are often constrained to 64 bits, each packet is usually packed with as much information as possible, and a detailed bit mask is required to extract the data (or send commands).

Before diving into CAN bus communication, I’ll review the functions needed for bit processing in Java.

The basics of bits

Java does such a great job of isolating the hardware that most programmers never need to think at the bit level, so an overview of bit processing is in order.

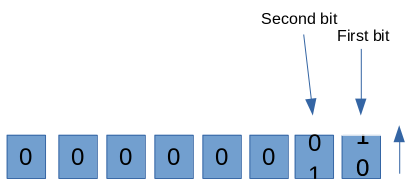
You can think of binary values as an odometer where each digit can be only 0 or 1. For instance, decimal 0 is (using eight-bit placements) 00000000 on your odometer. Increasing to decimal 1 rolls the rightmost 0 up to 1, as expected, yielding 00000001. Similarly 9 rolls up to 0 on your decimal car odometer, thereby rolling up the preceding digit, a decimal 2 rolls up the second bit, which precedes the first bit, as shown in Figure 1.

Core Java, Oracle Java, Oracle Java Exam Prep, Oracle Java Certification, Oracle Java Prep, Oracle Java Preparation, Oracle Java Career, Oracle Java Guides, Oracle Java Skills

Figure 1. The first two bits in binary

Therefore decimal 2 is 00000010 in binary. This continues down the line with the other digits. For example, decimal 3 is 00000011 in binary. Adding binary 1 to this flips the first bit up to 0, which flips the second bit up to 0, which flips the third bit to 1, as shown in Figure 2.

Core Java, Oracle Java, Oracle Java Exam Prep, Oracle Java Certification, Oracle Java Prep, Oracle Java Preparation, Oracle Java Career, Oracle Java Guides, Oracle Java Skills

Figure 2. The first three bits in binary

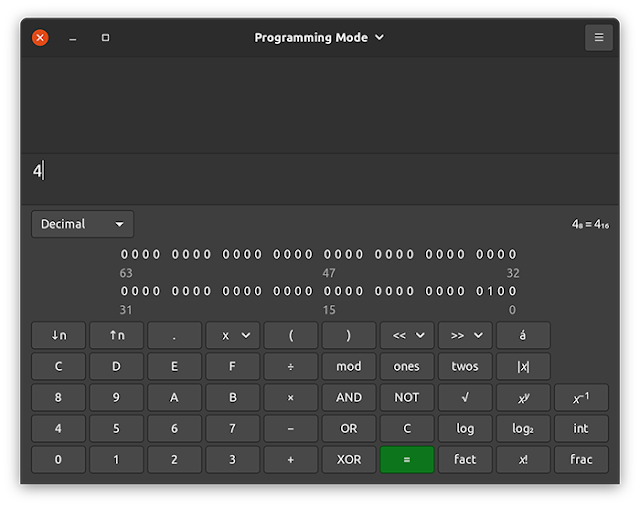
The result is decimal value 4 (binary 00000100). You can try this yourself using your computer’s calculator in “programming mode,” as shown in Figure 3.

Core Java, Oracle Java, Oracle Java Exam Prep, Oracle Java Certification, Oracle Java Prep, Oracle Java Preparation, Oracle Java Career, Oracle Java Guides, Oracle Java Skills

Figure 3. You can find a binary calculator in Linux, macOS, and Windows.

Bit shifting. Bit shifting does what it implies: It shifts all bits left or right by the number of positions indicated.

The shift-left operator in Java is <<. Using this operator, 4 << 1 means “shift all bits for binary 4 (00000100) to the left by one position,” which results in 8 (00001000). Shifting left multiplies the value by 2 or, more precisely, 2 to the power of the number of places shifted.

Bit shifting right is different because there are two bit-shift operators in Java: the logical shift right, >>>, and the arithmetic shift right, >>. The reason for this difference is to maintain the sign in signed values; the most-significant bit indicates this.

Note that bit shifting is a lossy operation, meaning when you shift, the bits that fall off the end are gone forever. For example, consider the binary value 11000100. If you shift to the left by one position, you get 10001000 (the leftmost 1 has fallen off). Logically shifting back to the right doesn’t restore that 1; it fills the positions shifted with zeros, so the result is 01000100.

Bit masking. Bit masking takes place when you apply a bitwise AND operator (&) or a bitwise OR operator (|) to two operands. As a result, the binary values of each number are compared or combined, respectively. For instance, applying bitwise AND to the hexadecimal values 0xF0 and 0x0F will compare each bit in each location, resulting in a 1 where both bits are 1; otherwise, a 0 is the result in that bit location.

    0xF0 (binary 11110000)
AND 0x0F (binary 00001111)
---------------------------
  = 0x00 (binary 00000000)

The result is 0 because there are no bit locations where both bit values are 1. However, let’s look at another example.

    0xF8 (binary 11111000)
AND 0x0F (binary 00001111)
---------------------------
  = 0x08 (binary 00001000)

Since the only bits in each binary number that are both 1 are in position 3, the result is decimal 8. Bit masks can be used with bitwise AND to check if specific bits are set in a value.

The bitwise OR operator differs in that it results in 1 for a bit position if either bit at that position is 1. The result is 0 only if both bits are 0 in that position.

   0xF0 (binary 11110000)
OR 0x0F (binary 00001111)
---------------------------
 = 0xFF (binary 11111111)

Because either or both bits in each bit location contain a 1, the result is hexadecimal 0xFF (decimal 255).

With luck, you can see how these operations are important for communicating with hardware such as a vehicle’s CAN bus.

Java classes for bit processing


Java includes two classes that provide bit operations, BigInteger and BitSet. Let’s take a look at how these classes help with bit processing and explore a couple of minor shortcomings.

java.math.BigInteger. The BigInteger class supports numbers of arbitrary precision, which can be quite large; hence, its name. You can create an instance of BigInteger with a seeded value using the constructor (along with the value as a String, specifying the radix) or with the valueOf method shown below.

BigInteger mask = BigInteger.valueOf(0L);

You can set a specific bit’s value to 1 via setBit, as shown below.

mask = mask.setBit(3); // sets the bit in position 3 to 1

You can also clear a bit by calling clearBit, toggle a bit’s value between 0 and 1 via flipBit, or check if a bit is set to 1 via testBit. To apply the bitwise AND operator, you have options.

BigInteger value = BigInteger.valueOf(15L);
if ( ( value.longValue() & mask.longValue() ) > 0 ) {
    System.out.println("It's set!");
}

The & operator was used above, but you can alternatively use the and method:

BigInteger value = BigInteger.valueOf(15L);
if ( value.and(mask).intValue() > 0 ) {
    System.out.println("It's set!");
}

You can even print a value out in any radix, making it easy to display it as binary or hex via BigInteger.toString(n), where n is the radix.

java.util.BitSet. With BitSet, you can set, clear, and test ranges of bits within a value. You can also apply bitwise operators AND, OR, and XOR and do much more at a fine level of detail.

However, if you want to set a value to a specific bit range within a 64-bit long value—a typical situation that comes up in hardware communications—both BitSet and BigInteger fall short.

For instance, if you want to set the value 3 between bits 23 through 26 (a four-bit range that can store a maximum value of 15), there’s no straightforward way to do this with either class. Although you can get the value for a specific bit range using BitSet.get(from, to), you still need to jump through a hoop to convert it to a long.

BitSet b1 = BitSet.valueOf(new long[] {240L}); // binary 11110000
BitSet b2 = b1.get(3, 5); // binary 00000011
System.out.println("Result="+b2.toLongArray()[0]);

First, due to its flexibility (that part’s good), you need to provide the initial BitSet value as an array of long values. Subsequently, it’s easy to yield a new BitSet that represents the value between the bits specified. However, the result is another BitSet, and to convert that to a long you need to work with an array as the result.

The code above will yield Result = 2 as expected, but it’s not safe because if the result were a 0, BitSet would return an empty array. Therefore, you need to check each returned array and extract the value or values accordingly.

To make BitSet safer and easier to work with, I filled in the gap mentioned above by creating two new methods.

The first method, getValue, is straightforward (see Listing 1). It takes a long value and a bit range and returns a long as a result (the value within the supplied bit range), as follows:

Listing 1. getValue handles the validation and conversion of the long array.

public static long getValue(long val, int startBit, int endBit) {
    BitSet source = BitSet.valueOf(new long[] { val });
    BitSet result = source.get(startBit, endBit);

    long[] lr = result.toLongArray();
    if ( lr.length == 0) {
        return 0;
    }
    return lr[0];
}

The code checks that the array contains a value and returns the first entry. There’s an assumption that all you’re interested in is the first 64 bits, which is likely the case. You’ll need to extend the implementation to support bit masks of arbitrary length. I’ve included an implementation using BigInteger that can be used for this.

Next, to support setting a value within a range of bits in a BitSet that is seeded from a long value, I created the setValue method, which is shown in Listing 2. This one is a bit more involved, so let’s work through it.

Listing 2. setValue sets a value between a bit range within a given long value.

public static long setValue(long target, long val, 
                            int startBit, int endBit) {
    // Convert the target to a BitSet object in prep to manipulate
    BitSet result = BitSet.valueOf(new long[] { target });

    // Position the value between the start and end bits
    if ( startBit > 0 ) {
        val = (val << startBit);
    }

    // Convert it to a BitSet
    BitSet valueToSet = BitSet.valueOf(new long[] { val });

    // Clear the trailing bits to protect against overflow
    int len = valueToSet.length();
    if ( valueToSet.length() > endBit+1) {
        valueToSet.clear(endBit+1, valueToSet.length());
    }

    // Apply the bitmask via a bitwise OR operation
    result.or( valueToSet );

    long[] lr = result.toLongArray();
    if ( lr.length == 0) {
        return 0;
    }
    return lr[0];
}

First, the code converts the original value (the target) to a BitSet. Next, it takes the given value (the one to set within the target value) and moves the bits that represent it to the starting bit location via a bit-shift operation. Essentially, this creates a bit mask with that value.

Next, the code ensures that the given value fits within the bit range provided by clearing the bits from the end location specified to the end of the value’s bit range. For instance, if the start bit is 4, the end bit is 6 (essentially a range of 2 bits) and if a value greater than 2 is provided, then the value needs to be truncated to fit within those 2 bits.

The properly located and sized bit mask, created with the given value, is applied to the original (target) value via a bitwise OR operation. All of the other bits within the original value remain untouched. Finally, the BitSet is converted to a long array and, safely, the long value is extracted.

Using the enhanced BitSet


Going back to the vehicle CAN bus use case, assume you want to read a car’s seat belt and occupancy status for each seat, door status (open or closed for each door), ignition state, car speed, brake level, steer angle, and so on. Here is a summary of how the bit ranges within a 64-bit CAN bus message might represent each of these readings.

// Fictitious Automobile CAN message:
//
// 0 : Seat Occupancy 1 State; 0=empty, 1=occupied
// 1 : Seat Occupancy 2 State
// 2 : Seat Occupancy 3 State
// 3 : Seat Occupancy 4 State
// 4 : Seat Occupancy 5 State
// 5 : Seat Belt 1 State; 0=unbuckled, 1=buckled
// 6 : Seat Belt 2 State
// 7 : Seat Belt 3 State
// 8 : Seat Belt 4 State
// 9 : Seat Belt 5 State
// 10 : Door 1 State; 0=open, 1=closed
// 11 : Door 2 State
// 12 : Door 3 State
// 13 : Door 4 State
// 14 : Ignition State; 0=off, 1=on
// 15-22 : Speed (max 255)
// 23-26 : Transmission; 0=park, 1=neutral, 2=forward, 3=reverse
// (max 15)
// 27-30 : Brake level; 0=no braking, 15=max braking
// 31-38 : Steering angle; 0=full left, 128=straight, 255=full right
// 39-40 : Directional status; 0=off, 1=left, 2=right (max 3)
// 41-42 : Headlights status; 0=off, 1=low, 2=high

Using the setValue method and some constants that match the ranges above, the code in Listing 3 sets the individual values within the message value.

Listing 3. Setting the auto status readings within a fictitious CAN bus message

Long autoStatus = 0L;
autoStatus = setValue(autoStatus, OCCUPIED, SEAT_1_OCC_BIT, 
                                            SEAT_1_OCC_BIT+1);
autoStatus = setValue(autoStatus, BUCKLED, SEATBELT_1_STATE_BIT, 
                                           SEATBELT_1_STATE_BIT+1);

autoStatus = setValue(autoStatus, CLOSED, DOOR_1_STATE_BIT, 
                                          DOOR_1_STATE_BIT+1);
autoStatus = setValue(autoStatus, CLOSED, DOOR_2_STATE_BIT, 
                                          DOOR_2_STATE_BIT+1);
autoStatus = setValue(autoStatus, CLOSED, DOOR_3_STATE_BIT, 
                                          DOOR_3_STATE_BIT+1);
autoStatus = setValue(autoStatus, CLOSED, DOOR_4_STATE_BIT, DOOR_4_STATE_BIT+1);

autoStatus = setValue(autoStatus, ON, IGNITION_STATE_BIT, 
                                      IGNITION_STATE_BIT+1);
autoStatus = setValue(autoStatus, FORWARD, TRANS_STATE_START_BIT, 
                                           TRANS_STATE_END_BIT);
autoStatus = setValue(autoStatus, 55, SPEED_START_BIT, 
                                      SPEED_END_BIT);
autoStatus = setValue(autoStatus, 0, BRAKE_LEVEL_START_BIT, 
                                     BRAKE_LEVEL_END_BIT);
autoStatus = setValue(autoStatus, 128, STEER_ANGLE_START_BIT, 
                                       STEER_ANGLE_END_BIT);
autoStatus = setValue(autoStatus, OFF, HLIGHT_STATUS_START_BIT, 
                                       HLIGHT_STATUS_END_BIT);

Extracting values from the CAN bus message is just as straightforward, as shown in Listing 4.

Listing 4. Reading bit range values from within a long value

long val = 0L;
val = getValue(autoStatus, SEAT_1_OCC_BIT, SEAT_1_OCC_BIT+1);
assert(val == OCCUPIED);

val = getValue(autoStatus, SEATBELT_1_STATE_BIT, SEATBELT_1_STATE_BIT+1);
assert(val == BUCKLED);

val = getValue(autoStatus, DOOR_1_STATE_BIT, DOOR_1_STATE_BIT+1);
assert(val == CLOSED);

val = getValue(autoStatus, DOOR_2_STATE_BIT, DOOR_2_STATE_BIT+1);
assert(val == OPEN);

val = getValue(autoStatus, DOOR_2_STATE_BIT, DOOR_2_STATE_BIT+1);
assert(val == CLOSED);

val = getValue(autoStatus, DOOR_2_STATE_BIT, DOOR_2_STATE_BIT+1);
assert(val == CLOSED);

// ...

For convenience, the sample code includes a utility method that displays the binary with bit position markers for easy inspection. The output for the resulting value of the code above looks like the following:

6       5       4       3       3       2       1
3       5       7       9       1       3       5       7      0
|       |       |       |       |       |       |       |      |
0000000000000000000000000100000000000001000110111111110000100001

Talking to the CAN bus


It’s pretty straightforward to connect to a car’s CAN bus or to even create your own CAN bus system for bench testing. All you need is an RS-232 cable, a CAN interface device, and two 120 ohm resistors to serve as terminators if your CAN bus interface device isn’t internally terminated.

For my own work, I’ve used a few different CAN bus interfaces, which I’ll describe here, but the easiest to work with are those that convert CAN bus traffic to Ethernet traffic, and vice versa. In those cases, all you need is to listen on an Ethernet socket to send and receive CAN bus messages.

A CAN bus is quite simple and typically consists of only two wires for determining relative voltage levels: CAN Hi and CAN Lo. A 0 is indicated when CAN Hi > CAN Lo, and a 1 is indicated when CAN Hi <= CAN Lo.

For this test, the RS-232 cable will be the physical CAN bus, although only pin 5 (for CAN Hi) and pin 9 (for CAN Lo) will be used, as shown in Figure 4.

Core Java, Oracle Java, Oracle Java Exam Prep, Oracle Java Certification, Oracle Java Prep, Oracle Java Preparation, Oracle Java Career, Oracle Java Guides, Oracle Java Skills

Figure 4. Creating your own CAN bus with an RS-232 cable

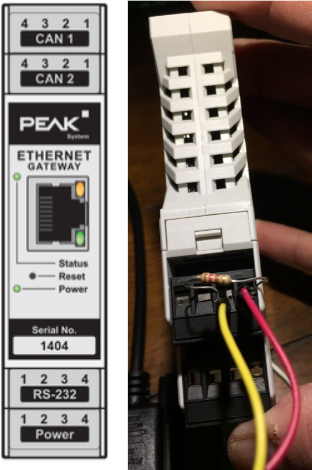
The Ethernet interface. One device I’ve successfully worked with is the PCAN-Ethernet Gateway by PEAK-System Technik. It’s very flexible and offers a web interface for setup.

To connect the gateway to a CAN bus, locate the CAN Hi and CAN Lo connections, and connect them to pin 5 and pin 9 of your RS-232 cable with wires, respectively. Since the gateway device isn’t internally terminated, you’ll also need to place a resistor across pin 1 and pin 2, as shown in Figure 5.

Core Java, Oracle Java, Oracle Java Exam Prep, Oracle Java Certification, Oracle Java Prep, Oracle Java Preparation, Oracle Java Career, Oracle Java Guides, Oracle Java Skills

Figure 5. Connecting and terminating the CAN bus to the gateway device

Next, you’ll need to power the device. I used a universal 12-volt AC power supply that you can find from many retailers. Use wires to connect the 12-volt (1 amp maximum) AC power supply to pin 1 and pin 3 of the power connectors at the bottom of the gateway device (see Figure 6).

Core Java, Oracle Java, Oracle Java Exam Prep, Oracle Java Certification, Oracle Java Prep, Oracle Java Preparation, Oracle Java Career, Oracle Java Guides, Oracle Java Skills

Figure 6. Connecting AC power to the gateway device

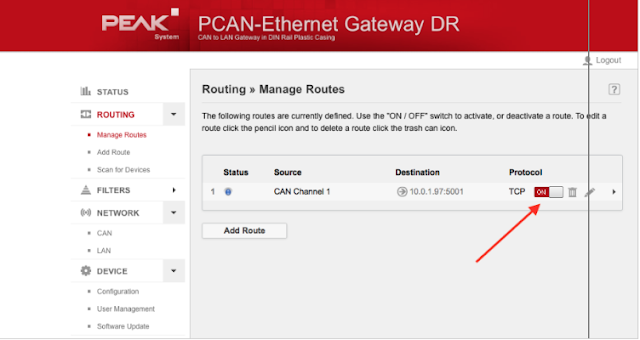
Connect the Ethernet cable to the gateway. Once you’ve done this, you can connect to the admin page for the device via a browser at http://192.168.1.10, using the default username admin and password admin, and then set the Ethernet settings, as shown in Figure 7.

Core Java, Oracle Java, Oracle Java Exam Prep, Oracle Java Certification, Oracle Java Prep, Oracle Java Preparation, Oracle Java Career, Oracle Java Guides, Oracle Java Skills

Figure 7. Setting the Ethernet parameters for the gateway

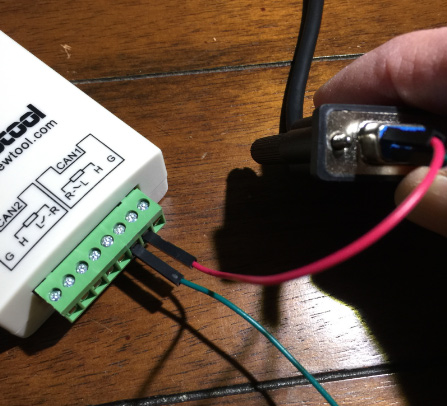
The USB interface. If you prefer to interface with your CAN bus over USB, try the USB-CAN interface from Ginkgo. Connect pin 5 to the CAN1 high connection on the device, and connect pin 9 to CAN1 low, as shown in Figure 8.

Core Java, Oracle Java, Oracle Java Exam Prep, Oracle Java Certification, Oracle Java Prep, Oracle Java Preparation, Oracle Java Career, Oracle Java Guides, Oracle Java Skills

Figure 8. Connecting the interface to the CAN bus cable

Plug the USB connector into your laptop, or use a Raspberry Pi running Java to leave your laptop free to move around. To test the connectivity, follow these steps.

1. Connect the Ginkgo USB cable to a Windows, Linux, or Mac computer.
2. Download the Ginkgo USB-CAN Interface Extend Software and test the connection.

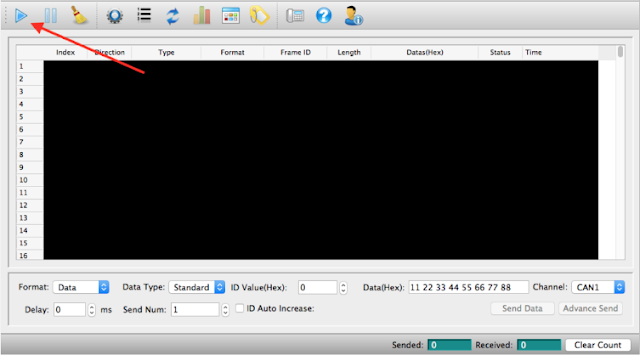
With everything connected and installed, start the Extend application and click the Play button in the upper left, as shown in Figure 9.

Core Java, Oracle Java, Oracle Java Exam Prep, Oracle Java Certification, Oracle Java Prep, Oracle Java Preparation, Oracle Java Career, Oracle Java Guides, Oracle Java Skills

Figure 9. Using the Extend test application

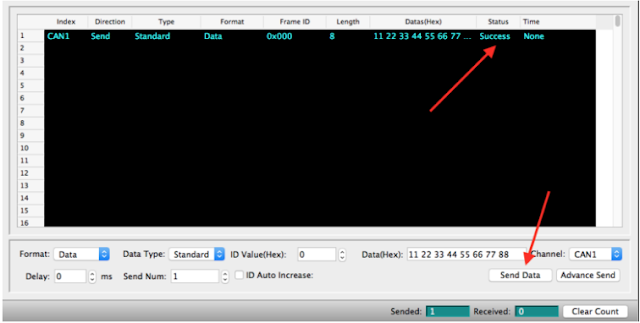
Make sure the settings are correct. Working Mode needs to be set to Normal, and the Band Rate should be 1000Kbps. Click the Send Data button, and ensure the status is Success, as shown in Figure 10.

Core Java, Oracle Java, Oracle Java Exam Prep, Oracle Java Certification, Oracle Java Prep, Oracle Java Preparation, Oracle Java Career, Oracle Java Guides, Oracle Java Skills

Figure 10. Using the Extend software to send test CAN packets

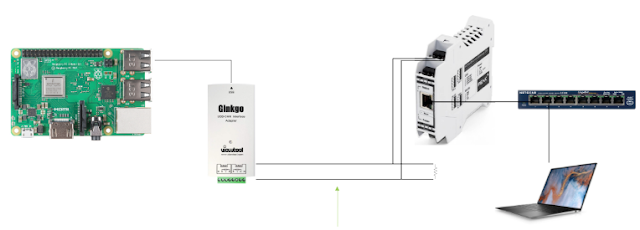
The Raspberry Pi. You can create a bench setup using both devices and a Raspberry Pi, as shown in Figure 11.

Core Java, Oracle Java, Oracle Java Exam Prep, Oracle Java Certification, Oracle Java Prep, Oracle Java Preparation, Oracle Java Career, Oracle Java Guides, Oracle Java Skills

Figure 11. A CAN bus bench test setup connecting two computers via a Raspberry Pi

Source: oracle.com

Friday, December 3, 2021

Modern file input/output with Java: Let’s get practical

Oracle Java Exam, Oracle Java Tutorial and Materials, Oracle Java Preparation, Oracle Java Learning, Java Career, Java Skills

You’ll learn how the Path API (also known as NIO.2) handles file system–specific extensions, including how to access features such as file attributes and symbolic links. I’ll also show you how to traverse a directory structure easily, as well as how to watch for changes. To wrap up, this article will look at temporary files (such as those used to indicate file locks) and how to handle .zip files.

File attributes

Each file system has its own set of attributes—and its own interpretation of what those file attributes mean. Fortunately, all modern versions of Java support file attributes across the many file systems via implementations of the FileAttributeView and BasicFileAttributes interfaces.

By the way, you need to take extra care when writing file system–specific code. Always ensure that your logic and exception handling cover all the cases where your code might run on a different file system.

Listing 1 manipulates the file permissions of a text file (sample.txt) that is located in a user’s home directory. The user (ben) wants to grant others in the same group the permission to read the file. The system-specific POSIX PosixFileAttributes class lets you add the read-only permission to the group (and provides an example of the API).

Listing 1. File attribute support in NIO.2

import java.nio.file.attribute.*;

import static java.nio.file.attribute.PosixFilePermission.GROUP_READ;

try {

    var teamList = Path.of("/Users/ben/sample.txt");

    PosixFileAttributes attrs =

        Files.readAttributes(teamList, PosixFileAttributes.class);

    Set<PosixFilePermission> posixFilePermissions = attrs.permissions();

    var owner = attrs.owner().getName();

    var perms = PosixFilePermissions.toString(posixFilePermissions);

    System.out.format("%s %s%n", owner, perms);

    posixFilePermissions.add(GROUP_READ);

    Files.setPosixFilePermissions(teamList, posixFilePermissions);

} catch(IOException e) {

    e.printStackTrace();

}

The code begins by importing some attribute classes and a PosixFilePermission constant, and then it gets a handle for the sample.txt file. Using a helper method from Files, it gains access to the PosixFileAttributes and subsequently to the PosixFilePermission attributes. The code echoes the current permissions and then adds the new group read permission to the file.

(I left in some unnecessary type information to aid readability in the example. In working code, some of this boilerplate could be removed.)

Symbolic links

Apart from these types of basic attributes, Java also has an extensible system for supporting special operating system features. I’ll showcase this support by walking through an example of symbolic link support. Symbolic links (symlinks) are available in many common operating systems including (but not limited to) Linux, macOS, and Windows.

A symlink can be thought of as a pointer to another file or directory, and in most cases these links are treated transparently. For example, using a symlink to change to a directory will put you in the directory that the symlink is pointing to. However, some software, such as backup utilities, needs to discern and manipulate symbolic links as a special case. NIO.2 allows this.

Java support for symlinks basically follows the semantics of the UNIX implementation. The following example examines and follows a symlink for /opt/maven that points to the specific directory for apache-maven-3.6.1. The file system looks like the following:

ben$ ls -l /opt/

total 0

drwxr-xr-x 9 root wheel 288 Apr 21 2019 apache-maven-3.6.1

lrwxr-xr-x 1 root wheel 18 Apr 21 2019 maven -> apache-maven-3.6.1

Listing 2 explores the symbolic link.

Listing 2. Exploring a symbolic link

Path path = Path.of("/opt/maven");

try {

    if (Files.isSymbolicLink(path)) {

        Path contents = Files.readSymbolicLink(path);

        Path target = path.toRealPath();

        System.out.println("Link contents: "+ contents);

        System.out.println("Link target: "+ target);

        var attrs = Files.readAttributes(target, BasicFileAttributes.class);

        System.out.println(attrs);

    }

} catch (IOException e) {

    e.printStackTrace();

}

The code starts by checking whether the path is a symlink and, if so, it reads the contents of the symlink. This is expressed as a Path object—but it does not point to the target of the link. In this case, contents contains the single path component apache-maven-3.6.1, which does not point to the actual physical path, /opt/apache-maven-3.6.1.

Instead, to access the file, use toRealPath(), which returns a Path that is the fully resolved, physical path.

Note: This discussion covers only symbolic links. In the Java APIs, multiple hard-linked files (assuming they are supported by the OS) are not distinguished. For example, all hard links are treated as equivalent.

Dealing with directories in NIO.2

Java’s ability to navigate directories was given a major overhaul in NIO.2. The addition of the new java.nio.file.DirectoryStream interface and its implementing classes allow you to perform the following types of operations:

◉ Iterate over entries in a directory

◉ Deal with large directory structures

◉ Filter entries using regular expressions and MIME-based content detection

◉ Perform recursive move, copy, and delete operations via the walkFileTree() method

Listing 3 shows a simple example of how to use a regular expression pattern match to list all the .java files in a project directory.

Listing 3. Finding the matching files

try {

    var dir = Path.of("/Users/ben/projects/openjdk/jdk");

    DirectoryStream<Path> stream = Files.newDirectoryStream(dir, "*.java");

    for (Path entry: stream) {

        System.out.println(entry.getFileName());

    }

} catch (IOException e) {

    e.printStackTrace();

}

The code begins from a base Path and constructs a DirectoryStream. It’s confusing because despite the name, this class does not implement the Stream interface (in fact, DirectoryStream predates Java 8). Instead, the class is intended to be used as a filtering tool. The code iterates over the entries that have been found and prints each one out.

Listing 3 shows how easy this API is to use when dealing with a single directory. But there’s a problem that you will see if you run the code: It returns no results. This is because the code will look only at a single directory, which is not very useful.

What can you do if you need to recursively filter across multiple directories?

For example, Java’s source files typically sit in a package structure. And the OpenJDK source code is not stored in the main directory but further down in the file system in src/java.base/share/classes/java/lang/. Thus, the source files exist in multiple directories, at multiple levels of depth in the file system. You need a way to handle this layout, and recursion that walks the directory tree is a natural way to achieve this.

Walking a directory tree is a relatively uncommon feature of Java and involves a number of interfaces and implementation details. The key method to use for walking the directory is

Files.walkFileTree(Path startingDir, FileVisitor<? super Path> visitor);

Providing the startingDir is easy enough, but what about an implementation of the FileVisitor interface? Unfortunately, it is not as simple as providing a lambda; in fact, you need to implement at least five methods.

◉ FileVisitResult preVisitDirectory(T dir)

◉ FileVisitResult preVisitDirectoryFailed(T dir, IOException exc)

◉ FileVisitResult visitFile(T file, BasicFileAttributes attrs)

◉ FileVisitResult visitFileFailed(T file, IOException exc)

◉ FileVisitResult postVisitDirectory(T dir, IOException exc)

That looks like a fair amount of work, but fortunately the API supplies a default implementation, the SimpleFileVisitor. Carrying on from the example in Listing 3 of finding .java source files in a directory, you can now list .java source files from all the directories that sit underneath /Users/ben/projects/openjdk/jdk. Listing 4 demonstrates this use of the walkFileTree() method.

Listing 4. Finding Java source code in subdirectories

var startingDir = Path.of("/Users/ben/projects/openjdk/jdk");

Files.walkFileTree(startingDir, new FindJavaVisitor());

public class FindJavaVisitor extends SimpleFileVisitor<Path> {

    @Override

    public FileVisitResult visitFile(Path file, BasicFileAttributes attrs) {

        if (file != null && attrs != null) {

            if (file.getFileName().toString().endsWith(".java")) {

                System.out.println(file.getFileName());

            }

        }

        return FileVisitResult.CONTINUE;

    }

}

You start by creating a Path object and then call the Files.walkFileTree() method. Pass in a FindJavaVisitor, which is an implementation that extends the SimpleFileVisitor. In other words, let the SimpleFileVisitor do most of the work of traversing the directories and so on. The only code you have to write is when you override the visitFile() method. In this method, you write some simple code to see if a file ends with .java and echo its name to stdout if it does.

Other use cases could be to recursively move, copy, delete, or otherwise modify files. In most cases, you’ll only need to implement an extension to the SimpleFileVisitor class, but the flexibility is there in the API if you want to implement your own complete FileVisitor.

Watch services and file change notifications

Files and directories are entities that can change in various ways, given their attributes as well as their contents. How do you know they changed so you can react to that event?

The Java APIs provide the ability to monitor a file or directory for changes. This is done through the WatchService class in java.nio.file. This class uses VM-managed client threads to keep an eye on registered files or directories for changes, and it will return an event when a change is detected. You do not need to manage these threads.

This sort of event notification can be useful for security monitoring, refreshing data from a properties file, looking for log creation or changes, and many other use cases. In Listing 5, WatchService is used to detect any changes to the home directory of the user ben and to print a modification event to the console.

Listing 5. Using WatchService

try {

    var watcher = FileSystems.getDefault().newWatchService();

    var dir = Path.of("/Users/ben");

    var registered = dir.register(watcher, ENTRY_MODIFY);

    while (!shutdown) {

        WatchKey key = null;

        try {

            key = watcher.take();

            for (WatchEvent<?> event : key.pollEvents()) {

                if (event == null) {

                    continue;

                }

                if (event.kind() == ENTRY_MODIFY) {

                    System.out.println("Home dir changed!");

                }

            }

            key.reset();

        } catch (InterruptedException e) {

            // Log interruption

            shutdown = true;

        }

    }

} catch (IOException | InterruptedException e) {

    e.printStackTrace();

}

The initial setup involves getting the default WatchService and a handle on the ben home directory. Next is the registration of a modification watch on that directory. Then, using the safe shutdown pattern (usually seen with a volatile boolean variable shutdown), the take() method on WatchService blocks until a WatchKey becomes available. As soon as the key is made available, the code polls that WatchKey for a list of WatchEvent objects.

If a WatchEvent is found of type ENTRY_MODIFY, the code communicates that fact by echoing the event. Finally, reset the key so it’s ready for the next event.

This technique is not widely used, but it can be a useful approach and a good thing to keep in your toolbox of I/O recipes.

By the way, some file system implementations may occasionally return a null event, so you should check for that condition.

Temporary files

Helper methods in the Files class include capabilities to create and work with temporary files and directories. (Note that UNIX-like operating systems clean up temporary working areas such as /tmp automatically, often at system reboot. You should never treat these areas as permanent storage.)

The simplest way to create a temporary file is

Path p;

try {

    p = Files.createTempFile("temp", null);

} catch (IOException e) {

    e.printStackTrace();

}

// code to work with p

After you’ve finished with the file, by default, you need to delete it. This quickly becomes tiresome, but fortunately the API has a simple solution. The Files class provides convenience methods for tasks such as an output stream from a Path. These helpers come with the possibility of specifying options for how the file is to be opened and closed, such as the following:

Path p;

try {

    p = Files.createTempFile("temp", null);

    System.out.println(p.getFileName());

    try (var output = Files.newOutputStream(p, DELETE_ON_CLOSE)) {

        // do work with the OutputStream

        // Temp file will be automatically cleaned up

    }

} catch (IOException e) {

    e.printStackTrace();

}

As you can see, the temporary file will be automatically deleted when the file is closed, which will occur when the inner try block is complete. This is much cleaner and safer than requiring manual cleanup and demonstrates a nice interaction with the try-with-resources language feature.

Listing 6 unpacks a .jar file into a temporary directory. This uses not only the temporary directory handling but also a ZipInputStream. This is a very useful class for working with .zip files (remember that JAR files are really just .zip files with a metadata directory stored in them along with the code).

Listing 6. Working with .zip files

public static Path unpackJar(String zipFilePath) throws IOException {

    var tmpDir = Files.createTempDirectory(Path.of("/tmp"), "jar-extract");

    try (var zipIn = new ZipInputStream(new FileInputStream(zipFilePath))) {

        var entry = zipIn.getNextEntry();

        while (entry != null) {

            var newFile = tmpDir.resolve(entry.getName());

            if (entry.isDirectory()) {

                Files.createDirectory(newFile);

            } else {

                Files.copy(zipIn, newFile);

            }

            zipIn.closeEntry();

            entry = zipIn.getNextEntry();

        }

    }

    return tmpDir;

}

Source: oracle.com

Wednesday, December 1, 2021

Java on Arm: The AArch64 hardware, software, cloud, and JDK

Learn about the hardware and software that can help bring your AArch64 development project to a new level in the cloud or on the desktop.

Download a PDF of this article

[The software world is buzzing about the Arm 64-bit architecture, and of course, Java programmers are no different. The good news is that as a Java developer, you don’t need to worry about the deployment hardware as long as a first-class JVM is available, and that’s certainly the case for AArch64. It’s business as usual: Sure, you might expect a performance gain; but at the end of the day, it’s your plain old Java bytecode.

Still, many developers want to know more about processor architecture, the hardware, and of course, the performance of their Java applications on those machines. Enjoy. —Ed.]

The technology of chip designer Arm Holdings is at the heart of most smartphones worldwide—but Arm chips can be found in many devices beyond mobile devices. Indeed, the Arm platform has been a thriving alternative to x86 chips from Intel and AMD in desktops and servers for a couple of years.

You’ve heard praise for Arm’s speed and productivity; this new silicon is easier on thermals and batteries while showing equal or higher efficiency than x86 processors. And still, if you are an enterprise Java developer who wants to switch your back-end Java operations to Arm entirely or partially, there are no proper and concise instructions for such migration.

This article serves as a step-by-step guide for x86-to-Arm migration, where you’ll get to choose

◉ A new AArch64-based machine

◉ The operating system

◉ The software stack

◉ Either an x86 emulation or an Arm-native JDK

The wide sea of Arm

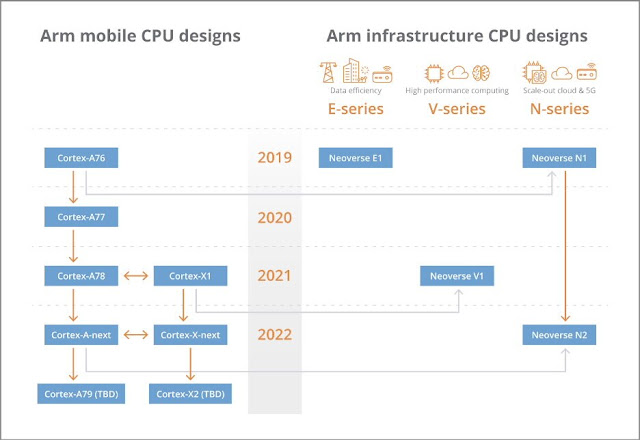
In 2018, Arm Holdings announced a public roadmap for the upcoming years with separate mobile and infrastructure domains. All infrastructure production will now fit into the so-called Neoverse, which is a concept describing the company’s infrastructure to encapsulate all cloud-to-edge workloads and technologies inside the ecosystem.

The Neoverse includes three generations of processors and three lineups: E-, V-, and N-series, as you can see in Figure 1. The important change for the IT industry is that from now on, Arm chip design for external manufacturers is practically focused in three directions. Cloud server processor cores are relatives of mobile chipset cores. For instance, the Neoverse N1 core model is similar to Cortex-A76, and the next generation will share a design with X cores. Neoverse N2 adopts the ARMv9.0-A specification with numerous enhancements, which is an extension of the current 8.x architecture.

Java on Arm, Hardware, Software, Cloud, and JDK, Core Java, Oracle Java Certification, Oracle Java Tutorial and Materials, Oracle Java Career, Oracle Java Preparation
Figure 1. The Arm computing roadmap (source: Arm Holdings)

Hardware for Java developers


The first option for AArch64-targeted development is to continue to use your current x86-based computer. Unless you are working at a very low level, such as when building Java hardware compatibility kits, there is almost never any need to run emulation because Java is “write once run anywhere.” So just develop your Java artifacts on one platform and then test and deploy them on another. You never need to stop using your favorite IDE, build system, and other tools.

In some cases, such as when testing or performance tuning, it is easy to use remote AArch64 machines via the Secure Shell (SSH) protocol. You can prepare all native AArch64 artifacts, including Java Native Interface (JNI) binaries and container images, using cross-compilation and container cross-builds on an x86 developer’s machine. Since it’s not always convenient to build and test your code in different environments, you can consider Arm hardware options for a developer—such as buying a shiny new machine.

The second possible (and very topical) choice for your soon-to-be-Arm project is Apple silicon. This concept consists of three components.

◉ M1, the first Apple-designed system on a chip (SoC) for Apple computers, which is intended to replace x86 processors

◉ Specific macOS products that use M1 processors; several were announced in November 2020, and more appeared in October 2021, with a choice of laptop and desktop configurations

◉ A hardware/software combination between M1 and the new macOS Big Sur (released November 2020) and macOS Monterey (October 2021) that brings extremely high performance and efficiency for native AArch64 applications

The only downside to the Apple configuration is an almost imperative use of macOS. Yes, you can run Linux or Windows on AArch64 Macs, but be prepared for a drop in performance. The first option is to run a virtual machine where Arm is emulated on Arm (the operating system is different). You’ll pay a virtualization and emulation penalty, though not as big as with emulation of x86 on Arm, which is also possible.

There is also an option of installing the system on Apple’s bare metal. There are two drawbacks: This is a work in progress for Linux, and native drivers are required, unlike with the emulation environment. Therefore, as a Java developer, you’ll need the software stack and JDK native to macOS—but more on that later.

Finally, when you don’t need all the power in the world, look into low-end processors for affordable and energy-efficient laptops. They are not very effective for software development, but they certainly have growth potential. I’m speaking of desktop-class chipsets: Samsung Exynos, MediaTek Helio, Huawei Kirin, and certain Qualcomm Snapdragon series.

These SoC systems, which are prevalent in smartphones, have started taking bites out of the laptop market inside the products of major vendors such as HP, Lenovo, and ASUS. Typically, vendors’ interest in Arm is long battery life, which explains why it is mostly seen in laptops and notebooks.

Choosing an operating system and JDK


The next step is to pick an operating system and the JDK that would be compatible with the chosen device and most relevant to your project.

The first AArch64 porting project was JEP 237: Linux/AArch64 port, which was part of Java 9. This JEP still greatly affects present-day work on Java as a programming language.

In Java 11, plenty of optimizations in the port were implemented in JEP 315: Improve Aarch64 intrinsics. These improvements are CPU-specific and, thus, help all operating systems. Thanks to contributions from Arm, there are also some optimizations for the future hardware, such as Scalable Vector Extension (SVE) vectorization code.

Due to Java 16’s Windows/AArch64 (JEP 388) and Java 17’s macOS/AArch64 (JEP 391) OpenJDK ports, you have full-fledged Java options on almost all popular operating systems.

Operating systems for the cloud. My clear, unequivocal recommendation is to run Linux for your cloud workloads and for hosting a JVM.

When you choose an OS image for a cloud JVM, it is better to have one from a vendor that clearly confirmed its support for AArch64 architecture along with other hardware platforms. Fortunately, major Linux distribution providers do that now. The same is true for cloud provider-branded images such as ones from Oracle. Such an OS can be a container host or run JVMs directly. Docker and Kubernetes work well on Arm servers.

When you choose an operating system and JVM combination for a container, it is sometimes useful to minimize the size of the image. As a result of engineering efforts from the BellSoft team and the OpenJDK community, JDK 16 received support for the tiny Alpine Linux with JEP 386. The use of musl (as the C standard library) natively without a glibc layer shows many benefits for cloud-native Java. One example is smaller images, which can lead to higher overall software performance and lower development costs.

JDK 11 musl binaries have been available for a while; thanks to the community’s efforts, JDK 8 musl binaries appeared shortly after JEP 386 was completed.

Profiling tools such as async-profiler work on Linux AArch64 either with JVMs started directly or with containers.

Using the very same package dependencies, you can use all Linux variants mentioned above to produce and run GraalVM native images, such as by using Spring Native.

Software for AArch64 Java development


Remember that you can continue using your familiar environment, and that includes the OS. Whether it’s Windows, Linux, or macOS on x86, keep your JDK, IDE, and other tools set up for Java development. For cross-compilation of C/C++ code, you have amd64-to-aarch64 64-bit cross-compilers in all the above cases.

However, instead making it, say, Windows to Linux can be tricky. Here, containers come to help. If you still don’t use containers to have a predictable, native build environment, maybe it is the time to start. Because you have a Linux x86 build container, it won’t be difficult to make it cross-compile to Linux AArch64, which is the target for the cloud deployment.

Windows has not been left out from the Arm trend, as you can see with JDK 16’s JEP 388 port. The Windows port for Arm is also extended from the Linux/AArch64 port, has optimized intrinsics from JEP 315, and is ready for production.

Needless to say, Windows support and integration to the mainline JDK means more Windows-based binaries for Arm 64-bit processors. As mentioned earlier, there are many Arm-based laptops, and they mostly have or support Windows 10 on Arm. As for JDK binaries, multiple vendors provide compatible builds. No full-fledged native assemblies of IntelliJ IDEA or NetBeans are out yet. However, other Java tools can be found for Windows.

Some Arm-based laptops with Windows 10 on Arm can be reimaged to run Linux. Moreover, the market also offers developer boards powerful enough to be used as a developer machine with Linux and modern GUIs.

If you’ve picked an Apple M1-based computer for your project, I suggest going for macOS, especially because the JEP 391 macOS/AArch64 port is targeted to JDK 17. It will likely share some code with the Windows port of the JDK, which is expected to reduce the macOS-specific AArch64 code further down the line.

Using Docker on Macs that have Apple silicon can be quite convenient for building native images suitable for Arm servers from your Java applications.

Native build versus emulation


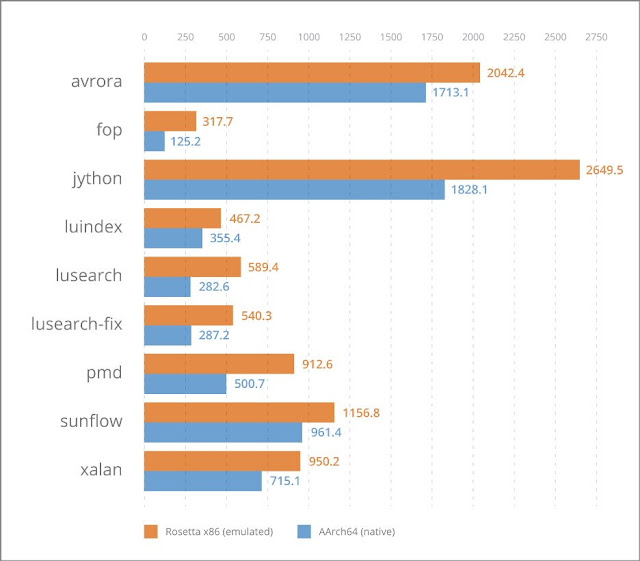
Why is the Apple silicon native build better with macOS than with Linux? When BellSoft first released native Liberica JDK builds for M1 in March 2021, it took several DaCapo benchmarks using default JVM parameters on two implementations: macOS-x86_64 on Rosetta 2 (a special translation environment bundled with Big Sur) and macOS-aarch64. The answer to the question posed here is evident in Figure 2. The native build provides a major difference in performance—up to 2.5 times.

Java on Arm, Hardware, Software, Cloud, and JDK, Core Java, Oracle Java Certification, Oracle Java Tutorial and Materials, Oracle Java Career, Oracle Java Preparation
Figure 2. DaCapo benchmarks in milliseconds (less is better) with JDK 17 EA build 25, MacBook Air M1, and macOS 11.4

On-the-fly emulation of a different CPU architecture consumes a significant part of computer resources. Also, as you can see in this article about AArch64 port optimization, there are many cases where OpenJDK HotSpot (and other compilers and runtimes) does special performance tricks that are highly platform-dependent.

The cloud ecosystem for Java


Just like Linux and JDK, many projects require porting to work efficiently, or to just work in general, on specific hardware. The software also needs to be built and distributed. For example, if you need the NGINX load balancer, simply check whether an AArch64 version of the appropriate package resides in the repository used by the OS package manager (most likely it does).

If you work with big data via Hadoop, there may be native accelerator libraries, such as the Hadoop Native Library (HNL) or the Intel Intelligent Storage Acceleration Library (ISA-L), which may even be third-party libraries. Ensure that platform-specific binaries are properly installed along with the main software installation, which can autodiscover them or might require extra explicit configuration. If you don’t add them to your ecosystem, the software continues to work but has worse performance. This is especially true for older Java versions.

The same situation applies to libraries that come as dependencies to your projects. For instance, consider the Netty network input/output client/server framework. Netty has native epoll transport (netty-transport-native-epoll). How can you check whether such libraries are effective in the Arm cloud, and how can you use them? Go to Maven Central and look at artifacts. In the case of Netty, platform-specific native libraries are packaged inside dedicated .jar artifacts in META-INF/native, for example, netty-transport-native-epoll-4.1.65.Final-linux-aarch_64.jar. There are a few such artifacts with different classifiers specifying different build and runtime targets.

What about Docker multiplatform images? Today it is easy to cross-build a container image, for example, for AArch64 or x86 systems. A Docker plugin called Buildx has a --platform option you can use to specify multiple platforms, including the two mentioned; see the documentation. My “Java in Docker on Apple Silicon” blog post shows an example of making a cross-build for x86 on Apple silicon. Remember that your parent image must be available for the desired CPU architecture. Ready-to-use parent images with Liberica JDK on top of a few different OS layers are provided at BellSoft’s public repository.

Cross-compilation and publishing for Java Native Interface


Take a look at this problem from the other side: Your project might be a component that could be embedded into another project. In this case, you should produce and publish binaries that include a native part that is, by definition, platform-specific.

For instance, consider a Maven project with one JNI library where some native methods are implemented, and you also have an x86 development machine (or container) with Linux. The project is built by Maven; the resulting artifacts are published in the Maven repository. What happens now is that the project is going to be targeted both to x86 and AArch64. So, it’s good to produce native artifacts doubling as Maven dependencies with a proper CPU architecture classifier. The code that loads native libraries like JNI libraries should do it correctly on all target platforms.

To create a dual-target application, you need a regular compilation toolchain and a cross-toolchain to compile and link both the x86 and AArch64 shared libraries on x86.

Use your system capabilities to install a native toolchain and an appropriate package manager for Linux systems, such as Advanced Package Manager (APT). For example, on Ubuntu Linux, type the following:

apt-get install gcc

Verify that the installation is valid, and that it has the correct version, with this command.

gcc -v

Some systems support cross-toolchain installation via a package manager. Others require separate downloads. The package manager can be used on Ubuntu Linux, as follows:

apt-get install gcc-aarch64-linux-gnu

Verify that the installation is valid, and that it has the correct version, with this command.

aarch64-linux-gnu-gcc -v

Next, ensure your configuration for native-maven-plugin has gcc as the compiler and linker for building x86, and that is has aarch64-linux-gnu-gcc for building AArch64 parts.

For x86, check the configuration for the following:

<compilerExecutable>gcc</compilerExecutable>
<linkerExecutable>gcc</linkerExecutable>

For AArch64, check the configuration for the following:

<compilerExecutable>aarch64-linux-gnu-gcc</compilerExecutable>
linux-gnu-gcc</linkerExecutable>

You can (but don’t have to) assemble binaries for different CPU targets in distinct profiles. Next, the Java code that loads the JNI library can look like the following:

package com.bellsoft.demo;

public class HelloWorld {
  native void helloFromC();

  static {
       System.loadLibrary("helloworld-" + System.getProperty("os.name") + "-" + System.getProperty("os.arch"));
  }

  public static void main(String[] args) {
      HelloWorld hw = new HelloWorld();
      hw.helloFromC();
  }
}

Here’s the C method.

#include <jni.h>
#include <stdio.h>

JNIEXPORT void JNICALL Java_com_bellsoft_demo_HelloWorld_helloFromC
      (JNIEnv *env, jobject obj) {
  printf("Hello world!\n");
  return;
}

You can have a fallback Java implementation for Hadoop and Netty; it looks similar to the above.

Here is how to build the artifact.

mvn compile

Check that everything works on both platforms.

java -Djava.library.path=./native-linux-amd64/target:./native-linux-aarch64/target -jar ./core/target/helloworld-core-1.0-SNAPSHOT.jar
Hello world!

The resulting .so files can be published as standalone artifacts or be packaged inside .jar files, similar to what Netty does. Cross-builds and regular builds can be defined in the same profile or in different profiles and, thus, performed together or performed according to the environment and parameters. No cross-build can be defined, but platform-specific artifacts still can be built and published with the right classifiers when the build process is executed a few times on machines with different CPU architectures. Choose what is best for your product and for your continuous integration.

Source: oracle.com