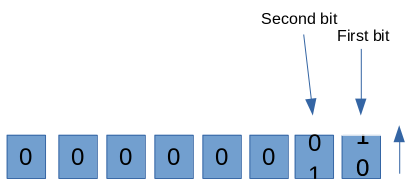
Figure 2. The first three bits in binary
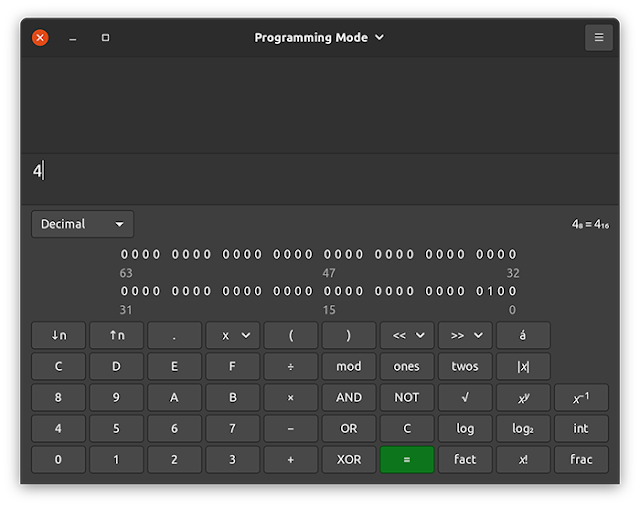
The result is decimal value 4 (binary 00000100). You can try this yourself using your computer’s calculator in “programming mode,” as shown in Figure 3.
Figure 3. You can find a binary calculator in Linux, macOS, and Windows.
Bit shifting. Bit shifting does what it implies: It shifts all bits left or right by the number of positions indicated.
The shift-left operator in Java is <<. Using this operator, 4 << 1 means “shift all bits for binary 4 (00000100) to the left by one position,” which results in 8 (00001000). Shifting left multiplies the value by 2 or, more precisely, 2 to the power of the number of places shifted.
Bit shifting right is different because there are two bit-shift operators in Java: the logical shift right, >>>, and the arithmetic shift right, >>. The reason for this difference is to maintain the sign in signed values; the most-significant bit indicates this.
Note that bit shifting is a lossy operation, meaning when you shift, the bits that fall off the end are gone forever. For example, consider the binary value 11000100. If you shift to the left by one position, you get 10001000 (the leftmost 1 has fallen off). Logically shifting back to the right doesn’t restore that 1; it fills the positions shifted with zeros, so the result is 01000100.
Bit masking. Bit masking takes place when you apply a bitwise AND operator (&) or a bitwise OR operator (|) to two operands. As a result, the binary values of each number are compared or combined, respectively. For instance, applying bitwise AND to the hexadecimal values 0xF0 and 0x0F will compare each bit in each location, resulting in a 1 where both bits are 1; otherwise, a 0 is the result in that bit location.
0xF0 (binary 11110000)
AND 0x0F (binary 00001111)
---------------------------
= 0x00 (binary 00000000)
The result is 0 because there are no bit locations where both bit values are 1. However, let’s look at another example.
0xF8 (binary 11111000)
AND 0x0F (binary 00001111)
---------------------------
= 0x08 (binary 00001000)
Since the only bits in each binary number that are both 1 are in position 3, the result is decimal 8. Bit masks can be used with bitwise AND to check if specific bits are set in a value.
The bitwise OR operator differs in that it results in 1 for a bit position if either bit at that position is 1. The result is 0 only if both bits are 0 in that position.
0xF0 (binary 11110000)
OR 0x0F (binary 00001111)
---------------------------
= 0xFF (binary 11111111)
Because either or both bits in each bit location contain a 1, the result is hexadecimal 0xFF (decimal 255).
With luck, you can see how these operations are important for communicating with hardware such as a vehicle’s CAN bus.
Java classes for bit processing
Java includes two classes that provide bit operations,
BigInteger and
BitSet. Let’s take a look at how these classes help with bit processing and explore a couple of minor shortcomings.
java.math.BigInteger. The BigInteger class supports numbers of arbitrary precision, which can be quite large; hence, its name. You can create an instance of BigInteger with a seeded value using the constructor (along with the value as a String, specifying the radix) or with the valueOf method shown below.
BigInteger mask = BigInteger.valueOf(0L);
You can set a specific bit’s value to 1 via setBit, as shown below.
mask = mask.setBit(3); // sets the bit in position 3 to 1
You can also clear a bit by calling clearBit, toggle a bit’s value between 0 and 1 via flipBit, or check if a bit is set to 1 via testBit. To apply the bitwise AND operator, you have options.
BigInteger value = BigInteger.valueOf(15L);
if ( ( value.longValue() & mask.longValue() ) > 0 ) {
System.out.println("It's set!");
}
The & operator was used above, but you can alternatively use the and method:
BigInteger value = BigInteger.valueOf(15L);
if ( value.and(mask).intValue() > 0 ) {
System.out.println("It's set!");
}
You can even print a value out in any radix, making it easy to display it as binary or hex via BigInteger.toString(n), where n is the radix.
java.util.BitSet. With BitSet, you can set, clear, and test ranges of bits within a value. You can also apply bitwise operators AND, OR, and XOR and do much more at a fine level of detail.
However, if you want to set a value to a specific bit range within a 64-bit long value—a typical situation that comes up in hardware communications—both BitSet and BigInteger fall short.
For instance, if you want to set the value 3 between bits 23 through 26 (a four-bit range that can store a maximum value of 15), there’s no straightforward way to do this with either class. Although you can get the value for a specific bit range using BitSet.get(from, to), you still need to jump through a hoop to convert it to a long.
BitSet b1 = BitSet.valueOf(new long[] {240L}); // binary 11110000
BitSet b2 = b1.get(3, 5); // binary 00000011
System.out.println("Result="+b2.toLongArray()[0]);
First, due to its flexibility (that part’s good), you need to provide the initial BitSet value as an array of long values. Subsequently, it’s easy to yield a new BitSet that represents the value between the bits specified. However, the result is another BitSet, and to convert that to a long you need to work with an array as the result.
The code above will yield Result = 2 as expected, but it’s not safe because if the result were a 0, BitSet would return an empty array. Therefore, you need to check each returned array and extract the value or values accordingly.
To make BitSet safer and easier to work with, I filled in the gap mentioned above by creating two new methods.
The first method, getValue, is straightforward (see Listing 1). It takes a long value and a bit range and returns a long as a result (the value within the supplied bit range), as follows:
Listing 1. getValue handles the validation and conversion of the long array.
public static long getValue(long val, int startBit, int endBit) {
BitSet source = BitSet.valueOf(new long[] { val });
BitSet result = source.get(startBit, endBit);
long[] lr = result.toLongArray();
if ( lr.length == 0) {
return 0;
}
return lr[0];
}
The code checks that the array contains a value and returns the first entry. There’s an assumption that all you’re interested in is the first 64 bits, which is likely the case. You’ll need to extend the implementation to support bit masks of arbitrary length. I’ve included an implementation using BigInteger that can be used for this.
Next, to support setting a value within a range of bits in a BitSet that is seeded from a long value, I created the setValue method, which is shown in Listing 2. This one is a bit more involved, so let’s work through it.
Listing 2. setValue sets a value between a bit range within a given long value.
public static long setValue(long target, long val,
int startBit, int endBit) {
// Convert the target to a BitSet object in prep to manipulate
BitSet result = BitSet.valueOf(new long[] { target });
// Position the value between the start and end bits
if ( startBit > 0 ) {
val = (val << startBit);
}
// Convert it to a BitSet
BitSet valueToSet = BitSet.valueOf(new long[] { val });
// Clear the trailing bits to protect against overflow
int len = valueToSet.length();
if ( valueToSet.length() > endBit+1) {
valueToSet.clear(endBit+1, valueToSet.length());
}
// Apply the bitmask via a bitwise OR operation
result.or( valueToSet );
long[] lr = result.toLongArray();
if ( lr.length == 0) {
return 0;
}
return lr[0];
}
First, the code converts the original value (the target) to a BitSet. Next, it takes the given value (the one to set within the target value) and moves the bits that represent it to the starting bit location via a bit-shift operation. Essentially, this creates a bit mask with that value.
Next, the code ensures that the given value fits within the bit range provided by clearing the bits from the end location specified to the end of the value’s bit range. For instance, if the start bit is 4, the end bit is 6 (essentially a range of 2 bits) and if a value greater than 2 is provided, then the value needs to be truncated to fit within those 2 bits.
The properly located and sized bit mask, created with the given value, is applied to the original (target) value via a bitwise OR operation. All of the other bits within the original value remain untouched. Finally, the BitSet is converted to a long array and, safely, the long value is extracted.
Using the enhanced BitSet
Going back to the vehicle CAN bus use case, assume you want to read a car’s seat belt and occupancy status for each seat, door status (open or closed for each door), ignition state, car speed, brake level, steer angle, and so on. Here is a summary of how the bit ranges within a 64-bit CAN bus message might represent each of these readings.
// Fictitious Automobile CAN message:
//
// 0 : Seat Occupancy 1 State; 0=empty, 1=occupied
// 1 : Seat Occupancy 2 State
// 2 : Seat Occupancy 3 State
// 3 : Seat Occupancy 4 State
// 4 : Seat Occupancy 5 State
// 5 : Seat Belt 1 State; 0=unbuckled, 1=buckled
// 6 : Seat Belt 2 State
// 7 : Seat Belt 3 State
// 8 : Seat Belt 4 State
// 9 : Seat Belt 5 State
// 10 : Door 1 State; 0=open, 1=closed
// 11 : Door 2 State
// 12 : Door 3 State
// 13 : Door 4 State
// 14 : Ignition State; 0=off, 1=on
// 15-22 : Speed (max 255)
// 23-26 : Transmission; 0=park, 1=neutral, 2=forward, 3=reverse
// (max 15)
// 27-30 : Brake level; 0=no braking, 15=max braking
// 31-38 : Steering angle; 0=full left, 128=straight, 255=full right
// 39-40 : Directional status; 0=off, 1=left, 2=right (max 3)
// 41-42 : Headlights status; 0=off, 1=low, 2=high
Using the setValue method and some constants that match the ranges above, the code in Listing 3 sets the individual values within the message value.
Listing 3. Setting the auto status readings within a fictitious CAN bus message
Long autoStatus = 0L;
autoStatus = setValue(autoStatus, OCCUPIED, SEAT_1_OCC_BIT,
SEAT_1_OCC_BIT+1);
autoStatus = setValue(autoStatus, BUCKLED, SEATBELT_1_STATE_BIT,
SEATBELT_1_STATE_BIT+1);
autoStatus = setValue(autoStatus, CLOSED, DOOR_1_STATE_BIT,
DOOR_1_STATE_BIT+1);
autoStatus = setValue(autoStatus, CLOSED, DOOR_2_STATE_BIT,
DOOR_2_STATE_BIT+1);
autoStatus = setValue(autoStatus, CLOSED, DOOR_3_STATE_BIT,
DOOR_3_STATE_BIT+1);
autoStatus = setValue(autoStatus, CLOSED, DOOR_4_STATE_BIT, DOOR_4_STATE_BIT+1);
autoStatus = setValue(autoStatus, ON, IGNITION_STATE_BIT,
IGNITION_STATE_BIT+1);
autoStatus = setValue(autoStatus, FORWARD, TRANS_STATE_START_BIT,
TRANS_STATE_END_BIT);
autoStatus = setValue(autoStatus, 55, SPEED_START_BIT,
SPEED_END_BIT);
autoStatus = setValue(autoStatus, 0, BRAKE_LEVEL_START_BIT,
BRAKE_LEVEL_END_BIT);
autoStatus = setValue(autoStatus, 128, STEER_ANGLE_START_BIT,
STEER_ANGLE_END_BIT);
autoStatus = setValue(autoStatus, OFF, HLIGHT_STATUS_START_BIT,
HLIGHT_STATUS_END_BIT);
Extracting values from the CAN bus message is just as straightforward, as shown in Listing 4.
Listing 4. Reading bit range values from within a long value
long val = 0L;
val = getValue(autoStatus, SEAT_1_OCC_BIT, SEAT_1_OCC_BIT+1);
assert(val == OCCUPIED);
val = getValue(autoStatus, SEATBELT_1_STATE_BIT, SEATBELT_1_STATE_BIT+1);
assert(val == BUCKLED);
val = getValue(autoStatus, DOOR_1_STATE_BIT, DOOR_1_STATE_BIT+1);
assert(val == CLOSED);
val = getValue(autoStatus, DOOR_2_STATE_BIT, DOOR_2_STATE_BIT+1);
assert(val == OPEN);
val = getValue(autoStatus, DOOR_2_STATE_BIT, DOOR_2_STATE_BIT+1);
assert(val == CLOSED);
val = getValue(autoStatus, DOOR_2_STATE_BIT, DOOR_2_STATE_BIT+1);
assert(val == CLOSED);
// ...
For convenience, the sample code includes a utility method that displays the binary with bit position markers for easy inspection. The output for the resulting value of the code above looks like the following:
6 5 4 3 3 2 1
3 5 7 9 1 3 5 7 0
| | | | | | | | |
0000000000000000000000000100000000000001000110111111110000100001
Talking to the CAN bus
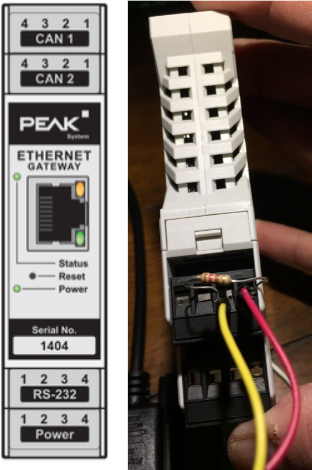
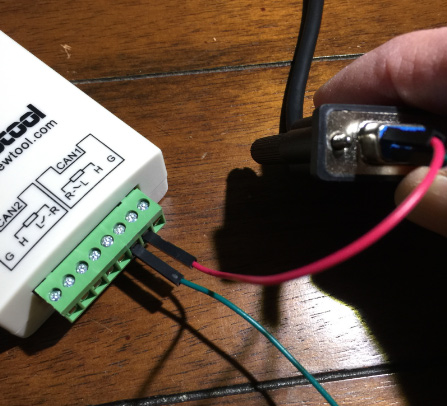
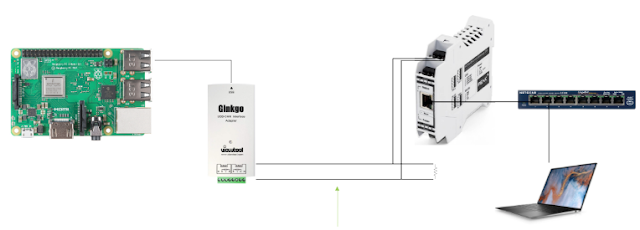
It’s pretty straightforward to connect to a car’s CAN bus or to even create your own CAN bus system for bench testing. All you need is an RS-232 cable, a CAN interface device, and two 120 ohm resistors to serve as terminators if your CAN bus interface device isn’t internally terminated.
For my own work, I’ve used a few different CAN bus interfaces, which I’ll describe here, but the easiest to work with are those that convert CAN bus traffic to Ethernet traffic, and vice versa. In those cases, all you need is to listen on an Ethernet socket to send and receive CAN bus messages.
A CAN bus is quite simple and typically consists of only two wires for determining relative voltage levels: CAN Hi and CAN Lo. A 0 is indicated when CAN Hi > CAN Lo, and a 1 is indicated when CAN Hi <= CAN Lo.
For this test, the RS-232 cable will be the physical CAN bus, although only pin 5 (for CAN Hi) and pin 9 (for CAN Lo) will be used, as shown in Figure 4.






0 comments:
Post a Comment